
Hey there! Some links on this page may be affiliate links which means that, if you choose to make a purchase, I may earn a commission at no extra cost to you. I greatly appreciate your support. Read the full disclosure here.
An improvised water filter for survival uses layered natural materials — typically charcoal, sand, and gravel — inside a container like a plastic bottle or hollow log to remove sediment, debris, and some contaminants from raw water sources. It takes 15 to 30 minutes to build with basic materials, but it does not eliminate bacteria or viruses on its own. Always follow filtration with boiling or chemical purification before drinking.
Key Takeaways
- An improvised water filter removes physical particles and some chemical impurities, but not pathogens — purification is always the final step.
- The classic survival filter uses five layers: cloth pre-filter, crushed charcoal, fine sand, coarse sand, and gravel.
- A plastic bottle, a hollow bamboo stalk, or even a birch bark cone can serve as the filter housing.
- Boiling filtered water for at least one minute (three minutes above 6,500 feet) kills bacteria, parasites, and most viruses.
- Activated charcoal is far more effective than simple wood ash charcoal, but both are better than no filtration at all.
- Unfiltered wild water can carry Giardia, Cryptosporidium, E. coli, and heavy metals — any of which can incapacitate or kill in a survival situation.
- Most improvised filters last only a few uses before the media becomes saturated and must be replaced.
- Children, the elderly, and immunocompromised individuals face higher risk from waterborne illness and should prioritize boiling above all else.
- Filtering and purifying are two different steps — skipping either one is a serious mistake.
- Climate and water source type affect which filter design works best.
How Do I Make a Basic Water Filter If I’m Lost in the Wilderness?
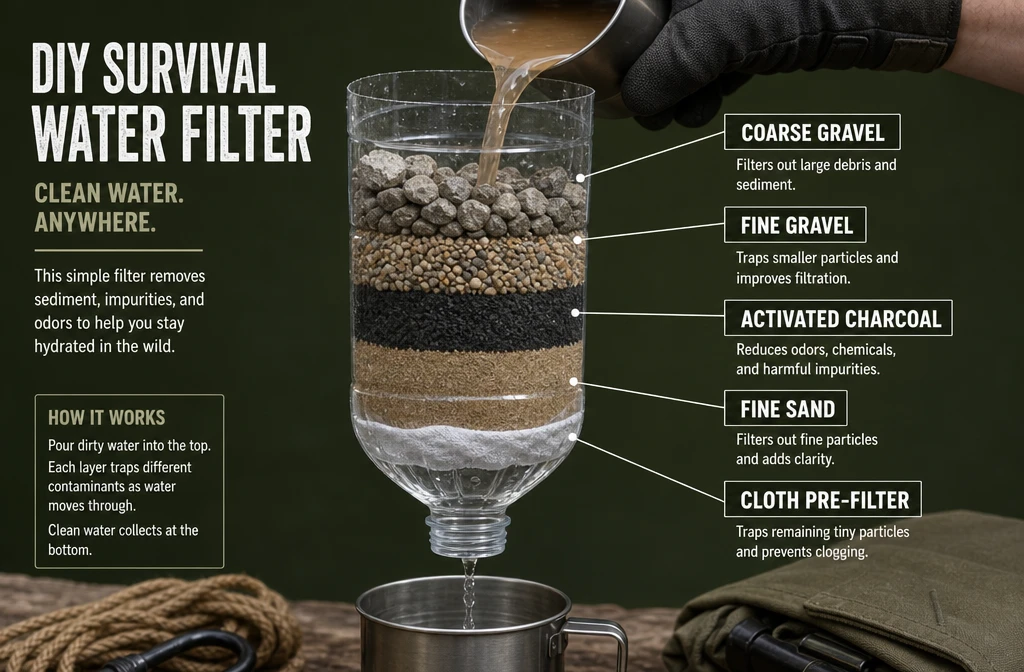
An improvised water filter survival method is explained most simply like this: layer coarse materials on top, fine materials in the middle, and charcoal at the bottom of a container with a small drainage hole. Water passes down through each layer, leaving behind sediment and some contaminants before dripping out clean enough to then boil.
Here’s the step-by-step process for the most reliable field version:
The Classic Plastic Bottle Filter (Most Common Method)
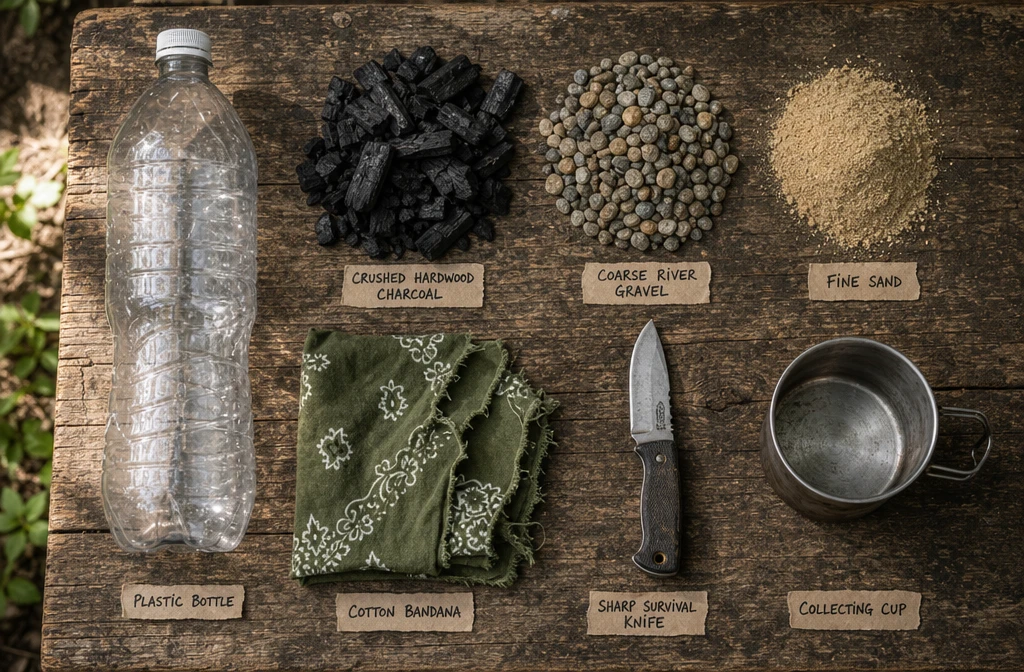
What you need: A plastic bottle (1–2 liter), a sharp tool to puncture the cap, cloth or grass, charcoal from a fire, fine sand, coarse sand or small gravel, and larger rocks.
Steps:
- Punch small holes in the bottle cap or cut off the bottom of the bottle entirely (you’ll pour water in from the cut end).
- Layer 1 — Pre-filter cloth: Stuff a piece of cotton fabric, a bandana, or tightly packed grass into the neck of the bottle. This catches large debris.
- Layer 2 — Crushed charcoal: Add 2–3 inches of crushed charcoal from a burned hardwood fire (not ash — actual charcoal). This is your primary contaminant-absorbing layer.
- Layer 3 — Fine sand: Add 2–3 inches of the finest sand you can find. Rinse it first if possible to reduce initial cloudiness.
- Layer 4 — Coarse sand or fine gravel: Add another 2–3 inches above the fine sand.
- Layer 5 — Large gravel: Top with coarse rocks to act as a pre-filter for large debris.
- Run two or three “flush” cycles with water before collecting any for drinking — the first outputs will be cloudy and should be discarded.
- Collect the output in a clean container, then boil or chemically treat before drinking.
⚠️ Critical rule: Never skip the purification step after filtering. Filtered water looks cleaner but can still carry invisible pathogens.
What Materials Do I Need to Create an Emergency Water Filter?
The core materials for an improvised survival water filter are available in almost any natural or suburban environment. You don’t need specialized gear — you need the right substitutes.
| Material | Best Source | Acceptable Substitute |
|---|---|---|
| Container | Plastic bottle | Hollow bamboo, birch bark cone, metal can |
| Pre-filter cloth | Cotton bandana | Grass, moss, pine needles |
| Charcoal | Hardwood campfire coals | Softwood charcoal (less effective) |
| Fine sand | Riverbed or beach | Crushed fine rock |
| Coarse sand/gravel | Streambed | Small pebbles, broken rock |
| Collection vessel | Metal cup or bottle | Large leaf, bark bowl |
Choosing your charcoal: Hardwood charcoal (oak, hickory, maple) is the most effective for improvised filtration. Crush it into small pieces — roughly pea-sized — before layering. Avoid charcoal that’s still ashy or mixed with burned material. If you have access to store-bought activated charcoal (from aquarium supplies or camping kits), use it — it’s significantly more porous and effective than field-made charcoal.
No plastic bottle? A hollow green bamboo stalk works well. Drill or burn small holes at one end, pack the layers inside, and let water pass through lengthwise. A birch bark cone sealed with pine pitch at the seams is another traditional option.
For more on building a comprehensive water preparedness system, see The Ultimate Emergency Water Storage and Purification Guide.
Can a Homemade Water Filter Actually Remove Bacteria and Parasites?
No — not reliably. This is the most important thing to understand about any improvised filtration method. A sand-and-charcoal filter removes suspended solids, some heavy metals, some organic compounds, and improves taste and odor. It does not consistently remove bacteria, viruses, or parasites like Giardia or Cryptosporidium.
Here’s what each layer actually does:
- Gravel and coarse sand: Remove large particles, insects, and debris.
- Fine sand: Removes smaller suspended particles and some protozoa in thick enough layers.
- Charcoal: Adsorbs (binds) certain chemicals, improves taste, reduces some organic contaminants.
- Cloth pre-filter: Catches the largest debris before it clogs the finer layers.
What it cannot do: Remove dissolved chemicals like nitrates, heavy metals in high concentrations, or microorganisms reliably without additional purification.
The fix: After filtering, always purify using one of these methods:
- Boiling — 1 minute at sea level, 3 minutes above 6,500 feet. This is the gold standard.
- Chemical treatment — Unscented household bleach (8 drops per gallon of clear water, 16 drops for cloudy water), or iodine tablets.
- UV purification — A SteriPen or similar device kills pathogens in about 90 seconds per liter.
Think of filtration and purification as a two-step system, not interchangeable options. This distinction is one of the most critical wilderness survival skills any prepper can master.
What’s the Difference Between Filtering and Purifying Water?
Filtering removes physical particles and some chemical impurities. Purifying kills or neutralizes biological threats like bacteria, viruses, and parasites. Both steps are necessary for genuinely safe drinking water in a survival situation.
Many people use these terms interchangeably, which leads to dangerous assumptions. Here’s the practical breakdown:
| Process | What It Removes | What It Misses |
|---|---|---|
| Improvised filtration | Sediment, debris, some chemicals, some protozoa | Bacteria, viruses, dissolved chemicals |
| Boiling | Bacteria, viruses, parasites | Sediment, chemicals, heavy metals |
| Chemical treatment | Bacteria, viruses (most) | Cryptosporidium (requires higher doses), sediment |
| UV purification | Bacteria, viruses, parasites | Sediment, chemicals |
The correct sequence: Filter first (to remove particles that can shield pathogens from purification), then purify. Trying to boil visibly murky water without filtering first is less effective because suspended particles can protect bacteria from heat.
What Are the Risks of Drinking Unfiltered Water in a Survival Situation?
Drinking untreated wild water is one of the fastest ways to turn a survivable situation into a fatal one. The risks are real, common, and often underestimated.
Primary biological threats:
- Giardia lamblia — A protozoan parasite causing severe diarrhea, cramps, and dehydration. Symptoms appear 1–3 weeks after exposure. Even a small number of cysts can cause infection.
- Cryptosporidium — Highly resistant to chemical treatment, causes profuse watery diarrhea. Particularly dangerous for immunocompromised individuals.
- E. coli and other bacteria — Found in water contaminated by animal or human waste. Can cause rapid, severe gastrointestinal illness.
- Hepatitis A and other viruses — More common in areas with human activity or flooding.
Chemical and environmental threats:
- Agricultural runoff (nitrates, pesticides)
- Heavy metals from mining areas or industrial sites
- Natural tannins and organic acids
The bottom line: Dehydration from avoiding water is dangerous, but waterborne illness causes dehydration too — often faster and more severely. An improvised filter buys you time and reduces the pathogen load, but it’s not a substitute for purification. This is why water preparedness is covered in depth in our 14 Essential Survival Skills Every Prepper Must Know.
How Long Does a DIY Survival Water Filter Last?
Most improvised survival water filters are good for only a few uses — typically 3 to 10 liters — before the filtration media becomes saturated or clogged and needs to be replaced or refreshed.
Signs your filter needs rebuilding:
- Output water flows very slowly (clogged media)
- Output water is still visibly cloudy after several passes
- Charcoal layer is exhausted (no longer improving taste or odor)
- Filter has been used with heavily silted water
Extending filter life:
- Pre-settle water in a container for 30 minutes before filtering — let the heaviest particles sink first.
- Rinse the gravel and sand layers with clean water when possible.
- Replace the charcoal layer after every 5–7 liters of heavily contaminated water.
- Use multiple filters in series for very murky sources.
A well-maintained improvised filter in a true survival situation should be treated as a temporary tool — not a long-term solution. If you’re preparing for extended scenarios, understanding the worst water storage mistakes preppers still make will help you build a more durable system before you ever need it.
Is a Charcoal and Sand Water Filter Safe for Drinking?
A charcoal and sand filter makes water significantly safer than drinking it raw, but it is not safe for drinking on its own without a follow-up purification step. The filter removes visible contaminants and reduces some chemical load, but pathogens pass through.
That said, charcoal is genuinely effective for what it does. Activated charcoal in particular works through adsorption — contaminant molecules bind to the porous surface of the charcoal and are removed from the water. Field-made charcoal is less porous than activated charcoal but still provides meaningful improvement.
Choose activated charcoal if:
- You have access to aquarium-grade or medical-grade activated charcoal in your kit.
- You’re filtering water with strong chemical odors or taste (near agricultural areas).
- You need the most effective improvised option available.
Field-made charcoal is acceptable if:
- You’re in a true wilderness emergency with no other options.
- You follow filtration with boiling.
- You crush it finely to maximize surface area.
What Kind of Water Sources Can I Use With an Improvised Filter?
An improvised survival filter works best with moving freshwater sources. The cleaner the source water going in, the more effective the filter will be — and the longer it will last.

Best sources for improvised filtration:
- Moving streams and rivers — Flowing water is generally lower in bacteria than stagnant water. Collect from the middle of the flow, not the bank.
- Springs — Often the cleanest natural source. Look for water emerging from rock or hillsides.
- Rainwater — Relatively clean but can carry airborne contaminants. Collect away from trees if possible (leaf runoff adds tannins).
- Snow melt — Generally clean but should still be filtered and purified.
Use with caution:
- Lakes and ponds — Stagnant water carries higher pathogen loads. Filter multiple times.
- Floodwater — Extremely contaminated. Contains sewage, chemicals, and debris. Improvised filtration alone is insufficient — multiple purification steps are needed.
- Water near agricultural land — High risk of nitrate and pesticide contamination. Charcoal helps but may not fully address chemical load.
Avoid entirely if possible:
- Water with a petroleum sheen or chemical smell
- Water near industrial sites or mining operations
- Bright green or algae-heavy water (possible cyanobacteria/blue-green algae toxins, which boiling does not neutralize)
What Are the Biggest Mistakes People Make When Trying to Filter Water in an Emergency?
The most common and dangerous mistake is treating filtered water as safe to drink without purifying it first. Other critical errors include using the wrong materials, skipping the flush cycle, and choosing the wrong water source.
Top mistakes — and how to avoid them:
- Skipping purification after filtering — Filtered water still contains pathogens. Always boil or treat chemically after filtering.
- Using ash instead of charcoal — Ash does not filter. Charcoal is the partially burned, solid carbon material. Look for black, solid pieces — not gray powder.
- Not flushing the filter first — The first 1–2 liters through a new filter will be cloudy and may contain fine particles from the media. Discard these.
- Packing layers too loosely — Loose media allows water to channel through gaps without proper contact. Pack each layer firmly.
- Using too little charcoal — A thin charcoal layer does almost nothing. Aim for at least 2 inches, ideally 3–4 inches.
- Collecting water from the wrong source — Stagnant, algae-heavy, or chemically contaminated sources overwhelm improvised filters quickly.
- Assuming one pass is enough — With very murky water, run it through the filter twice before purifying.
These same principles apply whether you’re in the wilderness or dealing with a grid-down scenario at home. For broader context on water preparedness, our 10 Critical Bug-Out Survival Skills guide covers this as part of a complete field readiness system.
How Quickly Can I Make a Water Filter With Basic Camping Supplies?
With a plastic bottle, a knife, and access to a fire for charcoal, an improvised water filter can be built in 15 to 30 minutes. The time-consuming part is sourcing and preparing the materials — the assembly itself takes under 10 minutes.
Speed breakdown:
- Sourcing gravel and sand from a nearby stream: 5–10 minutes
- Making charcoal from an existing fire: 20–30 minutes (or use existing coals immediately)
- Assembling the filter: 5–10 minutes
- Flushing the filter before use: 5 minutes
If you have a pre-packed kit: A small bag of activated charcoal, a folded bandana, and a spare bottle means you can have a working filter in under 10 minutes. This is worth including in any 72-hour bug-out bag.
Can Kids or Elderly People Use This Water Filter Method?
Filtered and then boiled water is safe for all age groups. The concern isn’t the filtration method itself — it’s ensuring that the purification step is never skipped, because children and the elderly face significantly higher risk from waterborne illness.
Special considerations:
- Children under 5 are especially vulnerable to Cryptosporidium and E. coli. Always boil water for this group, even if it looks clean after filtering.
- Elderly individuals with compromised immune systems face higher risk of severe illness from Giardia and bacterial infections. Double purification (boiling plus chemical treatment) is worth considering in high-risk water environments.
- Pregnant women should avoid iodine-based purification tablets as a primary method — boiling is safer.
- The filter-building process itself is manageable for older children and adults of any age. It requires no heavy lifting or specialized strength.
For families preparing together, Disaster Preparedness for Families covers age-specific water safety protocols in more detail.
How Do Professional Survival Experts Recommend Filtering Water?
Professional survival instructors and military field manuals consistently recommend the same core approach: filter to remove particles, then purify to kill pathogens. The improvised layered filter is a field-expedient tool — experts treat it as Step 1, not the complete solution.
What the experts emphasize:
- Prioritize moving water over stagnant sources when choosing what to filter.
- Pre-settle heavily silted water in a container for 30 minutes before filtering — this extends filter life significantly.
- Boiling remains the most reliable purification method in the field because it requires no additional supplies beyond fire and a container.
- Redundancy matters — carry water purification tablets as a backup even if you know how to build a filter.
- Practice before you need it — building a filter for the first time in a crisis is slower and more error-prone than doing it after practice at home.
The U.S. Army Survival Manual (FM 21-76) describes a similar layered filtration approach as a field expedient method, explicitly noting that it must be combined with purification before the water is safe to drink.
Are There Water Filter Methods That Work Better in Different Climates?
Yes — the best improvised filtration approach depends on the environment, available materials, and the type of contamination most likely present.
By climate and terrain:
| Environment | Best Filter Approach | Key Consideration |
|---|---|---|
| Temperate forest | Standard bottle filter with hardwood charcoal | Biological contamination is primary concern |
| Desert | Solar disinfection (SODIS) after basic filtering | UV exposure is plentiful; water sources are scarce |
| Arctic/subarctic | Melt snow, filter, then boil | Snow is relatively clean; focus on boiling |
| Tropical | Multiple passes + boiling | High pathogen load; heat and humidity degrade filter media faster |
| Urban/post-disaster | Chemical treatment prioritized | Chemical contamination may exceed what charcoal can handle |
Solar disinfection (SODIS): In desert or high-UV environments with no fuel for boiling, clear plastic bottles of filtered water left in direct sunlight for 6 hours (or 2 days if cloudy) can reduce pathogen load significantly. This works best with already-filtered, clear water.
High-altitude: Water boils at lower temperatures above 6,500 feet, so extend boiling time to 3 minutes to ensure full pathogen kill.
Products, Tools, and Resources Worth Having
An improvised water filter survival method is explained best as a last resort — the goal of any serious prepper is to have better options ready before the situation demands improvisation. These are the tools worth having in your kit:
Activated charcoal (pre-packed): Small bags of aquarium-grade or food-grade activated charcoal weigh almost nothing and dramatically improve improvised filter performance over field-made charcoal. Keep a few ounces in your bug-out bag.
LifeStraw Personal Water Filter: A compact, straw-style filter rated for 1,000 liters that removes bacteria and parasites. It doesn’t replace the improvised method — it complements it. Use the improvised filter to remove sediment first, then the LifeStraw for biological safety.
Sawyer Squeeze Filter: A versatile squeeze-bag filter system rated for 100,000 gallons. Lightweight, effective, and backflushable. One of the most reliable portable filters available for preppers.
Water purification tablets (iodine or chlorine dioxide): Aquatabs (chlorine dioxide) are effective against Cryptosporidium where iodine is not. Keep a bottle in every kit. Chlorine dioxide tablets are the professional standard.
SteriPen UV purifier: Battery-powered UV wand that purifies a liter of water in about 90 seconds. Excellent backup when boiling isn’t practical.
Bandanas (cotton): Multi-use pre-filter material. Pack two or three in any survival kit — they serve dozens of purposes beyond water filtration.
Metal water bottle or titanium cup: Essential for boiling. Plastic cannot go over a fire. A 1-liter stainless steel bottle is one of the highest-value items in any survival kit.
For a complete look at what belongs in your water preparedness system — including storage, filtration, and purification — the Ultimate Emergency Water Storage and Purification Guide is the most thorough resource available on Preppers HQ.
Conclusion: Build the Skill Before You Need It
An improvised water filter survival method is explained here not to replace proper preparation, but to fill the gap when preparation runs out. Knowing how to layer charcoal, sand, and gravel inside a plastic bottle could mean the difference between staying functional and becoming incapacitated from waterborne illness.
The three things to take away from this guide:
- Filter first, purify second — every single time. These are not the same step.
- Practice at home — build a filter in your backyard before you ever need one in the field. The first attempt always takes longer and reveals gaps in your knowledge.
- Layer your preparedness — a quality portable filter, purification tablets, and the improvised method as a backup gives you three layers of water security. That’s the Preppers HQ approach: confidence through redundancy.
Water is the one resource you cannot negotiate around. The skills in this guide are foundational — and they pair directly with the broader framework covered in our 14 Essential Survival Skills Every Prepper Must Know.
Start practicing now. The wilderness — and any real emergency — won’t give you time to figure it out on the fly.
Frequently Asked Questions
Q: Can I use sand from a playground or sandbox for my survival filter? Playground sand often contains chemical treatments, fine dust, and contaminants. Use natural riverbed or beach sand when possible. If playground sand is the only option, rinse it thoroughly with water before using it in your filter.
Q: How do I know if my improvised filter is working? The output water should be visibly clearer and lighter in color than the input water after the first few flush cycles. If the output is still dark or cloudy after three passes, your charcoal or sand layer may be too thin or the water source is too heavily contaminated.
Q: Is moss a good filter material? Moss can serve as a pre-filter layer to catch large debris, similar to grass or cloth. It is not a substitute for sand or charcoal — it doesn’t remove fine particles or contaminants effectively on its own.
Q: Can I drink rainwater without filtering it? Rainwater collected cleanly (away from roof runoff, trees, and industrial areas) is relatively safe but should still be filtered and boiled in a survival situation. Airborne contaminants, collection surface contamination, and storage conditions all introduce risk.
Q: What if I have no container at all? Hollow green bamboo, a birch bark cone sealed with pine pitch, or even a large folded leaf can work as a temporary filter housing. These are less effective than a bottle but functional in a true emergency. The key is maintaining the layered structure of the filter media.
Q: How long can I store water filtered through an improvised filter? Filtered and boiled water stored in a clean, sealed container is safe for 24–48 hours in most conditions. In hot climates, consume within 24 hours. Do not store filtered-but-not-purified water — it will allow bacteria to multiply.
Q: Does boiling remove chemical contamination? No. Boiling kills biological threats but does not remove dissolved chemicals, heavy metals, or agricultural runoff. If chemical contamination is suspected, activated charcoal filtration becomes more important — though it still may not fully address high chemical concentrations.
Q: Can I use charcoal briquettes from a barbecue? No. Commercial charcoal briquettes contain binders, accelerants, and additives that are toxic. Use only natural hardwood charcoal made from a campfire, or pre-packed activated charcoal.
Q: What’s the minimum amount of charcoal that’s actually effective? A minimum of 2 inches of crushed charcoal in the filter column provides some benefit. For meaningful contaminant reduction, aim for 3–4 inches. Thinner layers improve taste and odor but provide minimal chemical or particle filtration.
Q: Is this method safe enough for a baby or toddler? Filtered and then boiled water is the safest option for infants and toddlers. Always boil — do not rely on filtration alone for children under 5. If boiling isn’t possible, use chlorine dioxide tablets as a backup, not iodine (iodine is not recommended for infants).
Q: How is an improvised filter different from a commercial filter like a LifeStraw? A LifeStraw uses a hollow-fiber membrane with pores small enough to physically block bacteria and parasites (0.2 microns). An improvised sand-and-charcoal filter has no such precision — its pores are far larger and inconsistent. The improvised method reduces contamination; a quality commercial filter removes it far more reliably.
Q: Can I make a filter without any charcoal? Yes, but effectiveness drops significantly. A gravel-and-sand filter without charcoal still removes sediment and large particles, which makes subsequent boiling more effective. It just won’t improve taste, odor, or chemical contamination. Always prioritize getting charcoal into the filter if at all possible.
References
- U.S. Army. FM 21-76 Survival Manual. Department of the Army, 1992. https://www.armystudyguide.com
- Centers for Disease Control and Prevention. “Making Water Safe in an Emergency.” CDC, 2014. https://www.cdc.gov/healthywater/emergency/making-water-safe.html
- World Health Organization. Guidelines for Drinking-Water Quality, 4th edition. WHO, 2011. https://www.who.int/publications/i/item/9789241548151
- Sobsey, M.D. “Managing Water in the Home: Accelerated Health Gains from Improved Water Supply.” WHO, 2002.
- U.S. Environmental Protection Agency. “Emergency Disinfection of Drinking Water.” EPA, 2022. https://www.epa.gov/ground-water-and-drinking-water/emergency-disinfection-drinking-water