

Affiliate Disclosure: Hey there! As an Amazon Associate, some links on this page may be affiliate links which means that, if you choose to make a purchase, I may earn a commission at no extra cost to you. I greatly appreciate your support!
The wilderness doesn’t negotiate.
It doesn’t care that your GPS battery died, that your first aid kit has never been opened, or that you once watched three seasons of a survival show and felt genuinely prepared. It doesn’t soften its timeline to match your experience level. When something goes wrong out there — and something always can — the gap between what you know and what you actually need to know becomes visible with a speed that is, to put it plainly, terrifying.
This guide exists to close that gap before it opens.
What follows is not a collection of outdoor tips loosely assembled under a survival banner. It is a prioritized, sequenced, life-saving framework — 25 wilderness survival skills ranked by the order in which they determine survival outcomes in real emergency scenarios. The ranking follows the Rule of Threes, the physiological reality of human vulnerability, and the documented patterns of wilderness survival and fatality research.
Read it in order. The sequence is the lesson.
14 Essential Survival Skills Every Prepper Must Know
Why the Order You Learn These Skills Matters More Than the Skills Themselves
Most wilderness survival guides present skills as a flat list — fire starting, shelter building, water purification, navigation — as if they’re equally important and interchangeable. They’re not. Not even close.
The order in which you apply survival skills in an emergency determines whether you live or die. A person who builds a fire before building shelter in a cold, wet environment may die of hypothermia before the fire provides meaningful warmth. A person who searches for food before securing water will exhaust themselves on a task that won’t matter for three weeks while ignoring a need that becomes critical in three days.
The Rule of Threes provides the foundational framework for everything that follows:
- 3 minutes without air (or in icy water)
- 3 hours without shelter in a harsh environment
- 3 days without water
- 3 weeks without food
Every skill in this guide is ranked according to how quickly its absence kills — and how quickly its presence saves.
The short version: The 25 most critical wilderness survival skills follow the Rule of Threes framework — psychological skills first (panic kills fastest), then shelter, then water, then fire, then navigation, then food procurement, then long-term resilience. The sequence reflects the physiological timeline of human vulnerability in wilderness emergencies.
Key Takeaways:
– Prioritize psychological skills first: mastering the STOP method and situational awareness is critical to prevent panic and enable rational decision-making under stress.
– Follow the Rule of Threes: address immediate threats in order—air, shelter, water, fire, navigation, food—to maximize survival chances.
– Practice essential physical skills thoroughly before emergencies: emergency shelter building, water purification, reliable fire starting (modern and primitive), and navigation with map and compass.
– Prepare for long-term survival with skills in food procurement, wound care, tool making, medicinal plant knowledge, and psychological resilience.
– Stay put and signal effectively for rescue; avoid moving without a plan to conserve energy and improve chances of being found quickly.
Tier 1: The First Three Hours — Skills That Determine Immediate Survival
 These are the skills that matter in the first hours of a wilderness emergency. Their absence kills faster than any other category. Master these before anything else.
Skill #1: Survival Psychology and the STOP Method
Why it’s first: Panic kills faster than almost any environmental threat. Before any physical skill can be applied, the brain must be functioning rationally. The STOP method is the cognitive framework that makes all other skills possible.
Here’s what most people don’t understand about wilderness emergencies: the environment rarely kills directly. What kills is the cascade of bad decisions that follows the moment someone realizes they’re in trouble, running in the wrong direction. Exhausting energy reserves on tasks that don’t matter. Abandoning resources they didn’t notice because they were moving too fast to see them.
Survival psychology is the study of how the human mind responds to life-threatening stress — and how to manage that response to maintain the rational decision-making that survival requires.
When the brain perceives a genuine threat, the amygdala triggers the stress response: cortisol and adrenaline flood the system, heart rate spikes, blood flow redirects to large muscle groups, and the prefrontal cortex — the rational, planning brain — goes partially offline. This response is adaptive for short-term physical threats. It is catastrophically maladaptive to the complex, sustained problem-solving required in wilderness survival.
The STOP Method:
S — Stop. When you realize you’re in a wilderness survival situation, stop moving immediately. Sit down if possible. The instinct to do something — to move, to search, to act — is powerful and almost always counterproductive.
T — Think. Assess your situation honestly. What resources do you have? What are your immediate threats? What does the Rule of Threes tell you about your priorities?
O — Observe. Look at your environment with fresh eyes. What natural resources are available? What are the weather conditions? What direction is the sun? What sounds do you hear?
P — Plan. Based on your assessment and observation, create a specific, prioritized action plan before taking any action.
The most dangerous mistake in wilderness survival is moving without a plan. The instinct to move toward help, to not just sit there, kills people in wilderness situations. Moving when lost increases the search area for rescuers, exhausts energy reserves, and often leads people further from help.
How to actually practice this: The next time you feel genuinely stressed or disoriented — even in a non-emergency context — run the full STOP sequence. Stop what you’re doing. Think about your actual situation. Observe your environment. Plan your next action. The neural pathway this builds is the same one you’ll need when it actually matters.
Skill #2: Situational Awareness and Threat Assessment
Why it’s second: You cannot respond to threats you haven’t identified. Situational awareness is the continuous process of perceiving, comprehending, and projecting the state of your environment — and it must be active from the moment you enter a wilderness environment, not just after something goes wrong.
The color code system, developed by Lt. Col. Jeff Cooper and adapted for wilderness survival contexts, provides a practical framework:
White: Relaxed, unaware. Appropriate only in completely safe environments. Never appropriate in wilderness settings.
Yellow: Relaxed alertness. The baseline state for all wilderness travel. Aware of your surroundings, noting potential threats and resources without fixating on any specific concern.
Orange: Specific alert. You’ve identified a potential threat — a change in weather, an unfamiliar sound, a navigation uncertainty. Your attention is focused on assessing and responding to that specific concern.
Red: Active response. A threat has been confirmed, and you are actively responding to it.
Wilderness situational awareness in practice:
- Reading weather patterns and anticipating changes before they arrive
- Identifying terrain hazards before you encounter them
- Monitoring your own physical and psychological state honestly
- Tracking your position continuously, not just when you’re lost
- Identifying potential water sources, shelter sites, and signaling locations proactively — before you need them
Skill #3: Emergency Shelter Building
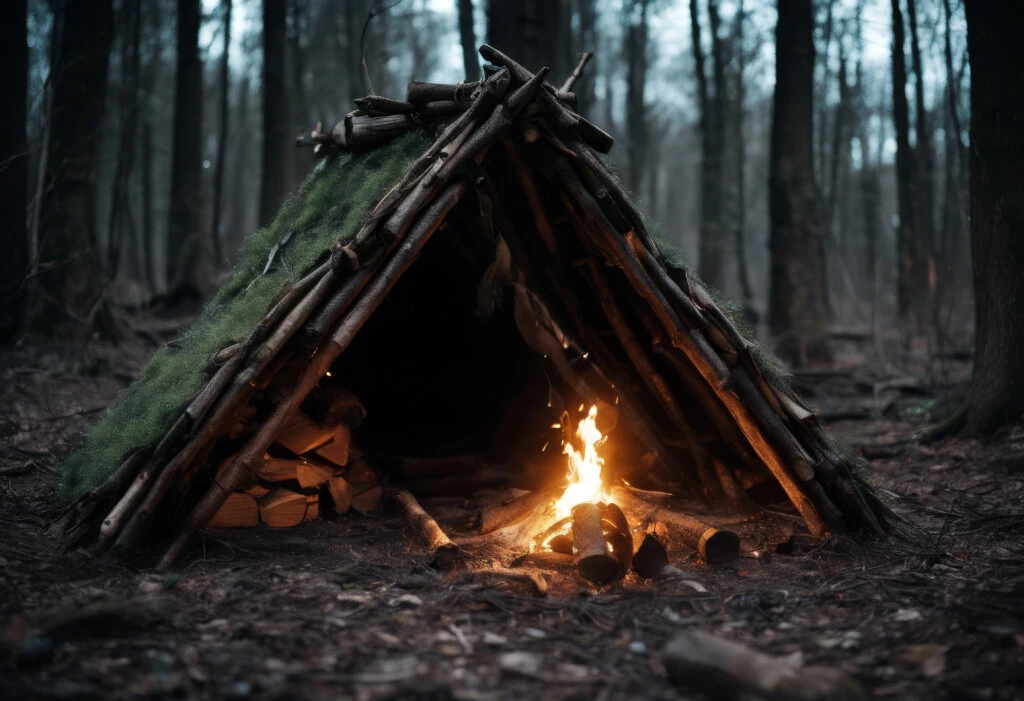 Why it’s third: In a harsh environment, an unprotected person can develop life-threatening hypothermia within 2 to 3 hours. Shelter is the second priority after psychological function — and the skill that saves the most lives in temperate and cold-weather wilderness emergencies.
The goal of the emergency shelter is not comfort. It is thermal regulation — maintaining core body temperature within the range that keeps the brain and body functional.
The Debris Hut — The Gold Standard of Primitive Wilderness Shelter:
The debris hut can be built anywhere there are trees, requires no tools, and provides remarkable thermal insulation through trapped air — the same principle that makes down jackets warm.
Construction:
- Find a ridgepole — a fallen branch or sapling, 9 to 12 feet long, strong enough to support weight
- Rest one end on a stump, forked branch, or rock approximately 2 to 3 feet off the ground; the other end rests on the ground
- Lean branches against both sides of the ridgepole at 45-degree angles, creating a triangular cross-section
- The interior should be just wide enough for your body — no wider (every extra inch is heat you must generate yourself)
- Cover the entire structure with leaves, pine needles, bark, and organic debris at least 2 feet thick — thick enough that you can’t see light through it
- Fill the interior with dry leaves before entering — you’ll sleep inside this material
- Stuff a large armful of debris into the entrance after you’re inside
The critical mistake: Building a shelter that’s too large. A debris hut should be body-sized. Larger shelters require more body heat to warm and provide less insulation per square foot.
Tarp Shelter Configurations:
For anyone carrying a tarp — which should be in every wilderness pack:
- A-frame: Ridgeline between two trees at chest height, tarp draped over and staked at 45-degree angles. Most stable and weather-resistant.
- Lean-to: One edge attached to a ridgeline at head height, opposite edge staked to the ground. Fastest to set up, allows fire in front for heat reflection.
- Diamond: Upwind corner attached high, side corners staked to ground, downwind corner staked low. Most wind-resistant.
Shelter site selection — what actually matters:
- Natural windbreak (rock face, dense vegetation, hillside)
- Drainage — never in a depression or dry streambed
- Away from dead trees and large branches overhead
- Proximity to building materials
- Visibility for signaling if needed
Skill #4: Hypothermia Prevention and Treatment
Why it’s fourth: Hypothermia is the leading cause of death in wilderness survival scenarios. Understanding it — recognizing it in yourself and others, preventing it, and treating it in the field — is a distinct and critical skill set beyond shelter building alone.
The hypothermia progression:
Mild hypothermia (core temp 90–95°F / 32–35°C): Shivering, impaired coordination and fine motor skills, slurred speech, confusion and poor judgment.
Moderate hypothermia (core temp 82–90°F / 28–32°C): Shivering stops — a dangerous sign indicating the body has exhausted its heat-generating capacity. Severe confusion, muscle rigidity, paradoxical undressing (the person removes clothing, believing they’re hot).
Severe hypothermia (below 82°F / 28°C): Loss of consciousness, cardiac arrhythmia, apparent death.
Field treatment:
- Remove the person from cold and wind immediately
- Remove wet clothing carefully — handle gently (rough movement can trigger cardiac arrhythmia in moderate to severe cases)
- Insulate from the ground (ground conducts heat away faster than cold air)
- Cover with dry insulation — sleeping bags, blankets, emergency space blankets
- Apply heat to the core: armpits, groin, neck — using warm water bottles, chemical heat packs, or body-to-body contact
- If conscious and able to swallow, provide warm (not hot) sweet liquids
- Do not rub the extremities — this drives cold blood to the core and can worsen the condition
The rule that saves lives: Never assume a hypothermic person is dead until they are “warm and dead.” People have survived core temperatures below 60°F (15°C) with appropriate rewarming.
Skill #5: Signaling for Rescue
 Why it’s fifth: Signaling is the skill that ends the survival situation. In most wilderness emergencies, the goal is not to survive indefinitely — it’s to be found as quickly as possible. Effective signaling dramatically reduces the time between the onset of an emergency and rescue.
Most wilderness rescues occur within 24 to 72 hours when the person stays put and signals effectively. The decision to stay and signal versus self-rescue is one of the most consequential decisions in a wilderness emergency — and staying is almost always the right choice.
Signal mirror — the most effective visual signaling method:
A signal mirror can be seen by aircraft at distances of up to 10 miles in clear conditions. It weighs almost nothing and requires no batteries.
Technique:
- Hold the mirror close to your face
- Extend your other hand toward the target (aircraft, distant person)
- Create a V with your fingers and sight the target through the V
- Tilt the mirror until the reflected sunlight spot appears on your fingers
- Adjust until the spot is in the V, aimed at the target
- Flash in a series of three — the universal distress signal
In the absence of a commercial signal mirror: a phone screen, piece of aluminum foil, polished metal surface, or CD can be used.
Ground-to-air signals:
Signals should be at least 10 feet tall and made from materials that contrast with the ground:
- X: Require medical assistance
- V: Require assistance
- →: Traveling in this direction
- F: Need food and water
Whistle signals:
Three blasts on a whistle is the universal distress signal. A whistle carries significantly farther than a human voice and requires far less energy. Every wilderness kit should contain a pealess whistle — pea whistles freeze and fail in cold conditions.
Signal fire:
A signal fire produces smoke visible for miles. In daylight, add green vegetation, rubber, or plastic to produce dark smoke visible against a light sky. At night, a bright fire is visible against darkness. Build signal fires in clearings, on ridgelines, or near water — locations with maximum visibility from the air.
Tier 2: The First Three Days — Skills That Address Sustenance

These skills address the needs that become critical within the first three days of a wilderness emergency. They build on the foundation established by Tier 1.
Skill #6: Water Source Identification
Why it’s sixth: Dehydration impairs cognitive function within 24 hours — exactly when you need your thinking to be sharpest. Water source identification is the first step in the water procurement sequence.
Water follows gravity. Understanding this principle allows you to locate water sources using terrain reading — interpreting landscape features to predict where water collects.
Terrain-based water finding:
- Follow valleys and drainages downhill: Water flows to the lowest point. Following a valley or drainage downhill will eventually lead to a water source.
- V-shaped valleys: Indicate active water flow. U-shaped valleys indicate glacial formation and may be dry.
- Concentrated green vegetation: In arid environments, willows, cottonwoods, and cattails indicate water within a few feet of the surface.
- Animal behavior: Animals travel to water at dawn and dusk. Bird flight patterns in the morning often indicate the direction of water.
- Listen: Moving water is audible at surprising distances in quiet environments. Stop, be still, and listen.
Alternative water collection methods:
- Transpiration bags: Tie a clear plastic bag around a leafy branch in direct sunlight. The plant’s transpiration process will collect clean water in the bag over several hours.
- Morning dew: Tie an absorbent cloth around your ankles and walk through grass at dawn. Wring the cloth into a container.
- Rain collection: Any waterproof surface — a tarp, a poncho, large leaves — can be configured to collect and channel rainwater.
Skill #7: Water Purification
Why it’s seventh: Finding water is only half the challenge. Natural water sources — regardless of how clean they appear — can contain bacteria, viruses, and protozoa that cause severe illness. In a wilderness survival scenario, waterborne illness compounds an already dangerous situation.
Purification methods ranked by reliability:
1. Boiling (most reliable): A rolling boil for 1 minute (3 minutes above 6,500 feet) kills all biological pathogens. Requires a heat source and a container. Does not remove chemical contaminants.
2. Chlorine dioxide tablets: The most effective chemical treatment option. Kills bacteria, viruses, and Cryptosporidium. Wait 30 minutes for bacteria and viruses; 4 hours for Cryptosporidium. Lightweight and compact.
3. Hollow fiber filters (Sawyer Squeeze, LifeStraw): Remove bacteria and protozoa but not viruses. Rated for 100,000 gallons (Sawyer). Immediate results. Requires backflushing to maintain flow rate.
4. Iodine tablets: Kills bacteria and most viruses. Less effective against Cryptosporidium. Not suitable for pregnant women or people with thyroid conditions.
5. UV purification (SteriPen): Destroys DNA of all biological pathogens including viruses. Requires batteries and clear water. Fast — 60 to 90 seconds per liter.
6. Improvised filtration: A layered filter of grass, sand, charcoal, and gravel removes particulate matter but does not reliably remove pathogens. Always follow with boiling or chemical treatment.
The turbidity rule: If water is cloudy or turbid, filter through a clean cloth before any purification method. Turbidity reduces the effectiveness of chemical treatment and UV purification.
Skill #8: Fire Starting — Modern Methods
Why it’s eighth: Fire provides warmth, water purification, food preparation, signaling, light, and psychological comfort. In cold or wet environments, it can be the difference between survival and hypothermia.
Modern fire-starting methods are ranked here separately from primitive methods because they are categorically more reliable and should be the first resort in any wilderness emergency.
Lighter: The most reliable fire-starting tool available. A standard BIC lighter works in most conditions and provides hundreds of ignitions. Every wilderness kit should contain at least two.
Ferro rod (ferrocerium rod): Produces sparks at approximately 5,400°F — hot enough to ignite almost any dry tinder. Works when wet, works in cold temperatures, lasts for thousands of strikes.
Waterproof matches: Reliable backup. Store in a waterproof container with a striker.
The fire lay — building a fire that actually catches:
- Tinder bundle: A bird’s nest-shaped bundle of dry, fine material — dry grass, cattail fluff, shredded bark. The tinder must be completely dry and fine enough to ignite from a spark.
- Kindling: Small, dry sticks approximately pencil-diameter. Arranged in a teepee or log cabin configuration over the tinder.
- Fuel: Progressively larger sticks and logs added as the fire establishes.
The most common beginner mistake: Adding fuel too quickly before the fire is established, smothering the flame before it has a chance to breathe.
Skill #9: Fire Starting — Primitive Methods
 Why it’s ninth: When modern fire-starting tools fail or are unavailable, primitive fire-starting methods become critical. They require significantly more practice than modern methods and should be learned before they’re needed — not during the emergency.
The bow drill — the most reliable primitive fire starting method:
The bow drill uses friction between a rotating spindle and a fireboard to create an ember. It requires dry materials, correct technique, and significant practice. Most people can master it with 10 to 20 hours of dedicated effort.
Components:
- Fireboard: Flat piece of dry, soft wood — cedar, willow, cottonwood, basswood. Approximately 12 inches long, 3/4 inch thick.
- Spindle: Straight, dry stick of the same or similar wood, approximately 12 inches long. One end carved to a blunt point, the other to a rounded point.
- Handhold: A piece of hardwood or stone with a small depression to hold the top of the spindle.
- Bow: Curved branch approximately 24 inches long with a cord tied loosely enough to wrap once around the spindle.
- Tinder bundle: Bird’s nest-shaped bundle of dry, fine material.
Process:
- Cut a small depression in the fireboard and a notch from the depression to the edge
- Place a small piece of bark under the notch to catch the ember
- Wrap the bow cord once around the spindle
- Place the spindle in the depression, apply downward pressure with the handhold
- Use long, smooth bow strokes to rotate the spindle
- When smoke appears and dark powder accumulates in the notch, continue for 10 to 15 more strokes
- Tap the ember into the tinder bundle, fold the bundle around it, and blow gently until flame appears
The flint and steel method: Striking flint against high-carbon steel produces sparks that can ignite char cloth or other prepared tinder. Requires specific materials and practice.
The hand drill: More difficult than the bow drill, requiring very dry conditions and specific wood combinations. Not recommended as a primary primitive method for beginners.
Skill #10: Natural Tinder Identification and Preparation
Why it’s tenth: The quality of your tinder determines whether your ember becomes a fire. This skill is distinct from fire-starting technique because it requires botanical knowledge and field identification ability — and it fails people who’ve never practiced it outside of ideal conditions.
Excellent natural tinder by category:
Plant-based tinder:
- Dry grass (crumbled fine)
- Cattail fluff
- Dry inner bark of cedar, birch, or cottonwood (shredded fine)
- Dry pine needles
- Dry leaves (crumbled fine)
- Dry moss
- Birch bark (contains natural oils that burn even when slightly damp)
- Dry seed heads of various plants
Fungal tinder:
- Amadou (from horse hoof fungus / Fomes fomentarius) — one of the best natural tinders available
- Dry bracket fungi
The moisture test: Tinder that feels even slightly cool to the touch contains moisture. Truly dry tinder feels room temperature and crumbles easily.
Tinder preparation: Even naturally dry tinder benefits from additional preparation — shredding, crumbling, and fluffing to maximize surface area and air circulation.
These skills address the need to understand your position, move safely through wilderness terrain, and make informed decisions about self-rescue versus staying put.
Skill #11: Topographic Map Reading

Why it’s eleventh: A topographic map is the most information-dense navigation tool available — and it works without batteries, signal, or any technology. The ability to read one is the foundation of all wilderness navigation.
Key topographic map concepts:
Contour lines: Each line represents a specific elevation. The contour interval (the elevation difference between adjacent lines) is printed in the map legend — typically 20, 40, or 80 feet.
Closely spaced contour lines: Steep terrain. Lines that are very close together or touching indicate a cliff.
Widely spaced contour lines: Gentle terrain.
V-shaped contours pointing uphill: A valley or drainage — water flows in the direction the V points.
V-shaped contours pointing downhill: A ridge.
Closed circles: A hilltop or depression (a depression is marked with tick marks on the inside of the circle).
Map orientation: Always orient your map to the terrain before navigating. Rotate the map until the features on the map align with the features you can see in the landscape.
Map scale: Understanding map scale allows you to estimate distances. A 1:24,000 scale map means 1 inch on the map equals 24,000 inches (2,000 feet) in reality.
Why it’s twelfth: A compass provides directional information that a map alone cannot. Together, map and compass form the most reliable wilderness navigation system available.
Critical concept — magnetic declination: A compass needle points to magnetic north — not true north. The difference between magnetic north and true north is called magnetic declination, and it varies by location. In the continental United States, declination ranges from approximately 20° west (Pacific Northwest) to 20° east (New England). Ignoring declination causes navigational errors that compound over distance.
Taking a bearing:
- Point the direction-of-travel arrow at your destination
- Rotate the compass housing until the orienting arrow aligns with the magnetic needle (red end north)
- Read the bearing at the index line
- Follow that bearing by keeping the needle aligned with the orienting arrow as you walk
Triangulation (finding your position):
- Identify two or three landmarks visible on both the map and the terrain
- Take a bearing to each landmark
- Draw lines from each landmark on the map in the direction of the bearing (back-bearing)
- Your position is where the lines intersect
Why it’s thirteenth: When a map and compass are unavailable, natural navigation methods provide directional information using environmental cues. These methods are less precise than compass navigation but can provide sufficient directional guidance to reach safety.
Solar navigation:
The shadow stick method (most reliable):
- Place a straight stick vertically in the ground
- Mark the tip of the shadow with a stone or stick
- Wait 15 to 20 minutes
- Mark the new shadow tip
- Draw a line between the two marks — this line runs approximately east-west (first mark is west, second mark is east)
- A line perpendicular to this runs north-south
Stellar navigation:
In the Northern Hemisphere, Polaris (the North Star) indicates true north within approximately 1 degree.
Finding Polaris:
- Locate the Big Dipper (Ursa Major)
- Find the two stars that form the outer edge of the dipper’s cup (the “pointer stars”)
- Follow a line from these stars approximately 5 times the distance between them
- The moderately bright star at that location is Polaris
In the Southern Hemisphere, the Southern Cross (Crux) indicates south. Extend the long axis of the cross approximately 4.5 times its length — that point indicates south.
Terrain-based navigation:
- Water flows downhill: Following water downstream leads to lower elevations, larger water bodies, and eventually human habitation.
- Vegetation patterns: In the Northern Hemisphere, south-facing slopes receive more sun and have different vegetation than north-facing slopes.
- Wind patterns: Prevailing winds create consistent patterns in vegetation — trees bent in the direction of prevailing wind.
Skill #14: Dead Reckoning
Why it’s fourteenth: Dead reckoning is the process of calculating your current position based on a known starting position, your direction of travel, your speed, and elapsed time. It allows you to track your position continuously without landmarks.
The basic formula: Distance = Speed × Time
Pace counting: Measure your pace count — the number of times your left foot hits the ground per 100 meters. Most adults have a pace count of 60 to 70 on flat terrain. This varies with terrain, load, and fatigue.
Practical dead reckoning:
- Note your starting position on the map
- Take a compass bearing to your destination
- Walk on that bearing, counting paces
- Every 100 meters, mark your progress on the map
- Adjust for terrain — uphill and downhill travel covers less ground per pace
Skill #15: Terrain Reading and Route Finding
Why it’s fifteenth: The ability to read terrain — to understand what the landscape is telling you about what lies ahead — is the skill that connects map reading, compass navigation, and natural navigation into a coherent wilderness travel system.
Key terrain reading skills:
Identifying ridgelines and valleys: Ridgelines provide visibility and are often easier travel than valleys. Valleys provide water and shelter but may be difficult to navigate.
Reading drainage patterns: Understanding how water flows through a landscape allows you to predict where streams and rivers will be, and to use them as navigation aids.
Identifying travel hazards: Cliffs, unstable slopes, dense vegetation, and boggy ground are identifiable from terrain features before you encounter them.
Route finding principles:
- Travel on ridgelines when possible for visibility and easier terrain
- Follow drainages when water is the priority
- Avoid travel in dense vegetation when possible — it’s exhausting and disorienting
- In unfamiliar terrain, move slowly and continuously assess your position
Tier 4: Food Procurement — Skills for the Long Game
 Food is the last priority in the Rule of Threes — but in extended wilderness survival scenarios, the ability to procure food becomes increasingly important for maintaining the physical and psychological energy required for survival.
Skill #16: Wild Plant Identification and Foraging
Why it’s sixteenth: Wild plants are the most accessible food source in most wilderness environments. They require no tools, no traps, and no hunting skills. But they also carry the highest risk of misidentification — and some misidentifications are fatal.
The 10 most common edible wild plants in North America:
- Dandelion (Taraxacum officinale): Entirely edible — leaves, flowers, and roots. Found in virtually every temperate environment.
- Cattail (Typha species): One of the most calorie-dense wild foods available. Young shoots in spring taste like a cucumber. Pollen in early summer can be used as flour. Roots contain starch year-round.
- Plantain (Plantago major/lanceolata): Not the banana — a common lawn weed with broad or narrow leaves and parallel veins. Young leaves are edible raw or cooked.
- Wood sorrel (Oxalis species): Heart-shaped leaves with a pleasant lemony flavor. Found in shaded woodland areas. Edible raw. High in vitamin C.
- Purslane (Portulaca oleracea): A succulent ground cover with small, paddle-shaped leaves. One of the most nutritious wild plants available — high in omega-3 fatty acids.
- Lamb’s quarters (Chenopodium album): A common garden weed with diamond-shaped leaves and a white powdery coating on new growth. Edible raw or cooked.
- Stinging nettle (Urtica dioica): Requires careful handling due to stinging hairs. Cooking or drying neutralizes the sting. Highly nutritious.
- Clover (Trifolium species): Both red and white clover are edible. Flowers and young leaves can be eaten raw.
- Chickweed (Stellaria media): A low-growing plant with small white flowers and oval leaves. Edible raw or cooked.
- Wild garlic/ramps (Allium ursinum/tricoccum): Identifiable by a strong garlic smell when leaves are crushed. Entirely edible. Must be distinguished from lily of the valley (toxic) by smell — lily of the valley has no garlic odor.
The Universal Edibility Test:
When you encounter a plant you cannot positively identify, the Universal Edibility Test provides a systematic method for assessing safety. It takes approximately 24 hours, but it is the only reliable field method for testing unknown plants.
- Separate the plant into components (leaves, stems, roots, flowers, seeds may have different edibility profiles)
- Smell test: avoid plants with almond-like or bitter almond odors (cyanide compounds)
- Skin contact test: rub a small amount on the inside of your wrist; wait 15 minutes
- Lip test: touch a small amount to your lips; wait 3 minutes
- Mouth test: place a small amount in your mouth without swallowing; hold for 15 minutes
- Swallow test: swallow a small amount (approximately 1/4 teaspoon); wait 8 hours
The rule: If you cannot make an identification with complete confidence, do not eat it.
Skill #17: Dangerous Plant Identification
Why it’s seventeenth: Knowing what not to eat is as important as knowing what to eat. The most dangerous aspect of foraging is not the plants that look obviously inedible — it’s the plants that look almost exactly like edible species.
Critical dangerous lookalikes:
Wild carrot vs. Poison hemlock: Both have white umbrella-shaped flower clusters and feathery leaves. Poison hemlock has purple-spotted stems and a musty, unpleasant odor. Wild carrot has hairy stems and a carrot smell when crushed. Poison hemlock is one of the most toxic plants in North America.
Wild garlic vs. Lily of the valley: Both have similar leaf shapes in early spring. Wild garlic smells strongly of garlic when crushed. Lily of the valley has no garlic odor and is highly toxic.
Elderberry vs. Water hemlock: Elderberry has edible berries (when cooked) and compound leaves. Water hemlock has similar compound leaves but is considered the most violently toxic plant in North America.
Skill #18: Primitive Trapping
Why it’s eighteenth: Trapping provides protein with minimal ongoing energy expenditure — you set the trap and let it work while you attend to other survival priorities. It is more reliable than hunting for most beginners.
The figure-four deadfall trap:
One of the most widely applicable primitive traps requires only sticks and a heavy flat rock.
Construction:
- Carve the three sticks to the required shapes (the upright, the diagonal, and the toggle)
- Interlock the sticks to create a balanced support structure
- Prop the rock on the support structure
- Place bait at the trigger point
- When an animal disturbs the bait, the sticks collapse, and the rock falls
The snare:
A simple wire or cordage loop set in an animal trail.
Construction:
- Identify an active animal trail (look for tracks, droppings, and worn vegetation)
- Create a loop of wire or cordage approximately the size of a fist for small game
- Suspend the loop at the appropriate height (approximately 4 inches off the ground for rabbits)
- Anchor the snare to a stake or tree
- Check snares every 4 to 6 hours
Legal note: Trapping regulations vary by jurisdiction. In a genuine survival emergency, legal considerations are secondary to survival. In training contexts, always comply with local regulations.
Skill #19: Wilderness Fishing Without Commercial Equipment
Why it’s nineteenth: Fish are one of the most calorie-dense and widely available wild food sources. In many wilderness environments, water bodies provide reliable food access that terrestrial foraging and trapping cannot match.
Improvised fishing methods:
Gorge hook: A small, straight piece of bone, wood, or metal sharpened at both ends and tied in the middle. When a fish swallows the bait, the gorge hook turns sideways and lodges in the throat.
Spear fishing: A sharpened stick or multi-pronged spear used in shallow, clear water. Most effective at dawn and dusk when fish are active near the surface.
Fish trap (weir): A funnel-shaped structure of rocks or sticks built in a stream that guides fish into a confined area from which they cannot easily escape.
Bait identification: Earthworms, insects, grubs, and small pieces of meat or fish are effective bait for most freshwater species.
Skill #20: Food Preservation in the Wilderness
Why it’s twentieth: In extended wilderness survival scenarios, the ability to preserve food — to store surplus for later consumption — becomes increasingly important. Food preservation prevents waste and provides a buffer against periods when food procurement is difficult.
Drying/dehydration:
The oldest and most universally applicable food preservation method. Removes moisture that bacteria and mold require to grow.
Technique:
- Cut food into thin slices (1/4 inch or less)
- Hang on a rack or string in direct sunlight with good air circulation
- In humid environments, build a small fire beneath the drying rack to accelerate the process
- Food is adequately dried when it is leathery and does not feel moist
Smoking:
Combines heat, dehydration, and antimicrobial compounds from wood smoke to preserve meat and fish.
Technique:
- Build a small fire with hardwood (avoid resinous woods like pine)
- Construct a rack above the fire at a height where the temperature is warm but not cooking (approximately 150 to 200°F)
- Hang thin strips of meat or fish on the rack
- Maintain a low, smoky fire for 6 to 12 hours
Cold storage:
In cold environments, natural refrigeration can extend food storage. Bury food in snow or cold ground, or store it in a cold stream (in a sealed container).
Tier 5: Long-Term Resilience — Skills for Extended Survival
 These skills become increasingly important in extended wilderness survival scenarios — situations lasting more than a few days where the immediate survival priorities have been addressed and the challenge shifts to sustained function.
Skill #21: Wilderness First Aid — Wound Management
Why it’s twenty-first: In a wilderness survival scenario, injuries are common — and without proper wound management, even minor injuries can become life-threatening through infection.
Wound cleaning — the most important step:
Use the cleanest water available — boiled and cooled if possible — to irrigate the wound under pressure. A plastic bag with a pinhole creates an effective irrigation syringe. Remove all visible debris. Thoroughly.
Wound closure:
For wounds that gape open, closure reduces infection risk and promotes healing.
- Butterfly closures can be improvised from tape or adhesive bandages cut into butterfly shapes
- Steri-strips, if available, are the most effective non-suture closure method
Wound protection:
Cover cleaned wounds with the cleanest available material. Change dressings daily if possible. Monitor for signs of infection: increasing redness, warmth, swelling, pus, red streaking from the wound, or fever.
Wounds requiring evacuation regardless of apparent stability:
Deep puncture wounds, wounds involving joints, wounds with significant tissue loss, wounds showing signs of infection, and any wound in a diabetic or immunocompromised individual.
Skill #22: Improvised Tool Making — Expanding Your Capability With What the Environment Gives You
In extended wilderness survival scenarios, the ability to create tools from available materials dramatically expands your capability across all other skill categories.
Stone knapping — creating cutting tools:
Flint, obsidian, chert, and similar cryptocrystalline stones can be shaped into cutting tools by controlled fracturing.
Basic technique:
- Select a suitable stone (cryptocrystalline, no visible grain)
- Strike the edge of the stone with a harder hammerstone at a 30 to 45-degree angle
- Controlled strikes remove flakes, creating a sharp edge
- Pressure flaking (using a pointed tool to press and remove small flakes) refines the edge
Cordage making:
Natural cordage can be made from plant fibers, animal sinew, or bark.
Reverse wrap technique:
- Gather long plant fibers (dogbane, stinging nettle, cattail leaves, inner bark of basswood)
- Divide the fibers into two equal bundles
- Twist each bundle clockwise while wrapping them around each other counterclockwise
- Add new fibers as the cordage grows
Improvised containers:
Bark containers (birch bark is ideal), clay pots (if clay is available and fire is established), and woven baskets from flexible plant materials can be used for water collection, food preparation, and storage.
Skill #23: Medicinal Plant Knowledge — When the Wilderness Is Your Pharmacy
In extended wilderness survival scenarios without access to medical supplies, knowledge of medicinal plants can address pain, infection, and illness that would otherwise compromise survival capacity.
Essential medicinal plants:
Plantain (Plantago major/lanceolata): Chewed and applied as a poultice, plantain has documented antimicrobial and anti-inflammatory properties. Effective for insect stings, minor wounds, and skin irritation.
Yarrow (Achillea millefolium): A feathery-leaved plant with white or yellow flower clusters. Applied to wounds, yarrow has hemostatic (blood-stopping) properties. Also used as a fever reducer when consumed as a tea.
Willow bark (Salix species): Contains salicin, a compound related to aspirin. Chewing willow bark or making a tea from it provides mild pain relief and fever reduction.
Echinacea (Echinacea species): Purple coneflower. Has documented immune-stimulating properties. Used as a tea or tincture to support immune function.
Elderberry (Sambucus nigra): Ripe berries (cooked) have antiviral properties. Leaves, bark, and unripe berries are toxic.
Critical caution: Medicinal plant knowledge requires identification. Misidentification of medicinal plants carries the same risks as misidentification of food plants. Learn from qualified instructors and verified field guides before relying on this knowledge.
Skill #24: Group Survival Leadership — When the Social Dynamics Become a Survival Variable
In group wilderness survival scenarios, the social dynamics of the group become a survival variable. Groups that organize effectively, distribute tasks according to individual capabilities, and maintain morale survive at higher rates than groups that fragment or fall into conflict.
Group survival leadership principles:
Establish clear roles: Assign specific responsibilities based on individual skills and physical capabilities. Ambiguity about who is responsible for what leads to tasks being duplicated or neglected.
Maintain morale: Psychological function is a group resource. Leaders who maintain group morale — through realistic optimism, task focus, and acknowledgment of progress — improve the group’s collective survival capacity.
Manage conflict: Conflict in survival situations is inevitable and must be managed actively. Establish decision-making processes before conflict arises.
Leverage individual skills: Identify what each group member knows and can do. A group’s collective skill set is almost always greater than any individual’s.
Distribute physical load: Physical tasks should be distributed according to individual capacity. Exhausting the strongest members early depletes the group’s most valuable physical resource.
Skill #25: Long-Term Psychological Resilience — The Skill That Outlasts All Others
 In extended wilderness survival scenarios, psychological resilience becomes the limiting factor. Physical survival needs can be met with the skills described above. The question becomes whether the mind can sustain the effort required to keep meeting them.
The psychological arc of extended wilderness survival:
Research on extended survival scenarios identifies a consistent psychological progression:
Phase 1 — Initial shock and denial (hours 1 to 24): The reality of the situation is not fully processed. The STOP method is critical in this phase.
Phase 2 — Reactive phase (days 1 to 3): Emotional responses intensify — fear, anger, grief. Physical symptoms of stress appear. This is the most psychologically dangerous phase.
Phase 3 — Acceptance and adaptation (days 3 to 7): Those who survive the reactive phase begin to adapt. Routines develop. The situation becomes normalized.
Phase 4 — Sustained function (beyond day 7): Psychological function stabilizes. The challenge shifts from managing acute stress to maintaining motivation and morale over an extended period.
Long-term psychological resilience techniques:
Routine and structure: Establishing daily routines — specific times for water procurement, food preparation, shelter maintenance, and signaling — provides psychological structure that reduces anxiety and maintains motivation.
Goal setting: Setting small, achievable daily goals provides a sense of progress and agency. “Today I will improve my shelter” is more psychologically sustaining than “I need to survive indefinitely.”
Meaning and purpose: Research on survival psychology consistently shows that people who maintain a sense of purpose — a reason to survive, people to return to, a mission to complete — survive at higher rates than those who don’t.
The will to live: Survival psychologists have documented cases where technically survivable situations resulted in death because the person gave up — and technically unsurvivable situations resulted in survival because the person refused to. The will to live is not a metaphor. It is a measurable psychological variable with real physiological consequences.
How to Actually Build These Skills — The Training Roadmap
Knowledge without practice is not a survival skill. It is a survival fantasy.
Phase 1 — Foundation (Weeks 1–4)
- Learn and practice the STOP method in low-stakes situations
- Build a debris hut in your backyard or a local park
- Practice fire starting with a ferro rod until you can reliably start a fire in under 5 minutes
- Learn to identify 5 edible plants in your local area
- Practice taking and following compass bearings
Phase 2 — Competence (Weeks 5–8)
- Practice fire starting in adverse conditions — wind, light rain, cold
- Learn compass navigation and practice triangulation
- Complete a basic wilderness first aid course
- Practice water purification using multiple methods
- Begin bow drill practice (expect 10 to 20 hours before reliable ember production)
Phase 3 — Integration (Weeks 9–12)
- Complete a 24-hour solo wilderness survival scenario with minimal gear
- Practice navigation on a route you don’t know using only map and compass
- Build and sleep in a primitive shelter
- Practice the full bow drill fire starting sequence
- Identify and prepare wild edible plants from your local area
Courses Worth Taking
Wilderness First Responder (WFR): The gold standard of wilderness medicine training. 70 to 80 hours of instruction covering emergency assessment, trauma management, and evacuation decisions.
NOLS (National Outdoor Leadership School): Comprehensive wilderness skills courses ranging from 8 days to a full semester. Covers navigation, leadership, environmental ethics, and technical skills.
Tom Brown Jr.’s Tracker School: One of the most respected primitive skills schools in North America. Focuses on tracking, awareness, and traditional survival skills.
Wilderness Medical Associates: Offers WFA (Wilderness First Aid) and WFR courses widely available across North America.
The Questions People Actually Ask About Wilderness Survival Skills
What’s the single most important wilderness survival skill?
The STOP method — the cognitive framework that prevents panic and enables rational decision-making under stress. Without it, all other wilderness survival skills are less effective because they require clear thinking to apply correctly. After the STOP method, the priority sequence follows the Rule of Threes: shelter, water, fire, food.
How long does it actually take to develop real wilderness survival competence?
Basic wilderness survival skills — enough to significantly improve your chances in a common emergency scenario — can be developed in 30 to 60 hours of deliberate practice spread over 4 to 8 weeks. This includes reliable fire starting with a ferro rod, basic shelter construction, water purification using multiple methods, basic compass navigation, and fundamental first aid. Mastery of primitive skills — bow drill fire starting, advanced foraging, celestial navigation — requires significantly more time. Typically 6 to 12 months of regular practice.
Do I really need to go into the wilderness to learn these skills?
No. Many of the most important wilderness survival skills can be practiced in urban and suburban environments. Fire starting in a backyard. Knot tying anywhere. Navigation in city parks and neighborhoods. First aid in a classroom. Mental resilience techniques in everyday life. Wilderness practice is valuable for integration and scenario testing — but it is not required for developing foundational competence.
What do military SERE programs teach first?
Military survival training — SERE (Survival, Evasion, Resistance, and Escape) — prioritizes: the STOP method and survival psychology, shelter construction, water procurement and purification, fire starting, signaling and communication, navigation, and food procurement. The sequence mirrors the Rule of Threes hierarchy exactly.
What’s the single most dangerous mistake beginners make?
Moving without a plan. The instinct to do something — to move toward help, to not just sit there — kills people in wilderness survival situations. Moving when lost increases the search area for rescuers, exhausts energy reserves, and often leads people further from help. The STOP method exists specifically to counter this instinct.
Are wilderness survival skills different for different environments?
The fundamental wilderness survival skills are the same across environments — the Rule of Threes applies universally. However, the specific application of each skill varies significantly by environment. Desert survival prioritizes water procurement and heat management above shelter. Arctic survival prioritizes thermal regulation and shelter above all else. Tropical survival must account for biological hazards — insects, venomous animals, parasites — that temperate environments don’t present. Learn the foundational skills first, then study the specific adaptations for your most likely environments.
Is solo wilderness survival harder than group survival?
Solo wilderness survival scenarios are psychologically more demanding — there is no one to share the cognitive and physical load, no one to provide perspective when decision-making is impaired, and no one to assist if you’re injured. Group scenarios introduce social dynamics that can either amplify or diminish the group’s collective survival capacity. The fundamental skills are the same; the application differs. In group scenarios, leadership, communication, and task distribution become critical survival variables.
Products / Tools / Resources
These are the items that consistently come up in serious wilderness survival skills conversations — not because they’re the most expensive or the most tactical-looking, but because they actually work when it matters.
Fire Starting
BIC lighters (multipack) — The most reliable fire-starting tool available. Carry two. Always. They’re inexpensive, they work in most conditions, and they provide hundreds of ignitions. The survival community’s open secret is that most experienced instructors carry a BIC before anything else.
Bayite ferro rod (6-inch, large) — The standard recommendation for wilderness survival kits. Produces sparks at 5,400°F, works when wet, lasts for thousands of strikes. The 6-inch version is significantly easier to use than smaller rods, especially with cold hands.
UCO Stormproof matches — Waterproof, windproof, and burn for approximately 15 seconds each. Reliable backup when a lighter fails.
Shelter
Aqua Quest Guide tarp (10×10) — Silnylon construction, fully waterproof, and versatile enough for every tarp configuration in this guide. Lighter than most alternatives at the same price point.
Emergency Mylar space blankets (multipack) — Reflect up to 90% of body heat. Weigh almost nothing. Take up almost no space. Every wilderness survival kit, every hiking pack, every car emergency kit should have at least two.
Paracord (550 lb, 100 feet) — The most versatile cordage available for wilderness survival applications. Used for shelter construction, lashing, improvised first aid, and dozens of other applications. Buy more than you think you need.
Water
Sawyer Squeeze water filter — Rated for 100,000 gallons, weighs 3 ounces, and removes 99.99999% of bacteria and protozoa. The most versatile portable water filtration option available. Pairs with a Nalgene bottle for a complete water procurement system.
Potable Aqua chlorine dioxide tablets — Lightweight, inexpensive, and effective against bacteria, viruses, and Cryptosporidium. The backup to your backup. Keep a bottle in every kit.
SteriPen Adventurer Opti UV purifier — For situations where viral contamination is a concern. Treats 1 liter in 90 seconds. Requires batteries — carry spares.
Suunto A-10 compass — The most recommended entry-level compass for beginners. Accurate, durable, and straightforward to use. Includes a declination scale and magnifying lens.
National Geographic Trails Illustrated maps — Waterproof, tear-resistant topographic maps for most major wilderness areas in North America. Buy the map for your region before you need it.
Tom Brown Jr.’s “Tom Brown’s Field Guide to Wilderness Survival” — One of the most comprehensive and readable wilderness survival skills books available. Covers primitive skills with the kind of detail that actually translates to field competence.
First Aid
Adventure Medical Kits Ultralight/Watertight .7 — The most recommended compact wilderness first aid kit for day hikers and backpackers. Includes a comprehensive first aid guide and enough supplies to manage most common wilderness injuries.
SAM splint (36-inch) — Lightweight, moldable, and reusable. The standard improvised splinting tool used by wilderness medicine practitioners. Weighs almost nothing and fits in any pack.
Israeli bandage (emergency pressure bandage) — The most effective improvised wound closure and pressure bandage available. Used by military and emergency medical personnel worldwide.
Signaling
UST StarFlash signal mirror — Military-spec signal mirror with a sighting hole for accurate aiming. Visible to aircraft at up to 10 miles in clear conditions. Weighs less than an ounce.
Fox 40 Classic pealess whistle — The standard recommendation for wilderness survival kits. Pealess design means it works in freezing temperatures when pea whistles fail. Audible at distances of over a mile.
Training Resources
Wilderness Medical Associates WFA course — The most accessible wilderness first aid certification for recreational outdoor users. 16 to 20 hours of instruction, widely available, and genuinely useful.
NOLS Wilderness Medicine — The textbook used in most wilderness medicine courses. Comprehensive, evidence-based, and readable enough to use as a self-study resource.
Primitive Technology (YouTube channel) — The most-watched and most accurate primitive skills channel available. Watching someone actually build a debris hut or start a bow drill fire is worth more than reading about it.
Survival Dispatch (survivaldispatch.com) — One of the most consistently reliable online resources for wilderness survival skills content. Covers everything from primitive skills to modern gear with a practical, non-sensationalist approach.