
Hey there! Some links on this page may be affiliate links which means that, if you choose to make a purchase, I may earn a commission at no extra cost to you. I greatly appreciate your support. Read the full disclosure here.
How To Survive the First 72 Hours After a Disaster
The first 72 hours after a disaster are critical for survival, focusing on immediate threat assessment, securing clean water, and finding safe shelter. Preparation—such as having a ready emergency kit and a clear family plan—dramatically increases your chances of staying safe. Acting quickly and calmly during this window can mean the difference between life and death.
Key Takeaways
- The first 72 hours after a disaster are the most dangerous, and the most controllable with preparation.
- Assess immediate threats (fire, structural damage, gas leaks) before anything else.
- The human body can survive roughly three days without water, making clean water your top priority after safety.
- Know your shelter-in-place vs. evacuation criteria before disaster strikes, not during.
- A pre-built 72-hour emergency kit removes guesswork when seconds matter.
- Establish an out-of-state contact point for family reunification, local lines are often overloaded.
- Vulnerable household members (children, elderly, disabled individuals) need a dedicated action plan.
- Panic is the enemy of survival, controlled breathing and a practiced plan are your best psychological tools.
- Most critical mistakes happen in the first hour: people freeze, grab the wrong things, or move without assessing danger.
- Preparation done before a disaster is worth more than any gear purchased after one.
Find this useful? Add us as a preferred source on Google and more of what we publish will show up in your results.
What Should You Do Immediately After a Disaster
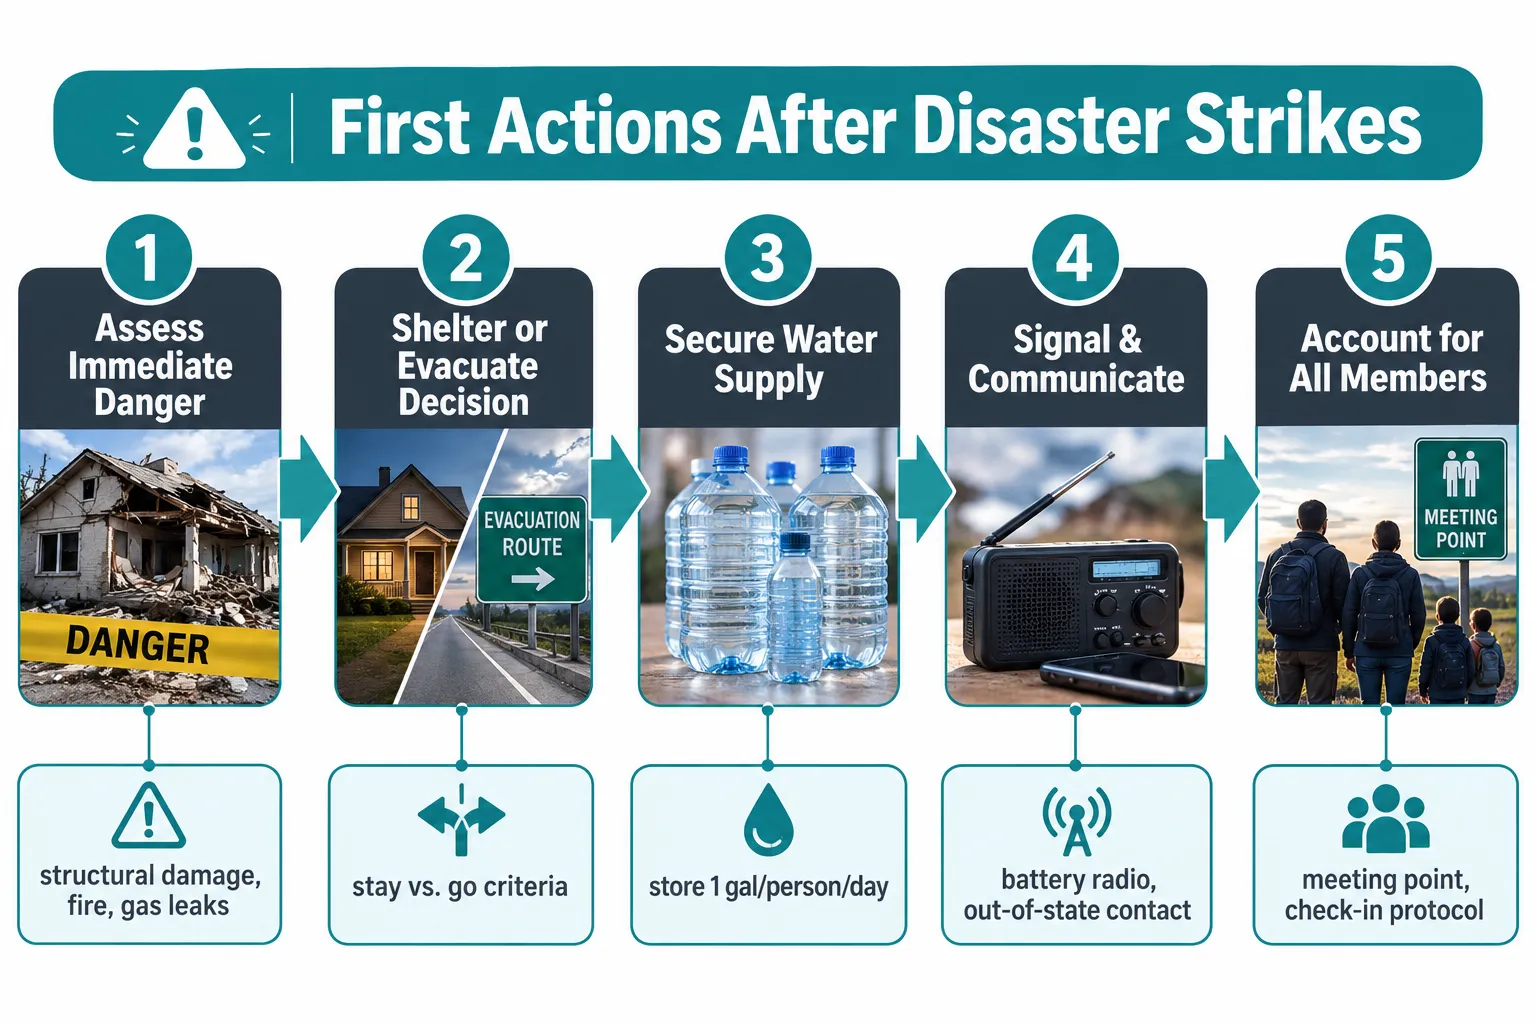
The first minutes after a disaster determine whether the next 72 hours are manageable or catastrophic. Stop, assess, and act in that order, never the reverse.
Before grabbing a bag or making a call, run through a rapid threat assessment:
- Structural integrity: Is the building you’re in safe to stay in? Look for cracks in load-bearing walls, leaning floors, or a compromised roof.
- Fire or gas: Smell gas? Leave immediately and do not use light switches. See flames? Evacuate before anything else.
- Utility hazards: Downed power lines, flooding near electrical panels, and burst pipes all create secondary threats that kill people who survived the initial event.
- Injuries: Check yourself and those around you before moving anyone. Moving an injured person incorrectly can worsen spinal or neck injuries.
Once you’ve confirmed no immediate life threat, move to your next priority: shelter, water, and communication, in that order.
Shelter In Place vs. Evacuation: How To Decide in the First 72 Hours
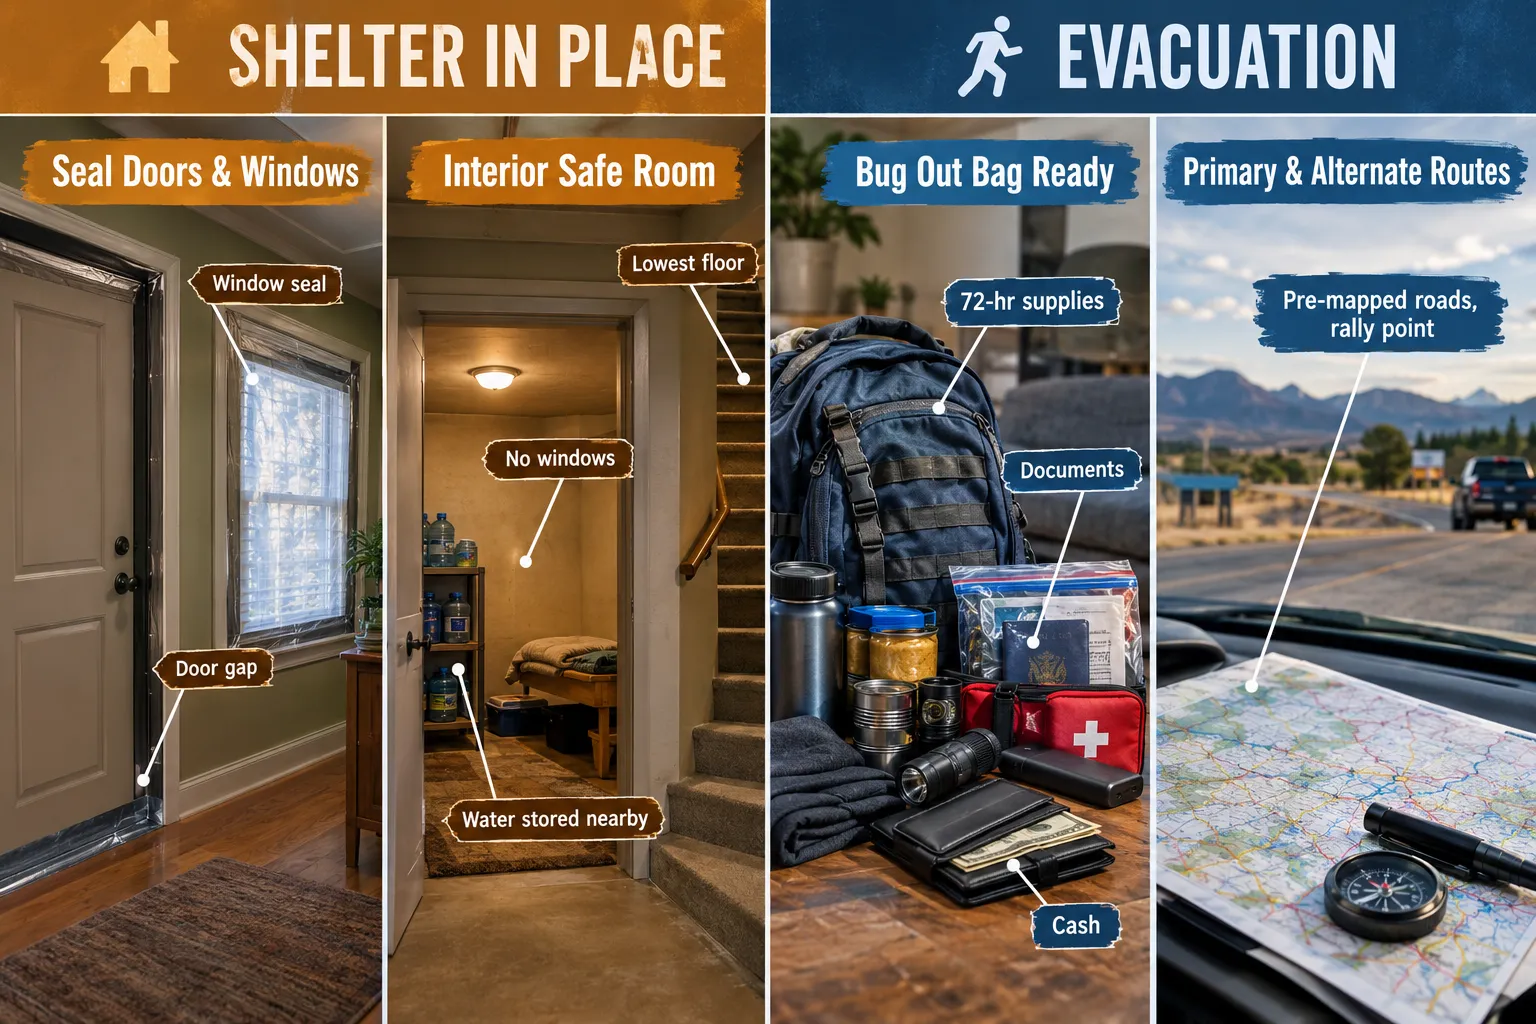
Shelter in place means staying where you are and securing your environment. Evacuation means leaving for a safer location. The right choice depends on the type of disaster, your location, and official guidance, and you need to decide fast.
Shelter in place if:
- There is an airborne chemical, biological, or radiological threat outside
- Roads are impassable due to flooding, debris, or downed lines
- Official emergency broadcasts instruct you to stay
- Your home is structurally sound and you have supplies for at least 72 hours
Evacuate if:
- Your home has been damaged and is unsafe
- A wildfire, flood, or tsunami is approaching your location
- Officials have issued a mandatory evacuation order
- You have no water, no food, and no way to get them where you are
For urban-specific scenarios, the guide to surviving in a city during a natural disaster covers this decision in detail for high-density environments. If you’re dealing with a grid-down situation specifically, the grid-down scenario guide covering the first 72 hours of a power outage is essential reading.
One common mistake: people wait too long to evacuate because leaving feels like giving up. If there’s any doubt about structural safety or incoming hazards, leave early. You can always return. You cannot undo a decision to stay in a collapsing building.
How To Find Shelter in the First 72 Hours After a Disaster
Safe shelter is your first physical priority after immediate threats are neutralized. Shelter protects you from exposure, secondary hazards, and psychological deterioration.
If your home is intact and safe, stay there. It’s the best shelter you have, it’s stocked, familiar, and defensible. If you must leave, prioritize in this order:
- A pre-designated rally point (ideally agreed upon before the disaster)
- A trusted neighbor or family member’s home outside the affected zone
- An official emergency shelter (check local emergency management or FEMA broadcasts)
- A vehicle, a last resort, but better than exposure
If you’re sheltering in place, seal gaps around doors and windows with tape and damp towels if there’s an air quality threat. Move to the lowest interior floor during high winds. For apartment dwellers, the guide to surviving in an apartment without power, water, or heat addresses shelter-specific challenges that single-family homeowners don’t face.
How To Get Clean Water After a Disaster
The human body begins to deteriorate from dehydration within 24 hours. Clean water is non-negotiable in the first 72 hours, and municipal systems are often compromised or contaminated after a major disaster.
FEMA recommends storing at least one gallon of water per person per day. For a family of four, that’s 12 gallons for a 72-hour period. If you haven’t stored water in advance, here’s how to source and purify it:
- Tap water (if pressure remains): Fill every container immediately after a disaster, pressure may fail within hours.
- Water heater tank: Most residential water heaters hold 30-80 gallons of drinkable water.
- Toilet tank (not bowl): The tank water is typically clean and safe.
- Boiling: Bring water to a rolling boil for at least one minute (three minutes above 6,500 feet elevation).
- Chemical treatment: Unscented liquid chlorine bleach (6-8.25% sodium hypochlorite), 8 drops per gallon, wait 30 minutes.
- Filtration: A quality portable filter (such as a Sawyer Squeeze or LifeStraw) removes bacteria and protozoa but does not remove viruses or chemical contaminants.
For a deeper breakdown of storage and purification methods, the ultimate emergency water storage and purification guide covers every scenario. And if you want to understand exactly what’s at stake physiologically, read how long you can survive without clean water.
How Long Can You Survive Without Water vs. Food
Water is the binding constraint. The general survival rule is three minutes without air, three days without water, and three weeks without food. Food is not a 72-hour emergency, water is.
| Resource | Survival Window | First 72-Hour Priority |
|---|---|---|
| Water | ~3 days | Critical, act within first hour |
| Food | ~3 weeks | Important but not urgent |
| Warmth/Shelter | Hours in extreme cold | Critical in cold/wet conditions |
| Sleep/Rest | ~11 days (cognitive decline begins sooner) | Manage in shifts if needed |
The practical implication: spend your first-hour energy securing water and shelter, not cooking or foraging. A person who is warm, hydrated, and sheltered can function effectively for days without food. A dehydrated person cannot make good decisions, cannot move effectively, and becomes a liability to everyone around them.
Best Emergency Supplies Kit for the First 72 Hours
A pre-built 72-hour emergency kit removes the need to think under pressure. When a disaster hits, the time for decisions has passed, you execute what you’ve already prepared.
Core 72-hour kit essentials:
- Water: 1 gallon per person per day (minimum)
- Food: Non-perishable, calorie-dense items (energy bars, canned goods, freeze-dried meals)
- First aid kit with prescription medications for at least 7 days
- Battery-powered or hand-crank NOAA weather radio
- Flashlights with extra batteries
- Multi-tool or utility knife
- Copies of critical documents (ID, insurance, medical records) in a waterproof bag
- Cash in small bills (ATMs and card readers fail during power outages)
- Dust masks or N95 respirators
- Whistle for signaling
- Local maps (printed, do not rely on phone GPS)
- Warm clothing and emergency mylar blankets
For a complete build-out, the ultimate guide to building a 72-hour emergency kit walks through every category with specific product recommendations. If budget is a concern, there’s also a version of the 72-hour emergency kit built for under $50.
How To Treat Injuries Without Medical Help After a Disaster
In the first 72 hours, professional medical help may not be available. Knowing basic trauma care is not optional, it is a survival skill.
Prioritize in this order:
- Bleeding control: Apply direct pressure with a clean cloth. Do not remove the cloth if it soaks through, add more on top. Tourniquets (applied 2-3 inches above the wound) are appropriate for life-threatening limb bleeding.
- Airway: An unconscious person should be placed in the recovery position (on their side) to prevent choking.
- Shock: Keep the injured person warm, calm, and lying down with legs elevated (unless spinal injury is suspected).
- Burns: Cool with room-temperature water for 10-20 minutes. Do not use ice, butter, or toothpaste.
- Fractures: Immobilize the limb with improvised splints (sticks, rolled magazines) and padding. Do not try to reset bones.
For a comprehensive list of what belongs in a trauma-ready kit, see 47 things every prepper first aid kit needs.
What if you’re injured and can’t move? Signal for help using a whistle (three blasts is the universal distress signal), a mirror, or bright-colored fabric. Conserve energy. Stay warm and hydrated. If you have a phone with any signal, text rather than call, texts often go through when voice calls cannot.
How To Communicate When Phones Don’t Work After a Disaster
Cell networks are frequently overloaded or knocked out in the first hours after a major disaster. Knowing your backup communication options before that happens is what separates a prepared household from a panicked one.
Communication hierarchy when phones fail:
- Text messaging: Texts use less bandwidth than voice calls and often get through when calls cannot.
- Battery or hand-crank NOAA weather radio: Receives official emergency broadcasts without any network dependency.
- Out-of-state contact: Designate one person outside your region as a family check-in point. Local lines jam; long-distance calls often connect more easily.
- Pre-agreed meeting points: If communication fails entirely, everyone in the household should know two rally points, one near home, one further away.
- Ham radio or GMRS radio: For serious preppers, a handheld radio provides communication independent of any infrastructure.
For a full system covering every scenario, the emergency communication plan guide for preppers is the most thorough resource available.
How To Find Family Members After a Disaster
Reuniting with separated family members in the first 72 hours requires a pre-established plan, not improvisation. The time to agree on meeting points and check-in protocols is before a disaster, not during one.
Steps to locate separated family members:
- Check pre-agreed rally points first.
- Contact your designated out-of-state family coordinator.
- Register yourself and check for family members at the American Red Cross Safe and Well registry (safeandwell.communityos.org).
- Check with local emergency shelters, they maintain lists of displaced persons.
- Use social media check-in features (Facebook Safety Check activates during declared disasters).
For families with children, the kids emergency preparedness guide covers age-appropriate protocols for teaching children what to do if they’re separated from adults.
How To Keep Kids Safe During the First 72 Hours
Children face unique risks in the first 72 hours: they dehydrate faster than adults, they’re more vulnerable to toxic air and temperature extremes, and they’re more likely to panic without clear guidance from a trusted adult.
Practical steps for keeping children safe:
- Give children a role. Even young children can carry a small backpack with their own water bottle and a comfort item. Having a job reduces panic.
- Use simple, honest language. Children handle truth better than uncertainty. “We’re going to our safe place now” is more calming than vague reassurance.
- Every child old enough to speak should memorize a parent’s phone number and the family’s out-of-state contact.
- Children should have an ID card in their pocket or backpack with name, address, parent contact, and any medical needs.
- Infants and toddlers need additional supplies: formula, diapers, medications, and familiar comfort items to reduce distress.
Who Needs Special Help During the First 72 Hours of a Disaster
Elderly individuals, people with disabilities, and those with chronic medical conditions face compounding risks in the first 72 hours. Standard emergency plans often fail them because they’re built for able-bodied adults.
Key considerations:
- Medications: A 7-day supply of all prescription medications should be part of every emergency kit. Insulin and other temperature-sensitive medications require a cooler with ice packs.
- Mobility: Pre-identify neighbors or community members who can assist with evacuation. Know the weight and dimensions of any mobility equipment.
- Medical equipment: Oxygen concentrators, CPAP machines, and powered wheelchairs all fail without electricity. Have a plan for each device. The emergency preparedness guide for disabled individuals covers this in full.
- Seniors: Older adults are more vulnerable to heat, cold, and dehydration, and may be less likely to ask for help. The 9 essential disaster prep strategies for seniors addresses their specific needs directly.
- Pets: Animals are family members and require their own emergency plan. The ultimate pets emergency preparedness checklist ensures no one gets left behind.
How To Stay Calm and Manage Panic After a Disaster
Panic is physiologically normal after a disaster, and it is also one of the most dangerous responses you can have. Panic narrows thinking, impairs decision-making, and spreads to others around you.
The most effective tool for managing panic is a practiced plan. When the brain has a script to follow, it defaults to that script instead of freezing. This is why preppers who have rehearsed their response consistently outperform unprepared people in the same scenario, not because they’re braver, but because they’ve removed the need to think from scratch under pressure.
Immediate techniques when panic sets in:
- Tactical breathing: Inhale for four counts, hold for four, exhale for four. This activates the parasympathetic nervous system and reduces the cortisol spike.
- Name five things you can see. Grounding exercises interrupt the panic loop and bring attention back to the present.
- Assign tasks. In a group, panic spreads when people have nothing to do. Give everyone a job immediately.
- Limit information overload. In the first hour, act on what you know. Speculation about what might happen is a panic accelerant.
For a deeper look at the psychology behind disaster response, the survival mindset and mental preparation guide is worth reading before you ever need it.
What Mistakes Do People Make in the First 72 Hours of a Disaster
Most survival failures in the first 72 hours aren’t caused by lack of gear, they’re caused by predictable decision errors made under stress.
The most common and costly mistakes:
- Freezing instead of acting. The “normalcy bias”, the brain’s tendency to assume things will return to normal, causes people to delay action by critical minutes or hours.
- Grabbing the wrong things. People under stress grab familiar, comfort items instead of survival-critical supplies. A pre-packed kit solves this.
- Not turning off utilities. A gas leak that ignites hours after the initial event kills people who survived the disaster itself. Know where your shutoffs are.
- Drinking unverified water. Contaminated water causes illness that compounds every other survival challenge.
- Ignoring official instructions. Evacuation orders exist for a reason. People who shelter in place during mandatory evacuations often require dangerous rescues, or don’t survive to need one.
- Failing to account for everyone. Assuming family members are fine without confirming leads to missed reunification windows.
- Draining phone battery on social media. In the first 72 hours, your phone is a survival tool. Use it that way.
FAQ
How long does FEMA say you should be prepared to survive on your own after a disaster?
FEMA recommends that every household be prepared to be self-sufficient for a minimum of 72 hours after a disaster, though they increasingly encourage preparation for up to two weeks, since emergency services are often overwhelmed in the immediate aftermath.
What’s the single most important thing to do in the first 10 minutes after a disaster?
Assess immediate physical threats, fire, gas leaks, structural damage, and injuries, before taking any other action. Moving without assessing can turn a survivable situation into a fatal one.
Can you drink water from a stream or river after a disaster?
Not without treatment. Natural water sources can be contaminated with bacteria, protozoa, chemicals, and debris after a disaster. Boil, filter, or chemically treat any water before drinking it.
What if I don’t have a 72-hour kit ready?
Work with what you have. Fill containers with tap water immediately. Gather food that requires no cooking. Find flashlights, warm clothing, and any medications. A partial kit assembled in 15 minutes is better than nothing.
Should I use my fireplace or camp stove indoors for heat or cooking after a disaster?
Never use a camp stove, charcoal grill, or generator indoors, carbon monoxide poisoning is a leading cause of post-disaster deaths. Fireplaces with functioning chimneys are generally safe for heating.
How do I know if it’s safe to return home after evacuating?
Wait for official clearance from local emergency management or law enforcement. Do not return to an area under mandatory evacuation, even if the immediate threat appears to have passed.
What’s the best way to signal for rescue if I’m trapped?
Three blasts on a whistle, three flashes of a light, or three of any repeated signal is the universal distress code. A whistle carries further than a voice and requires far less energy.
How do I keep my phone charged when there’s no power?
A portable power bank (charged before the disaster) is the most reliable solution. Solar chargers work but are slow. In a vehicle, use the car charger, but do not run the engine in an enclosed space.
What if a family member has special medical needs and we have to evacuate quickly?
Prepare a dedicated medical go-bag in advance: medications for at least 7 days, a list of conditions and dosages, doctor contact information, and any critical equipment. Keep it near the door and ready to grab in under 60 seconds.
Is it safe to eat food from a refrigerator after a power outage?
The USDA advises that a refrigerator keeps food safe for about four hours without power if kept closed. A full freezer maintains temperature for approximately 48 hours. When in doubt, throw it out, foodborne illness in a disaster scenario is a serious threat.
How do I prepare my kids to handle a disaster without panicking?
Practice. Run family drills, teach children their address and a parent’s phone number, and give them age-appropriate roles in the emergency plan. Children who know what to expect are significantly calmer when the unexpected happens.
What’s the difference between a 72-hour kit and a bug-out bag?
A 72-hour emergency kit is typically kept at home for shelter-in-place scenarios. A bug-out bag is a portable kit designed to be grabbed quickly for evacuation. Both serve the same time window but are optimized for different scenarios. The complete bug-out bag guide for building a 72-hour kit covers the portable version in depth.
Conclusion
Knowing how to survive the first 72 hours after a disaster is not about having the most gear or the most elaborate plan. It comes down to three things: a clear-headed assessment of immediate threats, access to water and shelter, and a practiced plan that removes guesswork when your brain is under maximum stress.
The window between a disaster striking and professional help arriving is real. FEMA acknowledges it. Emergency managers plan around it. The households that come through those 72 hours intact are almost always the ones that prepared before the event, not the ones who improvised during it.
Start with the fundamentals. Build your 72-hour kit. Establish your family communication plan. Know your shelter-in-place and evacuation criteria. Identify the vulnerable members of your household and build a specific plan for each of them. Then practice it, because a plan that lives only on paper is not a plan, it’s a wish.
For a structured starting point, the 4-layer disaster plan based on FEMA protocol is one of the most practical frameworks available for building a complete family response system.
Products, Tools, and Resources Worth Having
- NOAA hand-crank emergency radio (Midland ER310 or similar): Receives weather alerts and emergency broadcasts without any power or network dependency. Essential for the first 72 hours.
- Portable water filter (Sawyer Squeeze or LifeStraw): Lightweight, reliable, and capable of filtering hundreds of gallons from natural sources.
- Portable power bank (Anker 20,000mAh or higher): Keeps phones, radios, and medical devices running through multiple charge cycles.
- Trauma first aid kit (IFAK-style with tourniquet, hemostatic gauze, and chest seal): The standard household first aid kit is not adequate for disaster-level injuries.
- Printed local maps: Download and print your county and regional maps now. GPS fails. Paper doesn’t.
- Waterproof document bag: Copies of IDs, insurance policies, medical records, and cash stored in a fireproof, waterproof container.
- Freeze-dried food supply: A 72-hour supply of calorie-dense freeze-dried meals requires no refrigeration, has a 25-year shelf life, and takes up minimal space.
Preparation is not a one-time purchase. It’s a system, built deliberately, tested regularly, and updated as your household changes. The 72-hour window is survivable. Make sure you’re ready for it.