
Hey there! Some links on this page may be affiliate links which means that, if you choose to make a purchase, I may earn a commission at no extra cost to you. I greatly appreciate your support. Read the full disclosure here.
Most people can start a fire on a dry summer evening. The real test comes when the sky opens up, your gear is soaked, and your body temperature is dropping. Hypothermia can set in within 30 minutes in cold, wet conditions — and fire is often the only thing standing between discomfort and a genuine medical emergency. This complete guide to the survival fire in rain step by step method covers every stage: from reading your environment and sourcing dry materials to igniting a flame that holds even in continuous downpour.
Key Takeaways
- Dry tinder is the single most critical factor in wet-weather fire starting — find it inside dead standing wood, under bark, or in your pack
- Always build a raised platform first to insulate your fire from wet ground
- A ferrocerium rod outperforms matches and standard lighters in rain because it works when wet
- The teepee and log cabin fire lays are the most reliable structures for wet conditions
- Shelter your fire during ignition — a tarp, large bark sheet, or your own body blocks wind and rain
- Never skip the tinder bundle; it is the bridge between spark and sustained flame
- Waterproof fire-starting tools cost less than $15 and belong in every bug-out bag and day pack
- If you genuinely cannot get a fire going, hypothermia prevention shifts to insulation, shelter, and movement
- Practice this method at home in controlled wet conditions before you need it in the field
How Do I Start a Fire When Everything Is Wet?
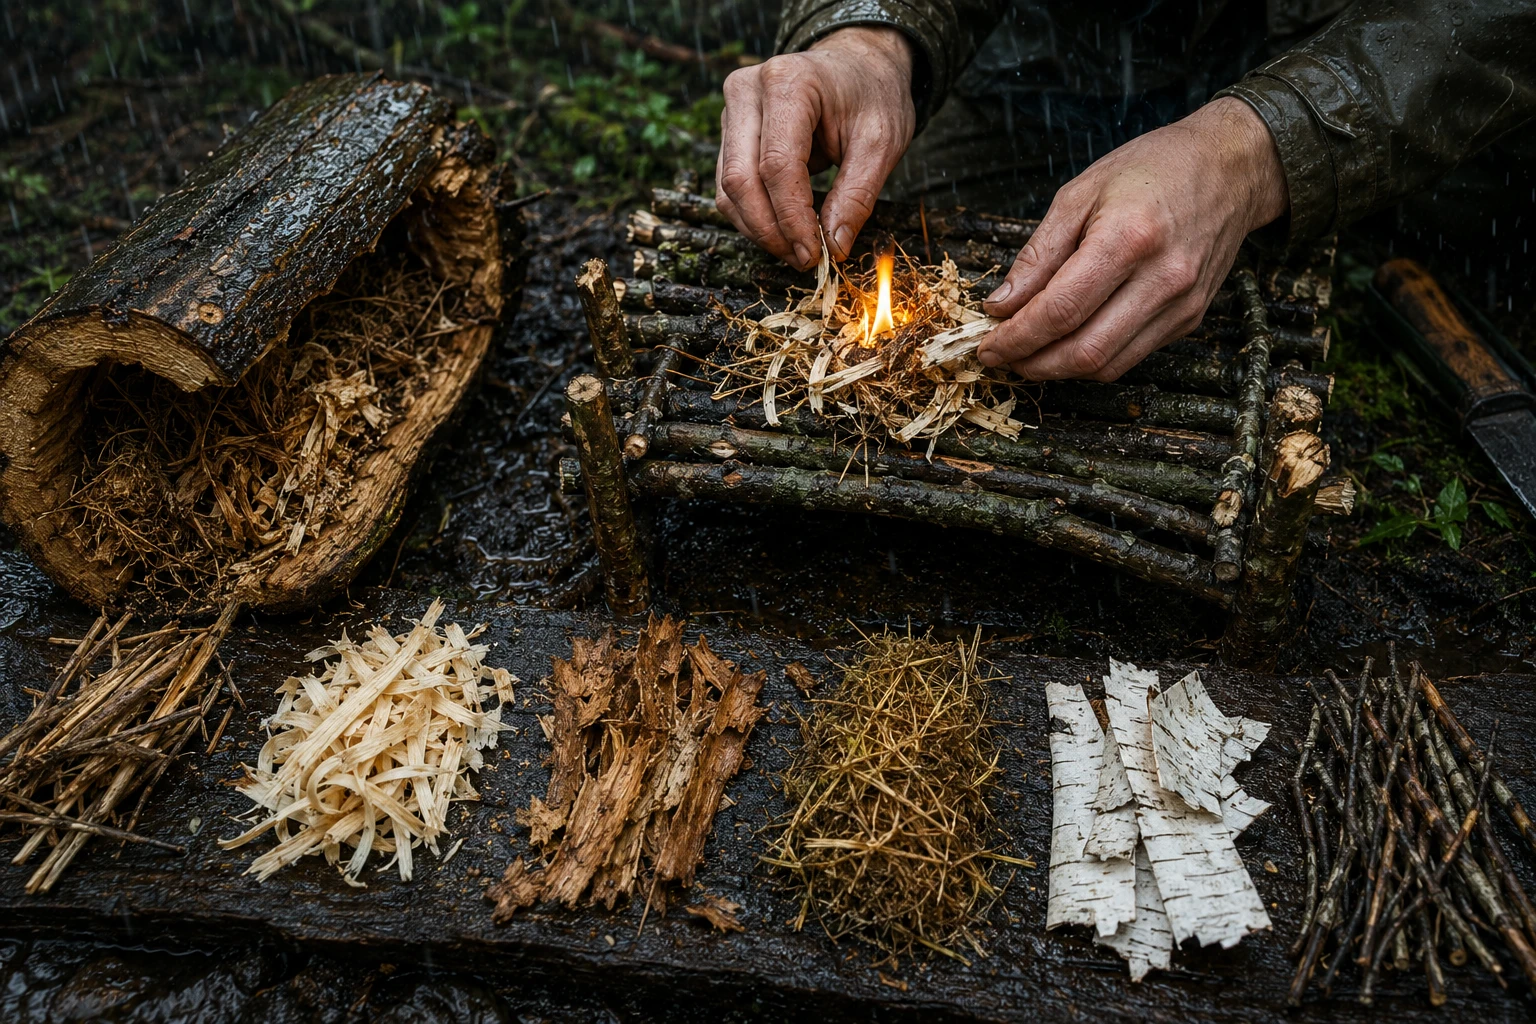
Starting a fire in wet conditions is absolutely possible, but it requires a different mindset than fair-weather fire building. The core principle: wet on the outside does not mean wet on the inside. Most natural fire-starting materials retain dry fibers beneath their surface, and your job is to find or create access to those fibers before anything else.
Here is the full survival fire in rain step by step method, broken into phases:
Phase 1: Build a Ground Platform
Before you collect a single piece of tinder, lay down a base. Use four to six wrist-thick green or semi-dry logs parallel to each other on the ground. This lifts your fire off saturated soil, which would otherwise wick heat away and drown your flame before it establishes.
Phase 2: Source Dry Tinder
This is where most people fail. They grab surface wood, which is wet. Instead:
- Split open dead standing wood (not fallen) with a survival knife — the interior is almost always dry
- Peel back outer bark on birch or cedar trees to find dry inner bark fibers
- Check the underside of large fallen logs where ground contact is minimal
- Look for dead leaves trapped under dense canopy or inside hollow stumps
- Carry commercial tinder (fatwood sticks, petroleum-based tinder tabs, or waxed jute) in a waterproof bag as a backup
Phase 3: Create a Tinder Bundle
Shape your dry fibers into a loose bird’s-nest bundle roughly the size of a softball. The bundle needs airflow — pack it too tight and it smothers. Too loose and the ember falls through.
Phase 4: Prepare Your Kindling and Fuel
Split larger pieces of wet wood to expose dry interior. Kindling should be pencil-thin to finger-thick. Stack it nearby but keep it off wet ground. Larger fuel logs go on the platform once the fire is established.
Phase 5: Create Ignition Shelter
Use a tarp, large sheet of bark, or a poncho propped at an angle to block direct rain and wind from your fire site. Even blocking 60% of rainfall dramatically improves ignition success.
Phase 6: Ignite and Nurse the Flame
Strike your ferrocerium rod (or use your lighter) into the tinder bundle. Once you see a glowing ember, fold the bundle gently around it and blow with slow, steady breath — not sharp puffs. Transfer the burning bundle to your platform and add pencil-thin kindling first, then progressively larger pieces.
Phase 7: Feed and Protect
Once the fire is 6 to 8 inches high, it generates enough heat to dry the wood above it. Add larger split logs with the dry interior facing inward and downward toward the flame. The fire becomes self-sustaining faster than most people expect.
Decision rule: If you have commercial tinder in your kit, use it for ignition and save your natural tinder-gathering energy for fuel preparation. If you have nothing, invest 80% of your time finding genuinely dry material before attempting any ignition.
What Materials Work Best for Fire Starting in Rainy Conditions?
The best natural tinder in wet weather is anything that was protected from direct moisture: the inner fibers of dead standing birch, cedar bark shreds, fatwood (resin-saturated heartwood from pine stumps), dry grass from under rock overhangs, and the fine inner wood of split hardwood. For carried materials, petroleum-based tinder tabs, waxed cotton, and commercial fatwood sticks are the most reliable because they ignite even when slightly damp.
Natural Tinder Ranked for Wet Conditions
| Material | Wet-Weather Rating | Where to Find It |
|---|---|---|
| Fatwood (pine resin wood) | ⭐⭐⭐⭐⭐ | Pine stump interiors |
| Birch bark (inner layer) | ⭐⭐⭐⭐⭐ | Peeled from standing trees |
| Cedar bark fibers | ⭐⭐⭐⭐ | Shredded inner bark |
| Dead standing wood interior | ⭐⭐⭐⭐ | Split open with knife |
| Dry grass under rocks/logs | ⭐⭐⭐ | Sheltered ground locations |
| Fallen leaves (surface) | ⭐ | Avoid — usually saturated |
| Fallen log surface wood | ⭐ | Avoid — outer layer wet |
Carried Tinder (Always Pack These)
- Petroleum jelly-soaked cotton balls (cheap, highly effective, waterproof)
- Commercial fatwood sticks
- Waxed tinder tabs or fire cubes
- Dryer lint in a sealed zip-lock (free and surprisingly effective)
For kindling, always split wet branches to expose the dry core. A good survival knife with a full tang makes this process fast and safe.
Survival Fire Techniques Compared: Which Method Is Most Reliable in Rain?
For wet conditions, the teepee fire lay and the log cabin fire lay consistently outperform other structures. The teepee concentrates heat upward to dry fuel as it burns; the log cabin creates a self-feeding structure that tolerates imperfect wood. Both work better than a flat lay in rain because they generate more vertical heat, which dries incoming fuel before it needs to burn.
Fire Lay Comparison for Rain Survival
| Fire Lay | Rain Performance | Best For | Drawback |
|---|---|---|---|
| Teepee | Excellent | Fast ignition, signal fire | Collapses as it burns |
| Log Cabin | Excellent | Long burns, damp wood | Slower to ignite |
| Star Fire | Good | Minimal wood supply | Requires constant attention |
| Lean-To | Moderate | Windy + rainy combined | Directional only |
| Flat/Hunter’s | Poor | Dry conditions only | No heat concentration |
The survival fire in rain step by step method works best with a teepee structure for ignition, transitioning to a log cabin layout once the base fire is established. This hybrid approach gives you fast ignition and sustained burn.
Cheapest Waterproof Fire-Starting Tools to Buy
For under $15 total, a survivalist can carry a fire-starting kit that works in virtually any wet condition. The three-tool minimum kit is: a ferrocerium rod, a windproof butane lighter, and a small tin of waterproof matches. Each serves as a backup for the others.
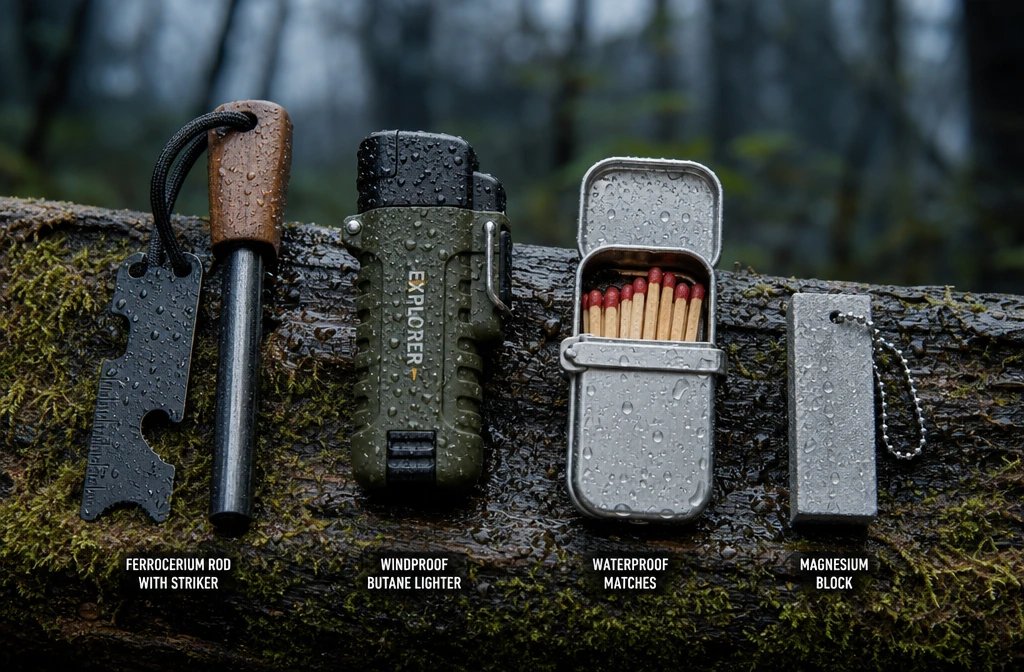
Budget Fire-Starting Kit (Under $15 Total)
- Ferrocerium rod ($5–$8): Throws sparks at approximately 3,000°F, works when wet, lasts thousands of strikes. This is the most reliable single tool for wet-weather fire starting
- Windproof/waterproof lighter ($3–$6): Brands like UCO or Zippo Storm make lighters that function in wind and light rain
- Waterproof matches ($2–$4): UCO Stormproof matches burn for 15 seconds even underwater — a genuine emergency backup
- Tinder tabs ($3–$5 for 20): Esbit or WetFire cubes burn hot enough to dry and ignite damp kindling
What to avoid: Standard paper matches fail immediately when damp. Cheap disposable lighters fail in cold and wind. Neither belongs in a survival kit. For a full breakdown of essential gear, see The Essential Survival Gear Guide.
Why Do My Matches Keep Failing When They Get Damp?
Standard matches fail in wet conditions because the ignition head absorbs moisture, which prevents the chemical reaction needed to produce a flame. Even “waterproof” matches from dollar-store camping kits are often only water-resistant, not genuinely waterproof. The striker strip on the box also degrades when wet.
Fix it with these steps:
- Store matches in a waterproof container (a small Nalgene bottle or sealed zip-lock inside a hard case)
- Keep the striker strip dry separately — wrap it in a piece of waxed paper
- Upgrade to UCO Stormproof matches, which use a different chemical compound that resists moisture
- Strike on your boot sole or a piece of dry fabric if the box striker is wet
- Treat this as a backup tool only — a ferrocerium rod is far more reliable as a primary ignition source
Emergency Fire Starting for Beginners With No Special Gear
If you have no fire-starting tools at all, friction-based methods are the fallback. The bow drill is the most practical friction fire technique for beginners, though it requires dry materials and significant practice. In rain, it becomes extremely difficult without pre-dried components.
Realistic options for zero-gear fire starting in rain:
- Bow drill with pre-dried materials: Requires a straight dry spindle (hardwood like willow or cedar), a flat dry fireboard with a notch, a handhold, and a bow strung with cordage. The friction creates an ember in the notch, which transfers to a tinder bundle. This takes 10–20 minutes even for practiced users
- Hand drill: Faster for experts, nearly impossible for beginners in wet conditions
- Friction from found materials: Extremely difficult in rain without practice — do not rely on this as a primary plan
The honest truth for beginners: Friction fire in the rain is a last resort, not a first option. The single best emergency preparedness move is carrying a ferrocerium rod in every pack, every time. It costs less than a cup of coffee and weighs almost nothing. This is one of the 14 essential survival skills that experienced preppers treat as non-negotiable.
What Are the Biggest Mistakes People Make Trying to Make Fire in Rain?
The most common mistake is using surface wood — bark, fallen branches, and ground-contact logs — without splitting them first. Wet surface wood will not ignite reliably. The second biggest mistake is skipping the ground platform, which lets wet soil kill the fire before it establishes.
Full list of critical mistakes:
- Using wet tinder: Surface materials in rain are almost always too wet. Always split wood to find the dry interior
- No ground platform: Wet soil conducts heat away from your fire and can flood it with water
- Igniting in open rain: Even light rain extinguishes early flames — always shelter your ignition point
- Building too large too fast: Start small. A fire the size of your fist is easier to establish than a bonfire
- Blowing too hard: Sharp puffs scatter ash and cool the ember. Slow, steady breath is correct
- Giving up after one attempt: Conditions change. Adjust your tinder, shelter, or technique and try again
- Not drying kindling near the fire: Once you have a small flame, use its heat to pre-dry the next layer of fuel before adding it
For broader wilderness preparedness context, the 25 Most Critical Wilderness Survival Skills guide covers fire as part of a complete survival priority framework.
Is It Possible to Start a Fire Under a Wet Tarp or in a Forest During Rainfall?
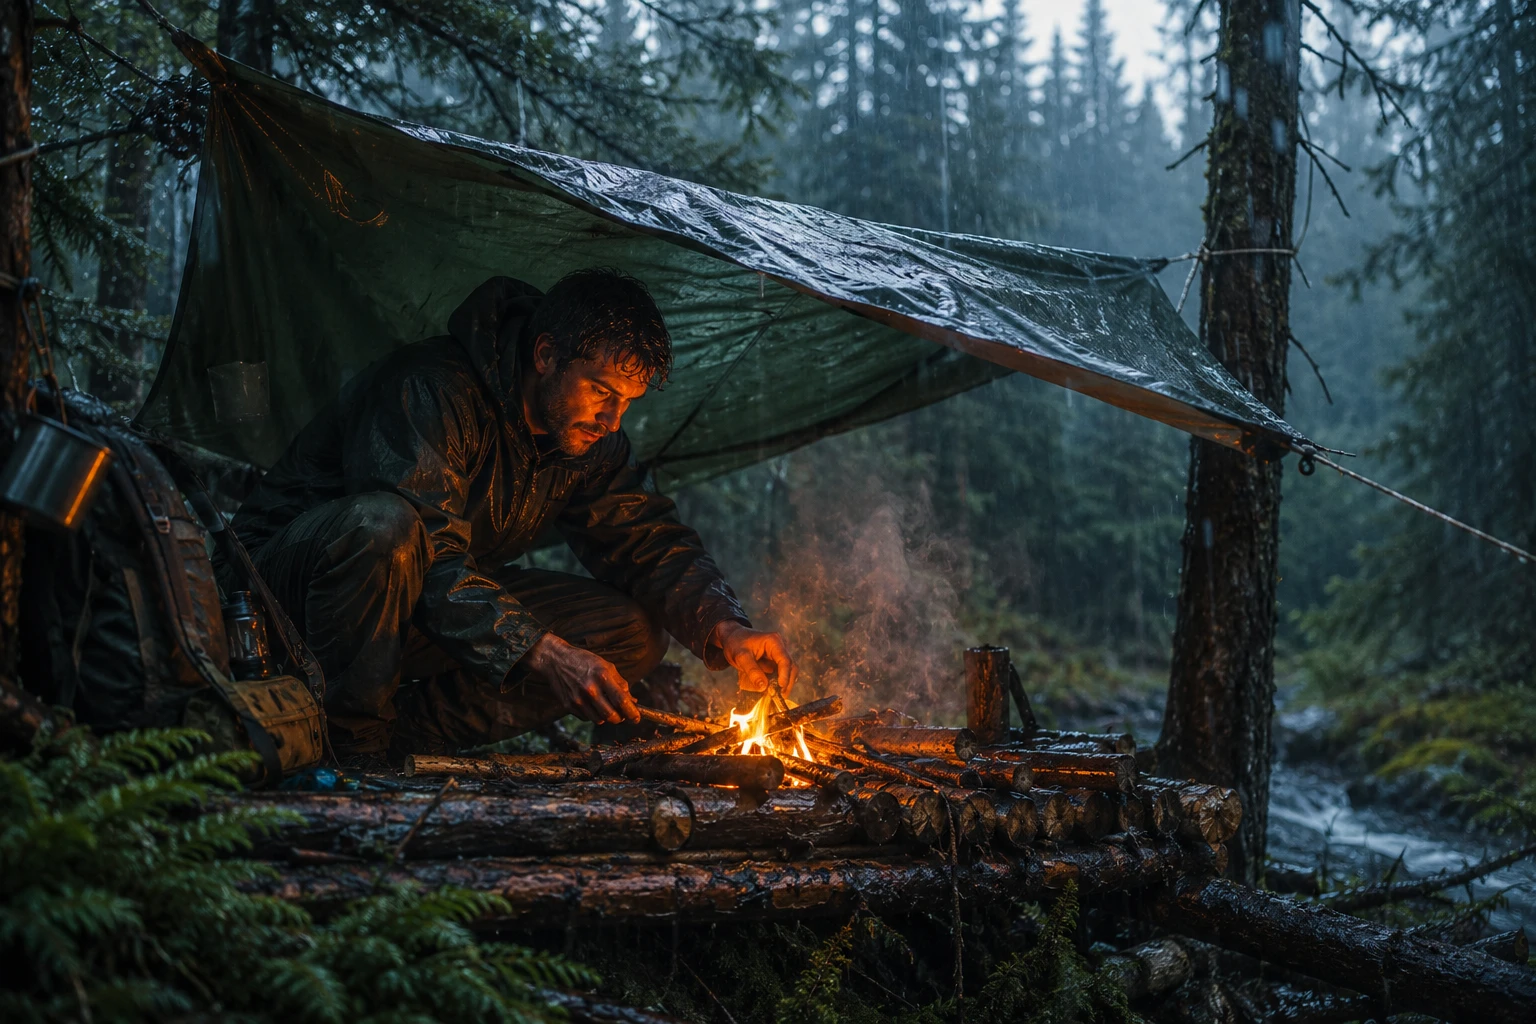
Yes — and in many cases, a forest canopy or tarp shelter makes the survival fire in rain step by step method significantly more achievable. Dense tree canopy blocks a large percentage of rainfall, and the ground beneath large conifers is often drier than open ground. A tarp angled at 45 degrees over your fire site blocks direct rain while allowing smoke to escape.
Setting up a fire shelter:
- String a tarp or emergency space blanket between two trees at a 45-degree angle, roughly 4 feet above the fire site
- Position the low edge upwind so wind pushes smoke away from you
- Keep the tarp at least 3 feet above the fire to prevent melting or ignition
- Use large sheets of bark as a secondary rain shield around the sides of the fire
Under a properly set tarp, even a moderate rainstorm becomes manageable. The fire generates enough heat to create a micro-climate that resists incoming moisture.
What Kind of Wood Burns Best When It’s Really Wet Outside?
Dead standing wood is the best option in wet conditions because it has not been in ground contact and retains dry interior fibers even after days of rain. Among species, birch, oak, and ash are preferred for their density and resin content. Pine and cedar are excellent for ignition because their natural resins repel moisture and burn hot.
Wood selection guide for wet conditions:
- Best ignition wood: Pine (resin-rich), cedar, birch bark
- Best sustained fuel: Oak, ash, hickory (dense, hot-burning)
- Avoid: Fallen logs with ground contact, green wood (living trees), wood that crumbles when split (too rotten to burn)
- Field test: Split a branch. If the interior is pale, firm, and slightly warm to the touch, it is usable. If it is dark, spongy, or smells strongly of mold, discard it
Always split wood to at least finger-thickness to expose dry interior before adding to the fire.
How Long Can You Realistically Keep a Fire Going in Continuous Rain?
A well-established fire on a raised platform, sheltered by a tarp, can burn continuously for hours even in heavy rain — provided you feed it with split wood that exposes dry interior fibers. The key threshold is fire size: once a fire reaches roughly 12 inches in height with a solid coal bed, it generates enough heat to dry incoming wood faster than rain can saturate it.
Realistic expectations:
- Light rain (under 0.1 inches/hour): A properly built fire can sustain indefinitely with normal fuel management
- Moderate rain (0.1–0.3 inches/hour): Requires a tarp shelter and consistent split-wood fuel; sustainable for hours
- Heavy rain (over 0.3 inches/hour): Extremely difficult without a tarp; fire can be maintained but requires constant attention and pre-split fuel stockpile
- Continuous overnight rain: Build a larger coal bed before dark, add large split logs, and bank the fire with ash to slow burn rate
When Should I Just Give Up on Making a Fire in Extreme Rain Conditions?
Stop attempting fire and shift to other survival priorities if: you have been trying for more than 45 minutes with no ember, your tinder supply is exhausted, or you are losing body heat faster than fire-building activity can compensate. At that point, fire-building effort itself becomes a hypothermia risk.
Alternative warming strategies when fire fails:
- Get off the ground immediately — ground contact steals body heat faster than cold air
- Use an emergency space blanket (reflective side inward) to trap radiant body heat
- Layer all available dry clothing, including inside a pack or bag
- Perform controlled physical movement (isometric exercises, walking) to generate internal heat
- Build a debris shelter using leaves, branches, and bark for insulation
Understanding your full emergency response framework matters here. The 10 Critical Bug-Out Survival Skills guide covers shelter and thermal management alongside fire as an integrated system.
First Aid and Hypothermia Risks if You Can’t Get a Fire Started
Hypothermia begins when core body temperature drops below 95°F (35°C) and can become life-threatening below 90°F (32°C). In wet, cold conditions, this can happen in under an hour for an unprepared person. Recognizing the early signs and acting immediately is as important as any fire-starting skill.
Early hypothermia warning signs:
- Uncontrollable shivering (the body’s attempt to generate heat)
- Slurred speech or difficulty concentrating
- Loss of fine motor control (fumbling with gear, difficulty striking a ferro rod)
- Pale, cold skin; blue lips or fingertips
Immediate actions if hypothermia symptoms appear:
- Stop all wet-weather exposure — get under shelter immediately
- Remove wet clothing and replace with dry insulation if available
- Use an emergency space blanket or sleeping bag
- Apply heat to core areas (armpits, groin, neck) — not extremities
- If conscious, provide warm (not hot) liquids
- Do not rub extremities — this pushes cold blood to the core
Critical note: A person showing moderate to severe hypothermia symptoms (confusion, loss of shivering, muscle rigidity) needs professional medical attention. Fire is a tool, not a substitute for emergency medical response when one is available.
For comprehensive emergency planning that includes medical scenarios, the Ultimate Family Emergency Plan Template is worth reviewing before any wilderness trip.
Survival Fire Techniques for Hikers vs. Campers vs. Wilderness Survival
The survival fire in rain step by step method applies to all three groups, but priorities and gear differ significantly.
| User Type | Primary Goal | Best Tool | Fire Lay | Key Difference |
|---|---|---|---|---|
| Day hiker | Emergency warmth | Ferro rod + tinder tabs | Teepee | Minimal kit; speed matters most |
| Backpacker/camper | Cooking + warmth | Windproof lighter + ferro rod | Log cabin | Has more gear; can carry more tinder |
| Wilderness survivor | Long-term heat + signaling | Ferro rod + natural tinder skills | Hybrid teepee/log cabin | Must rely on natural materials |
Choose your approach based on your scenario:
- Hiker lost in rain: Focus on speed — use commercial tinder, teepee lay, get warm fast
- Camper in storm: Use your gear advantage — tarp shelter first, then build a larger log cabin fire for sustained heat and cooking
- Wilderness survival (no gear): Invest time in finding genuinely dry tinder before any ignition attempt; friction fire is a last resort
For those building a comprehensive survival kit that supports all three scenarios, the 72-Hour Bug Out Bag Checklist includes fire-starting tools as a priority category.
Frequently Asked Questions
Can I really start a fire in pouring rain?
Yes, with the right technique and materials. The key is sourcing dry tinder from inside dead standing wood, building a raised platform, and sheltering the ignition point from direct rainfall. Rain on the outside of wood does not mean the inside is wet.
What is the single best fire-starting tool for wet conditions?
A ferrocerium rod. It throws sparks at approximately 3,000°F, functions when wet, and lasts thousands of strikes. Pair it with petroleum jelly-soaked cotton balls or commercial tinder tabs for the most reliable wet-weather kit.
How do I keep my tinder dry in the field?
Carry commercial tinder in a sealed waterproof bag inside your pack. For natural tinder, source it immediately before use by splitting dead standing wood — do not collect it in advance and let it sit in rain.
Does the type of wood matter that much?
Significantly. Resinous woods like pine and cedar ignite in wet conditions far more easily than non-resinous hardwoods. For sustained burning, dense hardwoods like oak and ash are best — but always split them first to expose dry interior.
What if I only have a regular lighter?
Protect the lighter from rain with your body, dry the flint wheel with clothing before striking, and use it to ignite a tinder bundle rather than trying to light wood directly. Cup your hands around the flame the moment it catches.
Is bow drill fire starting realistic in rain?
Only if your materials were pre-dried and stored dry. Wet spindles and fireboards will not generate sufficient friction heat. In field conditions during active rain, bow drill is a last resort for experienced practitioners only.
How long does it take to start a fire in rain using this method?
With practice and the right materials, 10–20 minutes from site selection to established flame. Without prior practice, expect 30–45 minutes. This is why practicing at home in controlled wet conditions (garden hose, backyard) is strongly recommended.
Should I signal with my fire in a survival situation?
Yes — once established, add green leaves or wet bark to create white smoke visible from the air. Three fires in a triangle is the universal distress signal. Smoke is often more visible in overcast, rainy conditions than on clear days.
What if the ground is completely flooded?
Build your fire platform higher — use green logs stacked in two layers, or find a rock surface, a large fallen log above water level, or a raised bank. Never attempt to build a fire directly on saturated or flooded ground.
Can hypothermia happen even in summer rain?
Yes. Hypothermia is a function of heat loss rate, not air temperature alone. Wind and wet clothing dramatically accelerate heat loss even at 50–60°F (10–15°C). Summer hikers are frequently caught off guard by this.
Do I need a tarp to make this work?
A tarp helps significantly but is not mandatory. Dense forest canopy, large overhanging rock faces, and even your own body positioned as a wind/rain block can substitute. The goal is reducing direct rainfall on your ignition point during the critical first 3–5 minutes.
What is the minimum kit I should always carry for wet-weather fire starting?
At minimum: one ferrocerium rod, one windproof lighter, and a small sealed bag of commercial tinder (cotton balls with petroleum jelly or tinder tabs). Total weight under 3 ounces, total cost under $15.
Conclusion: Build the Skill Before You Need It
The survival fire in rain step by step method is not complicated — but it absolutely requires practice before it becomes reliable under pressure. Cold hands, low visibility, and rising stress all degrade performance. The survivalists who get fires going in the worst conditions are not lucky. They have done it before, in controlled wet conditions, until the process became automatic.
Your actionable next steps:
- Assemble a fire kit this week: Ferrocerium rod, windproof lighter, waterproof matches, and a bag of petroleum jelly cotton balls. Keep one in every pack you own
- Practice splitting wood with your knife: Get comfortable finding dry interior material in wet branches
- Run a wet-weather drill: Set up a tarp in your backyard during rain and attempt a fire using only natural materials. Do this at least twice before any backcountry trip
- Learn to read wood quality: Practice the split-and-feel test on different wood species so you can identify usable fuel quickly in the field
- Review your full survival skill set: Fire is one piece of a larger picture. The 25 Most Critical Wilderness Survival Skills guide is a strong next read for anyone serious about preparedness
Being prepared is not about fear — it is about confidence. And confidence in wet-weather fire starting comes from repetition, not reading alone.
Products, Tools, and Resources Worth Having
These are practical, field-tested recommendations — not a shopping list for its own sake.
Fire-Starting Tools
- Light My Fire Swedish FireSteel Army — A large, long-lasting ferrocerium rod that throws a consistent shower of sparks. Reliable in rain, cold, and altitude. Around $15–$20 and worth every cent
- UCO Stormproof Match Kit — 25 matches that burn for 15 seconds in wind and rain. The hard case floats. A genuine backup for any kit
- Zippo Emergency Fire Starter — Waxed tinder sticks that light with a ferro rod and burn for several minutes. Compact and effective
Tinder and Fuel
- Fatwood sticks — Resin-saturated pine heartwood that lights easily even when surface-damp. Buy a small bag and split sticks into your pack before any trip
- WetFire Tinder cubes — Designed specifically for wet conditions; burn at high temperature even in standing water. Lightweight and compact
- Petroleum jelly cotton balls in a small Nalgene — The cheapest and most effective homemade tinder. Make 20 before any trip
Shelter and Support Gear
- Emergency space blanket — Doubles as a fire shelter and hypothermia prevention tool. Never leave home without one
- Lightweight silnylon tarp (8×10 ft) — The single most versatile piece of wet-weather survival gear. Shelters your fire site, your sleep area, and your gear simultaneously
For a complete gear review framework, the Essential Survival Gear Guide ranks 50 items by survival priority — fire-starting tools appear in the top tier for good reason.