
Hey there! Some links on this page may be affiliate links which means that, if you choose to make a purchase, I may earn a commission at no extra cost to you. I greatly appreciate your support. Read the full disclosure here.
Every year, search and rescue teams respond to thousands of calls from hikers and outdoor travelers who became disoriented after their phone died, lost signal, or simply failed at the worst possible moment. Knowing how to navigate in the wilderness without a phone is not a niche skill for elite survivalists, it is a fundamental competency that every person who spends time outdoors should own. This guide covers every core method, from map and compass work to reading the stars, so that if technology fails, your ability to find your way home does not.
Key Takeaways
- A baseplate compass and a 1:24,000 scale topographic map are the two most reliable navigation tools for wilderness travel.
- The sun rises in the east and sets in the west, and casts its shortest shadow due north (in the Northern Hemisphere) at solar noon, a reliable directional reference.
- Polaris (the North Star) sits within one degree of true north and is visible on clear nights in the Northern Hemisphere.
- Natural signs like moss, water flow, and tree growth can support navigation but should never be used as a sole directional method.
- If you become lost, stopping and assessing before moving is almost always safer than continuing in an unknown direction.
- Trail marking, pace counting, and terrain association are active habits that prevent getting lost in the first place.
- A topographic map’s contour lines reveal elevation changes, ridgelines, valleys, and water sources, all critical for route-finding.
- Common navigation mistakes include ignoring magnetic declination, failing to mark a starting point, and over-relying on a single method.
The core methods for navigating in the wilderness without GPS or a phone are map and compass navigation, celestial navigation (using the sun and stars), terrain association, and reading natural environmental signs. Each method has strengths and limitations, and experienced navigators combine more than one.
Here is a quick breakdown of each approach:
- Map and compass: The most reliable and precise method. Requires a topographic map and a baseplate compass.
- Celestial navigation: Uses the sun, moon, and stars to determine cardinal directions. Works well in open terrain with clear skies.
- Terrain association: Matching visible landscape features (ridges, rivers, peaks) to a map. Requires a map but not necessarily a compass.
- Natural signs: Moss growth, water flow direction, and prevailing wind indicators. Useful as supporting clues, not primary navigation.
For preppers and survivalists, the goal is to layer these methods. No single technique is foolproof in all conditions.
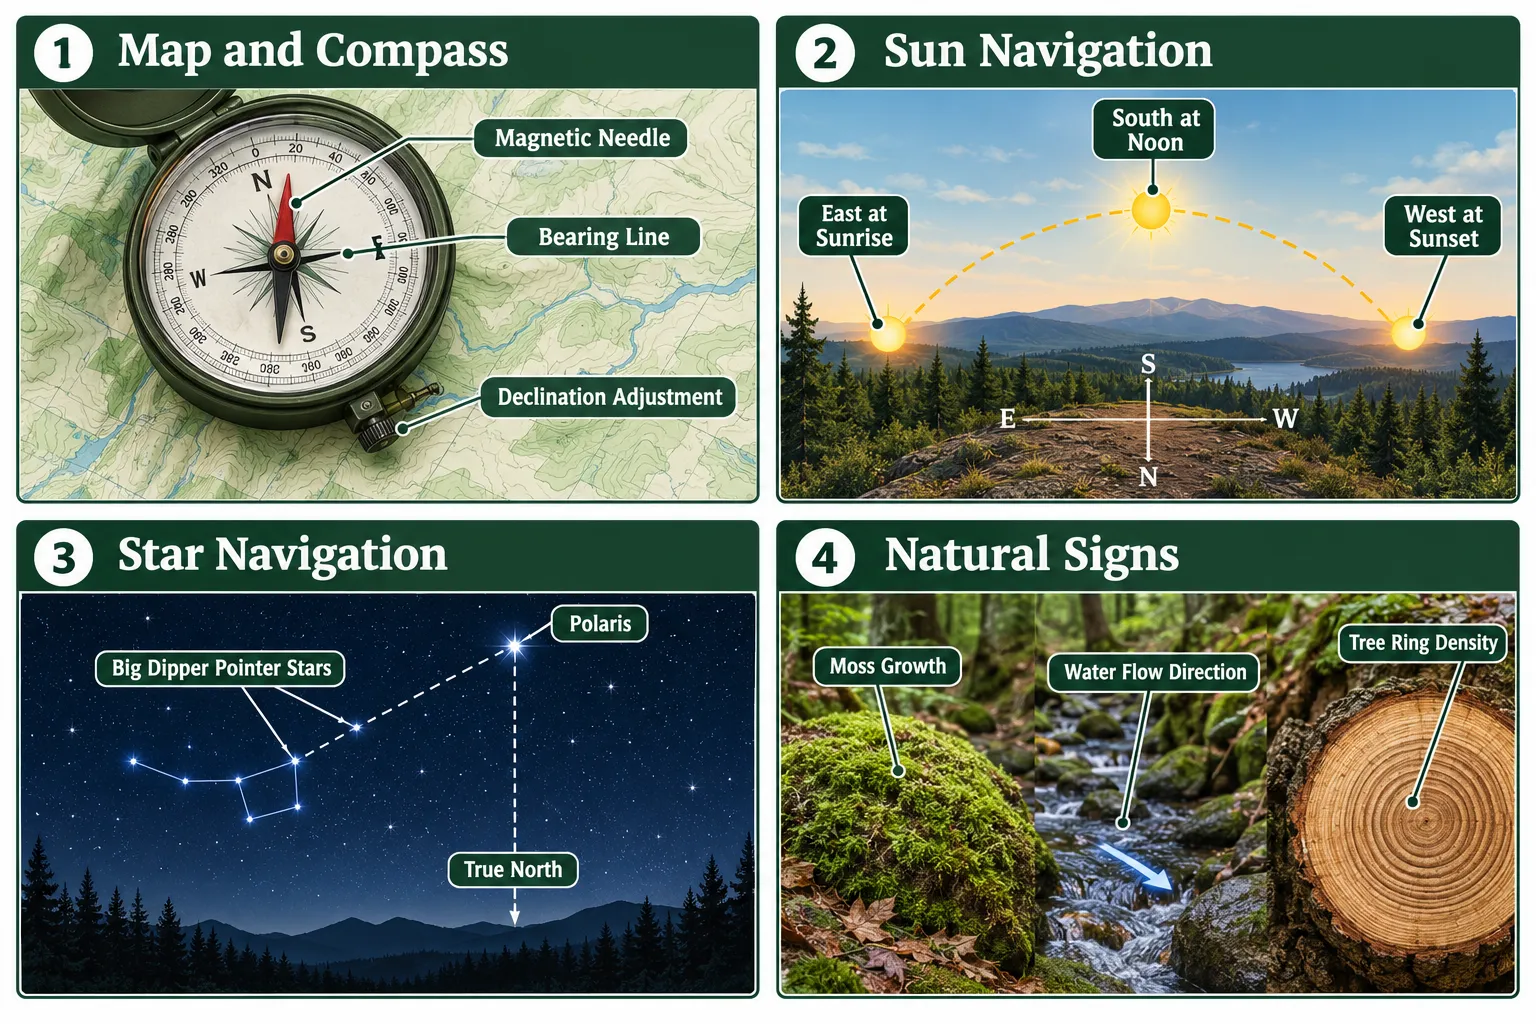
A compass and topographic map together give you the ability to determine your exact location, plot a bearing to your destination, and travel in a straight line even through dense terrain. This is the foundation of how to navigate in the wilderness without a phone.
Step-by-step process:
- Orient your map. Place the compass on the map and rotate the map until the north arrow aligns with magnetic north on the compass.
- Find your location. Use terrain association, match visible features like hills, streams, and trails to the map, to identify your current position.
- Set a bearing. Place the compass edge between your current location and your destination on the map. Rotate the bezel until the orienting lines align with the map’s north-south grid lines.
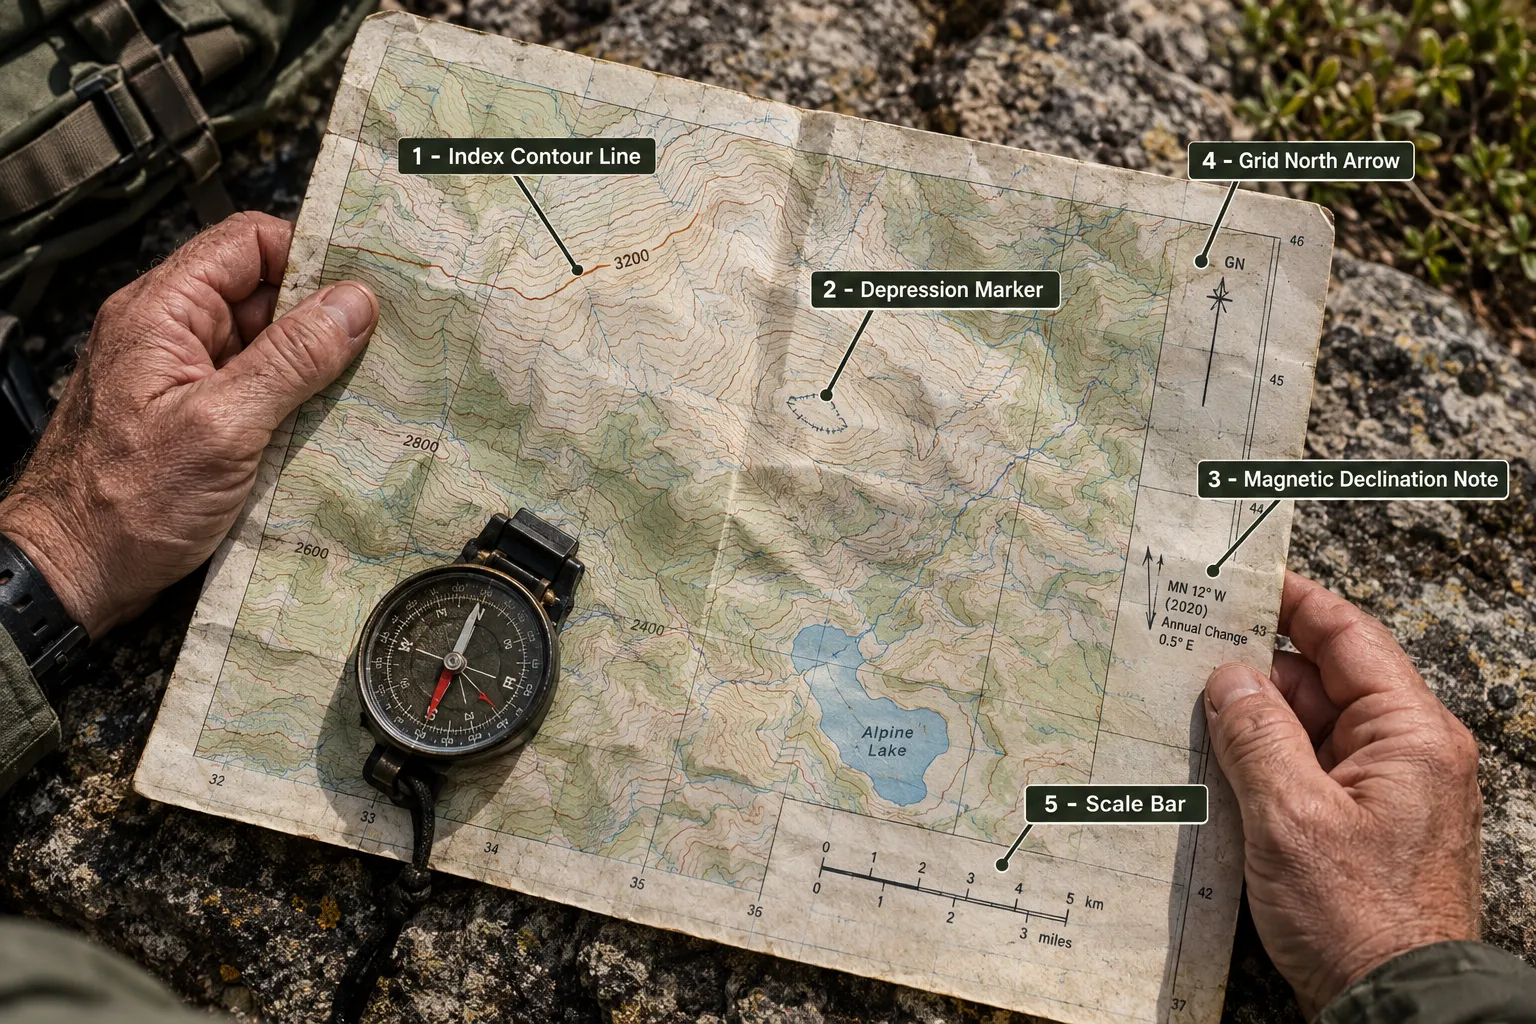
- Adjust for declination. Magnetic north and true north differ by several degrees depending on your location. This difference (magnetic declination) is printed on most topographic maps. Failing to adjust for it is one of the most common navigation errors.
- Follow the bearing. Hold the compass level, rotate your body until the needle sits in the orienting arrow, and walk toward a distant landmark in that direction. Re-check every few hundred yards.
For a deeper look at mastering this skill set, see The Complete Beginner’s Guide To Navigation Without GPS.
How To Find North Without a Compass
You can find approximate north without a compass using the sun, stars, or a simple analog watch. These methods are accurate enough to keep you moving in the right general direction when tools are unavailable.
Sun methods:
- Shadow-tip method: Push a stick into the ground and mark the tip of its shadow. Wait 15-20 minutes and mark the new shadow tip. A line drawn from the first mark to the second points roughly east. North is 90 degrees to the left of that line (in the Northern Hemisphere).
- Solar noon: The sun is due south (Northern Hemisphere) at its highest point in the sky. Shadows point due north at this moment.
- Analog watch method: Point the hour hand at the sun. The midpoint between the hour hand and the 12 o’clock position points south. North is the opposite direction.
Night method:
- Locate the Big Dipper constellation. The two stars forming the outer edge of its “cup” (Dubhe and Merak) point directly to Polaris, the North Star. Polaris sits within about one degree of true north.
Yes, star navigation is a proven and reliable method for determining direction at night, particularly in the Northern Hemisphere. Polaris (the North Star) is the most useful reference because it remains nearly stationary in the sky while all other stars appear to rotate around it.
How to find Polaris:
- Locate the Big Dipper. Draw an imaginary line through the two outermost stars of the cup (Dubhe and Merak) and extend it approximately five times that distance. The bright star at the end of that line is Polaris.
- Polaris sits at the end of the Little Dipper’s handle.
- In the Southern Hemisphere, use the Southern Cross (Crux) constellation. The long axis of the cross, extended approximately 4.5 times its length, points toward the south celestial pole.
Star navigation requires a clear sky and some practice beforehand. It is worth spending time learning these constellations before you need them.
What Is the Difference Between Using a Compass vs Landmarks
A compass gives you a precise, measurable direction that does not depend on visibility or terrain. Landmarks give you positional reference but require that you can actually see them and correctly identify them on a map.
Compass navigation:
- Works in fog, dense forest, and featureless terrain where no landmarks are visible.
- Requires a compass and ideally a map.
- Provides consistent accuracy over long distances.
Landmark navigation (terrain association):
- Works well in open terrain with distinct features like peaks, rivers, and ridgelines.
- Requires no tools if the features are obvious.
- Can break down in flat, heavily wooded, or uniform terrain.
Best practice: Use landmarks to confirm your compass bearings. If your compass says you should be approaching a river bend and you see one ahead, you have strong confirmation of your position. Using both together is far more reliable than either method alone.
Sun-based navigation is accurate enough to maintain a general direction of travel but should not be relied upon for precise route-finding. The shadow-tip method and solar noon technique are typically accurate within 5-15 degrees, which is sufficient to keep you moving toward a road, river, or known landmark.
Accuracy factors that affect sun navigation:
- Time of year: The sun’s arc shifts significantly between summer and winter, especially at higher latitudes.
- Latitude: Near the equator, the sun passes nearly overhead, making directional readings less reliable.
- Cloud cover: Partial overcast can still allow shadow reading; full overcast eliminates it entirely.
- Time of day: The shadow-tip method is most accurate around mid-morning and mid-afternoon. Near sunrise and sunset, shadows are long and the directional reading is less precise.
Sun navigation is a strong backup method. Pair it with terrain association for better results.
How To Read Topographic Maps for Hiking
A topographic map represents three-dimensional terrain on a flat surface using contour lines, each line connecting points of equal elevation. Reading these lines accurately is one of the most valuable skills for wilderness navigation without a phone.
Key concepts:
- Contour interval: The elevation difference between each contour line, printed in the map legend. Common intervals are 20 or 40 feet.
- Closely spaced lines: Indicate steep terrain (cliffs, steep slopes).
- Widely spaced lines: Indicate gentle, gradual slopes.
- Concentric closed circles: Represent hilltops or peaks. If marked with hachures (small tick marks), they indicate a depression (hollow or crater).
- V-shaped contours pointing uphill: Indicate a valley or drainage. Water flows in the direction the V points.
- V-shaped contours pointing downhill: Indicate a ridge or spur.
Practical tip: Before any wilderness trip, study the topographic map of your route and identify three to five major terrain features you will pass. Mentally “check them off” as you travel. This habit alone prevents most cases of disorientation.
For more on building a complete outdoor skill set, see 25 Most Critical Wilderness Survival Skills.
Every person venturing into backcountry terrain should carry dedicated navigation tools that do not depend on cellular service, battery life, or satellite connectivity. These are the items that make how to navigate in the wilderness without a phone a practical reality rather than a theory.
Core navigation kit:
- Baseplate compass with a rotating bezel and declination adjustment (Silva, Suunto, and Brunton are well-regarded brands)
- 1:24,000 scale USGS topographic map of your specific area, printed and laminated or stored in a waterproof map case
- Pencil and waterproof notepad for marking waypoints and recording bearings
- Altimeter watch (optional but useful for confirming elevation on a topo map)
- Signal mirror for emergency communication with aircraft or distant rescuers
Supporting gear:
- Whistle (three blasts is a universal distress signal)
- Personal locator beacon (PLB) or satellite communicator for true emergencies, these are not navigation tools but can summon help if navigation fails
For a complete gear overview, see 7 Essential Wilderness Survival Tools Every Hiker Needs.
Natural signs can provide directional clues, but they are unreliable as a primary navigation method. Use them as supplementary information to support other techniques.
Moss: The common belief that moss always grows on the north side of trees is an oversimplification. Moss grows where moisture and shade are present, which tends to be the north-facing side in the Northern Hemisphere but varies significantly based on local topography, canopy density, and humidity. Treat moss as a weak indicator, not a reliable compass.
Water flow: Rivers and streams always flow downhill toward lower elevation. Following water downstream will generally lead to larger waterways, valleys, and eventually human habitation or roads. This is one of the more reliable natural navigation strategies in a genuine emergency.
Prevailing wind and snow: In many regions, prevailing winds come from a consistent direction. Snow tends to accumulate on the leeward (downwind) side of ridges and trees. If you know the prevailing wind direction for your region, this can support directional awareness.
Tree growth: Trees in open areas often grow with slightly more branch density on the south-facing side (more sun exposure in the Northern Hemisphere). This is a weak indicator at best.
How To Mark Your Trail So You Don’t Get Lost
Trail marking is a proactive strategy that prevents disorientation before it starts. It is especially important in dense forest, featureless terrain, or when traveling off established trails.
Effective trail marking methods:
- Rock cairns: Stack three to five rocks in a distinctive arrangement at decision points and trail junctions. Disassemble them when you return to leave no trace.
- Flagging tape: Bright surveyor’s tape tied to branches at eye level. Use biodegradable tape and remove it on your return trip.
- Natural markers: Arrange sticks in an arrow pattern on the ground, or break small branches in a consistent direction to indicate your path.
- Pace counting: Count double-steps (every time your dominant foot strikes the ground) to track distance. Average adults cover roughly 100 meters per 65-70 double-steps on flat terrain.
- Waypoint notes: Write down compass bearings and notable terrain features at each significant turn. Keep these in your waterproof notepad.
Critical habit: Always note your starting point’s compass bearing from camp before you leave. If you need to return directly, reversing that bearing gets you back on track.
If you’re preparing for a scenario where the whole family needs to move through wilderness terrain, see Wilderness Survival For Families With Children: The Complete Preparedness Guide.
What To Do If You Get Lost in the Wilderness Without a Phone
Stop moving the moment you realize you are disoriented. Continuing to travel when you are unsure of your location almost always makes the situation worse by increasing the distance between you and known terrain.
The S.T.O.P. protocol:
- Stop: Sit down, control your breathing, and resist the urge to panic-walk.
- Think: Recall the last point where you were certain of your location. How long ago was that? What direction were you traveling?
- Observe: Look for terrain features, ridgelines, drainages, peaks, that you can match to your map. Listen for roads, rivers, or aircraft.
- Plan: Decide on a deliberate course of action based on what you know, not what you hope.
Is it better to stay put or try to find your way out?
Stay put if you told someone your planned route and expected return time, if you have shelter and water, or if you are injured. Rescuers search along known routes first, and a stationary person is far easier to find than a moving one.
Move out if no one knows your location, if staying put means exposure to worsening weather or rising water, or if you can clearly identify a route to safety (a road, river, or known landmark visible on your map).
For related preparedness skills, see How To Bug Out Without A Car: Complete Guide 2026 and How To Purify Water Without Tools Outdoors, because staying hydrated while lost is a survival priority in its own right.
Even experienced hikers make navigation errors. Knowing the most common ones helps you avoid them before they become emergencies.
Top navigation mistakes:
- Ignoring magnetic declination. In some parts of North America, the difference between magnetic north and true north exceeds 20 degrees. Over several miles, this error compounds into a significant positional offset.
- Not establishing a baseline. A baseline is a long linear feature (road, river, fence line) that you can deliberately aim for if lost. Without one, you have no safety net.
- Trusting memory over the map. Terrain looks different from different angles. Always verify against the map rather than assuming you recognize a feature.
- Moving without marking your start. Failing to note your camp’s bearing before leaving is one of the most common reasons people cannot find their way back.
- Over-relying on a single method. Sun, stars, compass, and terrain all have failure conditions. Layering methods is what separates prepared navigators from lost ones.
- Underestimating terrain complexity. Flat terrain on a map can be dense brush on the ground. Always account for obstacles that will slow and redirect your travel.
Frequently Asked Questions
Do I need an expensive compass for wilderness navigation?
No. A reliable baseplate compass from a reputable brand costs between $15 and $50 and performs as well as models costing ten times more for most navigation purposes. The key features to look for are a rotating bezel, a clear baseplate, and a declination adjustment mechanism.
Can a phone compass app replace a real compass?
A phone compass app can give you a directional reading, but it depends on battery life, software function, and in some cases cellular data for map display. A dedicated compass has no battery, no software, and no failure modes tied to technology. For serious wilderness travel, a physical compass is non-negotiable.
How do I navigate in dense forest where I can’t see landmarks?
Use dead reckoning: set a compass bearing to your destination, pick a visible object in that direction (a tree, rock, or clearing), walk to it, then pick the next object on the same bearing. Repeat this process. It is slower than open-terrain navigation but accurate over distance.
What is magnetic declination and why does it matter?
Magnetic declination is the angular difference between magnetic north (where your compass needle points) and true north (geographic north). It varies by location and changes slightly over time. In the western United States, declination can exceed 15 degrees east. Ignoring it causes you to travel off-course by a significant margin over long distances.
How do I navigate at night without stars?
In overcast conditions with no stars visible, rely on your compass and topographic map. If you have neither, the safest strategy is to stop and make camp rather than travel blind. Moving in unknown terrain at night without directional tools dramatically increases the risk of injury.
Is following a river always safe if I’m lost?
Following a river downstream is generally a sound strategy because it leads to lower elevation and often to human habitation. However, rivers in mountainous terrain can lead into steep gorges, waterfalls, or impassable terrain. Move cautiously, stay on the bank, and be prepared to backtrack if the terrain becomes dangerous.
How long does it take to learn map and compass navigation?
Basic proficiency, enough to orient a map, take a bearing, and follow it, can be developed in a single afternoon of focused practice. True competency, including declination adjustment, terrain association, and route-finding in complex terrain, takes several field sessions over weeks or months. Start practicing before you need the skill.
What is the shadow-tip method and how accurate is it?
The shadow-tip method uses a stick’s shadow to determine east-west direction. It is accurate within roughly 5-15 degrees under good conditions. It works best in mid-morning and mid-afternoon, in the Northern Hemisphere, when the sun is well above the horizon. It is a reliable backup when no compass is available.
Should I build a fire if I’m lost?
A fire serves two purposes when you are lost: warmth and signaling. Smoke is visible from aircraft and distant ridgelines. Three fires in a triangle pattern is an internationally recognized distress signal. Build a fire if conditions allow, but prioritize shelter and water first. See our guide on how to start a fire without matches for no-tool fire-starting techniques.
Can children learn wilderness navigation?
Yes. Children as young as eight or nine can learn basic compass use and map reading with proper instruction. Teaching these skills early builds confidence and situational awareness. For family-specific guidance, see Wilderness Survival For Families With Children.
Conclusion
Knowing how to navigate in the wilderness without a phone is one of those skills that costs almost nothing to learn but can be worth everything in the field. The tools are inexpensive. The methods are teachable. The practice required is measured in hours, not years.
Start with a baseplate compass and a topographic map of your local wilderness area. Practice orienting the map, taking a bearing, and walking to a target. Then add celestial navigation, spend one clear night locating Polaris and the Southern Cross. Layer in terrain association on your next hike by matching what you see to what the map shows.
These are not emergency-only skills. They make every wilderness trip safer, more confident, and more self-reliant, which is exactly what preparedness is about.
Actionable next steps for 2026:
- Purchase a quality baseplate compass and download a USGS topographic map of your nearest wilderness area.
- Practice the shadow-tip method in your backyard this week.
- On your next clear night, locate Polaris using the Big Dipper.
- Complete one practice navigation exercise before your next backcountry trip.
- Read The Complete Beginner’s Guide To Navigation Without GPS for a structured skill-building path.
Products, Tools, and Resources
Compass: The Silva Ranger 2.0 and Suunto A-10 are both well-regarded entry-level baseplate compasses with declination adjustment. Either is a solid starting point.
Maps: USGS topographic maps are available free for download at the USGS National Map website. Print on waterproof paper or use a commercial lamination service for field use.
Map case: A waterproof roll-top map case keeps paper maps functional in rain and stream crossings.
Altimeter watch: The Garmin Instinct series offers a built-in altimeter, barometer, and compass in a rugged watch format, useful for confirming elevation on a topo map without relying on GPS.
Personal locator beacon (PLB): Devices like the ACR ResQLink 400 or SPOT Gen4 allow you to send a distress signal via satellite when all other options have failed. These are not navigation tools, but they are a critical safety backstop for serious backcountry travel.
Field reference: The U.S. Army Survival Manual (FM 3-05.70) is a publicly available, comprehensive reference covering land navigation, signaling, and survival techniques. It is worth having a printed copy in your pack.