
Hey there! Some links on this page may be affiliate links which means that, if you choose to make a purchase, I may earn a commission at no extra cost to you. I greatly appreciate your support. Read the full disclosure here.
A topographic map uses contour lines to show elevation and terrain shape, providing essential detail for off-road navigation that standard maps lack. Learning to read these maps step by step enables you to identify land features, measure distances, and navigate reliably with or without digital tools. Mastery of topo maps is a foundational survival skill for hikers, preppers, and anyone venturing into unfamiliar wilderness.
Key Takeaways
- Contour lines are the core of any topo map, they represent elevation, and their spacing tells you how steep the terrain is.
- Brown contour lines, blue water features, green vegetation, and black man-made structures each carry specific meaning on a standard USGS topographic map.
- The map legend (also called the map key) decodes every symbol, color, and line type on the map, always read it first.
- Grid references and map scale together let you pinpoint your exact location and calculate real-world distances without any digital tools.
- Using a compass alongside a topo map is a non-negotiable survival skill, GPS batteries die; a compass and paper map do not.
- Common mistakes include ignoring the map datum, misreading contour intervals, and confusing magnetic north with true north.
- Free apps like Gaia GPS and CalTopo provide digital topo maps, but paper backups remain essential for any serious bug-out or survival scenario.
- Preppers who master topo map reading gain a critical edge: the ability to plan routes, identify water sources, find defensible terrain, and navigate after infrastructure fails.
What Is a Topographic Map and Why Do Hikers and Preppers Need One
A topographic map is a two-dimensional representation of three-dimensional terrain. Unlike a standard road map, it shows elevation changes, landforms, water features, and vegetation using a standardized system of symbols and contour lines. For preppers and survivalists, this distinction is everything.
When GPS fails, cell towers go down, or you’re moving through unfamiliar wilderness during a bug-out scenario, a topographic map is the tool that keeps you oriented, safe, and moving with purpose. Road maps show you where roads go. Topo maps show you what the land actually looks like, where ridgelines run, where valleys flood, where cliffs drop without warning, and where water collects naturally.
Understanding how to read a topographic map step by step is not optional for serious preparedness. It belongs in the same category as fire-starting and water purification: a foundational skill that works regardless of what technology is or isn’t available.
For a broader look at where navigation fits in your overall readiness plan, the Step-by-Step Guide to Natural Disaster Preparedness covers the full spectrum of skills worth building before a crisis hits.
What Is the Difference Between a Topographic Map and a Regular Map
A regular map shows location and direction, roads, cities, borders. A topographic map adds the vertical dimension: it shows elevation, slope, terrain shape, and natural features that a flat road map completely ignores.
Standard road maps are built for navigation on established infrastructure. Topographic maps are built for navigation when that infrastructure doesn’t exist or can’t be trusted. The key difference comes down to contour lines, which are absent from regular maps entirely.
At a glance:
| Feature | Regular Map | Topographic Map |
|---|---|---|
| Roads and streets | Yes | Yes |
| Elevation changes | No | Yes (contour lines) |
| Terrain shape | No | Yes |
| Water features | Basic | Detailed |
| Vegetation | No | Yes |
| Useful off-road | No | Yes |
For preppers building an apartment bug-out plan, understanding the terrain between your location and your bug-out destination is a step most people skip, and one that topo maps make possible.
What Are Contour Lines on a Topographic Map
Contour lines are curved lines on a topo map that connect all points at the same elevation above sea level. Every point on a single contour line sits at exactly the same height. They are the foundational element of any topographic map and the first thing to understand when learning how to read a topographic map step by step.

Here is what the different types of contour lines mean:
- Index contours: Darker, bolder lines printed at regular elevation intervals (usually every fifth contour line). They are labeled with their elevation value.
- Intermediate contours: Lighter lines between index contours. They are not labeled but follow the same interval spacing.
- Supplementary contours: Dashed lines used in areas of very gentle terrain where standard intervals would be too far apart to be useful.
- Depression contours: Lines with small tick marks (hachures) pointing inward, indicating a low point or hollow rather than a hill.
The contour interval, the elevation difference between each line, is printed in the map legend. Common intervals on USGS maps are 20 feet, 40 feet, or 80 feet depending on the terrain. Always check the interval before reading elevation.
How Do You Read Elevation on a Topo Map
To read elevation, find the nearest labeled index contour line and count the intermediate contours between it and your point of interest, multiplying by the contour interval. If an index line reads 1,000 feet and you count two intermediate lines above it with a 20-foot interval, your point sits at 1,040 feet.
Key rules for reading elevation:
- Contour lines never cross each other (except in rare overhanging cliff cases).
- Closed circles or loops indicate a hilltop or summit, the innermost ring is the highest point.
- Numbers on index contours always read uphill (the top of the number faces the higher elevation).
- V-shaped contours pointing uphill indicate a valley or drainage; V-shapes pointing downhill indicate a ridge.
What Do the Different Colors Mean on a Topographic Map
Each color on a standard USGS topographic map represents a specific category of feature. Brown lines are contour lines showing elevation. Blue indicates water, rivers, lakes, streams, swamps, and glaciers. Green represents vegetation, including forests and orchards. Black marks man-made features: roads, buildings, railroads, and boundaries. Red highlights major roads and land survey lines. Purple or magenta marks features added from aerial photography updates that haven’t been field-verified yet.
For preppers, the blue and green layers are especially valuable. Blue features identify water sources you can move toward in a survival situation. Green areas indicate cover, concealment, and potential foraging terrain. Knowing your foraging options for emergency food becomes far more actionable when you can locate wooded terrain on a topo map before you arrive.
What Does the Map Legend Tell You on a Topo Map
The map legend, sometimes called the map key, is printed in the margin of every topographic map and decodes every symbol, line style, and color used on that specific map. Always read the legend before reading the map itself.
The legend will tell you:
- The contour interval (elevation difference between lines)
- The map scale (ratio of map distance to real-world distance)
- The datum (the geographic reference system used, such as NAD83 or WGS84)
- The declination diagram (the angle difference between true north, magnetic north, and grid north)
- Symbols for specific features: springs, mines, campgrounds, benchmarks, and more
Skipping the legend is one of the most common mistakes beginners make. Two maps of the same region printed at different scales or different time periods can use different symbols for the same features.
How To Identify Steep vs Gentle Slopes on a Topographic Map
Slope steepness is read directly from contour line spacing. Closely spaced contour lines mean steep terrain, the elevation is changing rapidly over a short horizontal distance. Widely spaced contour lines mean gentle terrain, the elevation rises or falls gradually.
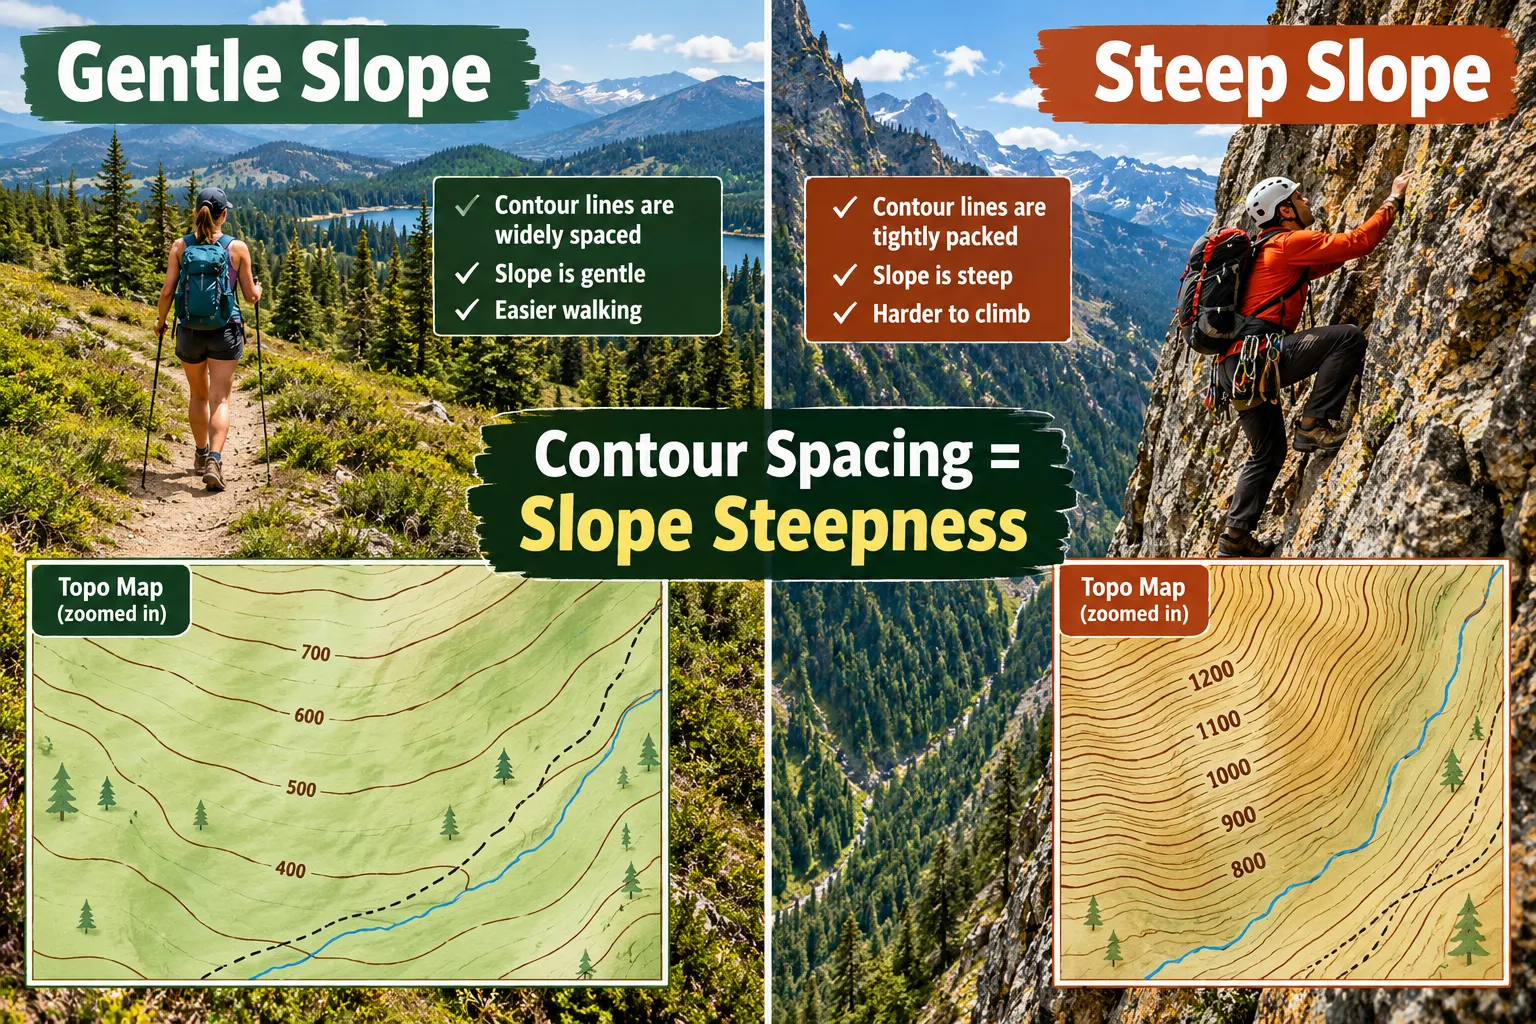
A practical rule of thumb:
- Cliff or near-vertical face: Contour lines appear to merge or stack on top of each other.
- Steep hiking terrain: Lines are close together but still distinguishable.
- Moderate slope: Lines are evenly spaced with clear separation.
- Flat or gently rolling terrain: Lines are far apart or nearly absent.
For route planning, always trace the path of least resistance by following widely spaced contour lines. Moving along a contour (staying at the same elevation) is almost always faster and less exhausting than crossing contours repeatedly.
How To Read a Topographic Map Step By Step: A Field Guide
Here is a direct, sequential process for reading any topo map in the field. This is the core of how to read a topographic map step by step.
Step 1: Orient the map. Rotate the map so north on the map aligns with actual north. Use a compass or the sun to establish direction first.
Step 2: Read the legend. Confirm the contour interval, map scale, datum, and declination angle before doing anything else.
Step 3: Identify major terrain features. Find ridgelines (contours forming elongated ovals or spines), valleys (V-shapes pointing uphill), peaks (closed circles), saddles (hourglass shapes between two peaks), and drainages (V-shapes pointing downhill toward water).
Step 4: Locate water sources. Find all blue features within your operational area. Note whether they are perennial (solid blue line) or intermittent (dashed blue line).
Step 5: Read elevation along your route. Trace your intended path across contour lines, noting total elevation gain and loss. This determines travel time and energy cost.
Step 6: Identify landmarks. Match prominent terrain features on the map to what you can see in the field. This is called terrain association and is the foundation of land navigation.
Step 7: Confirm your position. Use two or more identifiable landmarks to triangulate your location on the map.
How To Find Your Location on a Topographic Map
To find your location on a topo map, use a technique called resection: identify two or more visible landmarks in the field, find them on the map, shoot a compass bearing to each one, then draw back-bearings from each landmark on the map. Where the lines intersect is your position.
If you have a compass and can see two distinct terrain features (a mountain peak, a river bend, a road junction), resection works reliably even without GPS. The more landmarks you can use, the more precise your fix.
When landmarks aren’t visible, rely on terrain association: match the shape of the ground around you (slope angle, drainage direction, vegetation type) to the pattern of contour lines on the map.
How To Measure Distance on a Topographic Map
To measure distance on a topo map, use the map’s scale bar printed in the legend. The scale is expressed as a ratio (1:24,000 means one inch on the map equals 24,000 inches, or 2,000 feet, in the real world) or as a graphic bar you can measure against.
Practical method:
- Use a piece of string or the edge of a paper strip to trace your route on the map, following all curves.
- Straighten the string against the scale bar to read the real-world distance.
- For straight-line distances, use a ruler and convert using the scale ratio.
USGS 7.5-minute quadrangle maps use a 1:24,000 scale, which is the most common standard for backcountry navigation in the United States. At this scale, one inch equals approximately 2,000 feet, or roughly 0.38 miles.
How To Read Map Grid References on a Topo Map
Grid references use a coordinate system printed on the map’s edges to identify any point with a specific alphanumeric or numeric code. Most USGS topo maps use the Universal Transverse Mercator (UTM) grid system, printed as blue grid lines at 1,000-meter intervals.
To read a UTM grid reference:
- Find the easting value (the vertical grid line to the left of your point) and read the number printed at the map edge.
- Find the northing value (the horizontal grid line below your point) and read that number.
- Estimate tenths of a grid square to refine your position to within 100 meters.
The result is a six-digit or eight-digit grid reference that can be communicated to another person or entered into a GPS for verification.
What Scale Should You Use for a Topographic Map
For most survival and backcountry navigation purposes, a 1:24,000 scale map is the best choice. It provides enough detail to identify individual trails, stream crossings, and terrain features while covering a manageable geographic area (roughly 7.5 miles by 7.5 miles per sheet for USGS quadrangles).
- 1:24,000: Best for on-foot navigation, route planning, and detailed terrain reading.
- 1:50,000: Standard for military land navigation; covers more area with slightly less detail.
- 1:100,000 or smaller: Useful for regional planning and vehicle-based route selection, but too coarse for foot navigation in complex terrain.
Choose larger scale (lower ratio number) when you need more detail. Choose smaller scale (higher ratio number) when you need to see a broader area.
How To Use a Compass With a Topographic Map
A compass and a topographic map work together to give you reliable navigation without any electronic dependency. The compass provides direction; the map provides terrain context.
Basic compass-and-map procedure:
- Account for declination. Find the declination diagram in the map legend. In most of the continental U.S., magnetic north differs from true north by several degrees. Adjust your compass bearing accordingly, either by setting the declination on an adjustable compass or by manually adding or subtracting the angle.
- Orient the map. Place the compass on the map with the edge along the north-south grid lines. Rotate the map and compass together until the compass needle aligns with magnetic north (adjusted for declination).
- Shoot a bearing. Point the compass at a visible landmark. Read the bearing in degrees. Find that bearing on the map to identify the landmark’s direction from your position.
- Follow a bearing. Set your desired direction of travel on the compass. Pick an intermediate landmark in that direction and walk to it, then repeat.
Practicing this skill before you need it is non-negotiable. A compass does nothing for you if you’ve never used one under pressure.
Common Mistakes People Make Reading Topographic Maps
Even experienced navigators make these errors. Knowing them in advance prevents costly mistakes in the field.
Ignoring declination. Magnetic north and true north are not the same. In some parts of the U.S., the difference exceeds 20 degrees, enough to put you hundreds of meters off course over a short distance.
Misreading the contour interval. Assuming a standard interval without checking the legend leads to serious elevation miscalculations. Always verify.
Confusing ridges and valleys. Both appear as V-shapes on a topo map. The direction the V points relative to elevation tells you which is which. V pointing uphill = valley. V pointing downhill = ridge.
Using an outdated map. Roads, trails, and structures change. USGS maps carry a print date, check it. Features marked on a 1970s map may no longer exist.
Forgetting to account for terrain when estimating travel time. Flat-ground pace and steep-terrain pace are not comparable. A mile on a topo map that crosses multiple tight contour lines will take far longer than a mile across open flat ground.
Not practicing before the emergency. Map reading is a perishable skill. If the only time you open a topo map is during a crisis, you will struggle with it.
Best Topographic Map Apps for Beginners
Digital topo map apps are valuable training tools and useful backups, but they should never replace a paper map and compass in a serious survival kit.
Top options in 2026:
- Gaia GPS: The most feature-rich option for preppers and backcountry users. Supports offline map downloads, USGS topo layers, satellite imagery, and route tracking. Works without cell service once maps are downloaded.
- CalTopo: Preferred by search-and-rescue teams and serious navigators. Offers custom map printing, slope-angle shading, and detailed USGS layers. Free tier available; advanced features require a subscription.
- OnX Hunt: Strong topo layer coverage with property boundary data, useful for preppers scouting bug-out land.
- Avenza Maps: Allows you to load any georeferenced PDF map, including official USGS downloads, and tracks your GPS position on them.
For offline use, always download your operational area before leaving cell coverage. Battery banks and solar chargers extend device life, but paper maps remain the true redundancy.
FAQ
Do I need a compass to read a topo map?
You can read and interpret a topo map without a compass, but you cannot reliably navigate with one in unfamiliar terrain. A compass is essential for orienting the map, shooting bearings, and correcting for magnetic declination. Always carry both.
What is a contour interval and why does it matter?
The contour interval is the elevation difference between each contour line on the map. If the interval is 40 feet, each line represents a 40-foot rise or fall. Misreading the interval leads to serious elevation errors, so always confirm it in the map legend before reading the map.
How do I know which direction is uphill on a topo map?
Look for labeled index contour lines, the numbers always read uphill. Alternatively, find a water feature: streams and rivers always flow downhill, so the terrain rises away from the water.
What is magnetic declination and does it really matter?
Magnetic declination is the angle between true north (geographic north) and magnetic north (where your compass needle points). It varies by location and can be as large as 20+ degrees in parts of the U.S. Over a long route, ignoring declination causes significant navigation errors. Always check the declination diagram on your map.
Can I use Google Maps instead of a topo map?
Google Maps shows roads, satellite imagery, and basic terrain shading, but it does not show contour lines, elevation data, or the detailed terrain features a topo map provides. For survival navigation off established roads, Google Maps is inadequate. Use it as a supplement, not a replacement.
What does a saddle look like on a topo map?
A saddle appears as an hourglass or figure-eight shape between two peaks. Contour lines form two separate closed loops (the peaks) connected by a narrowing between them. Saddles are often the easiest crossing points between ridgelines and are key features to identify when planning routes.
Where can I get free USGS topographic maps?
The USGS National Map Downloader (available at nationalmap.gov) provides free PDF downloads of 7.5-minute quadrangle topo maps for the entire United States. These can be printed at home or loaded into apps like Avenza Maps.
How long does it take to learn to read a topo map?
Basic map reading, understanding contour lines, colors, and scale, can be learned in a few hours of study. Practical field navigation with a compass takes more time and requires hands-on practice. Most people become competent with a few dedicated practice sessions in familiar terrain before applying the skill in unfamiliar areas.
Conclusion
Learning how to read a topographic map step by step is one of the highest-return skills any prepper can develop. It costs almost nothing, requires no batteries, and works in every scenario where digital navigation fails, which is precisely when you need it most.
Start with a USGS 7.5-minute quadrangle map of your local area. Study the contour lines, identify the terrain features you can see from your backyard or a nearby trail, and practice orienting the map with a compass. Then take it into the field and test yourself.
The goal isn’t perfection on the first attempt. The goal is competence before the moment you actually need it.
Practical next steps:
- Download a free USGS topo map of your bug-out route at nationalmap.gov.
- Purchase a quality baseplate compass with an adjustable declination setting.
- Practice resection with two known landmarks in familiar terrain.
- Store a printed, laminated topo map in every bug-out bag and vehicle kit.
Navigation is only one piece of a complete preparedness system. If you’re building out your full readiness plan, the apartment bug-out plan guide walks through route planning in detail, and the natural disaster preparedness guide covers the broader framework every prepared household needs.
Products, Tools, and Resources
Suunto A-10 Baseplate Compass, Reliable, affordable, and accurate. A solid entry-level compass for map-and-compass navigation. Look for models with a rotating bezel and clear baseplate for map work.
USGS 7.5-Minute Quadrangle Maps, Available free at nationalmap.gov or as printed waterproof editions from vendors like MyTopo and National Geographic Trails Illustrated. Waterproof editions hold up in rain and rough handling.
Gaia GPS (app), Download USGS topo layers for your operational area while you have internet access. The offline mode makes it a legitimate field tool, not just a planning app.
CalTopo (web and app), The preferred tool for serious route planning. Use it to print custom topo maps at any scale with slope-angle shading overlaid on contour lines.
Suunto MC-2 or Silva Ranger Compass, Step up from a basic baseplate compass. Both include a sighting mirror for precise long-range bearing shots, which improves resection accuracy significantly.
Waterproof map case or lamination pouches, A printed topo map is useless if it disintegrates in the rain. Protect it.