

Hey there! Some links on this page may be affiliate links which means that, if you choose to make a purchase, I may earn a commission at no extra cost to you. I greatly appreciate your support. Read the full disclosure here.
Wilderness survival shelter is your top priority to prevent hypothermia and other dangers in emergencies. Mastering key shelter types—lean-to, debris hut, snow trench, and tarp—allows you to build effective shelters using natural materials or minimal gear. Quickly creating insulated, waterproof shelters tailored to your environment greatly increases your survival odds.
Key Takeaways
- Shelter is the top survival priority in most wilderness emergencies, hypothermia can kill in under three hours in cold, wet conditions.
- The four core shelter types are the lean-to, debris hut, snow trench, and tarp shelter, each suited to different environments and time constraints.
- A functional emergency shelter can be built in 1 to 3 hours using only natural materials and no tools.
- Ground insulation is as critical as overhead cover, losing body heat to the cold ground kills faster than rain exposure.
- The most common shelter-building mistakes are choosing a bad site, building too large, and neglecting the floor.
- Tarp shelters are faster and more reliable in wet conditions; natural shelters outperform tarps in extreme cold due to insulation depth.
- Permits are generally not required for temporary emergency shelters in national forests, but Leave No Trace principles apply.
- Practice building shelters before you need them, a skill untested in daylight will fail you in a storm at dusk.
What Are the Basic Types of Wilderness Survival Shelters
The four most practical wilderness survival shelter types are the lean-to, debris hut, snow trench/quinzhee, and tarp shelter. Each one addresses a specific threat, wind, cold, rain, or snow, and the best choice depends on available materials, weather conditions, and how much time and energy you have.
Understanding these categories is the foundation of all wilderness survival shelter building techniques. Choosing the wrong type for your environment wastes critical time and energy.
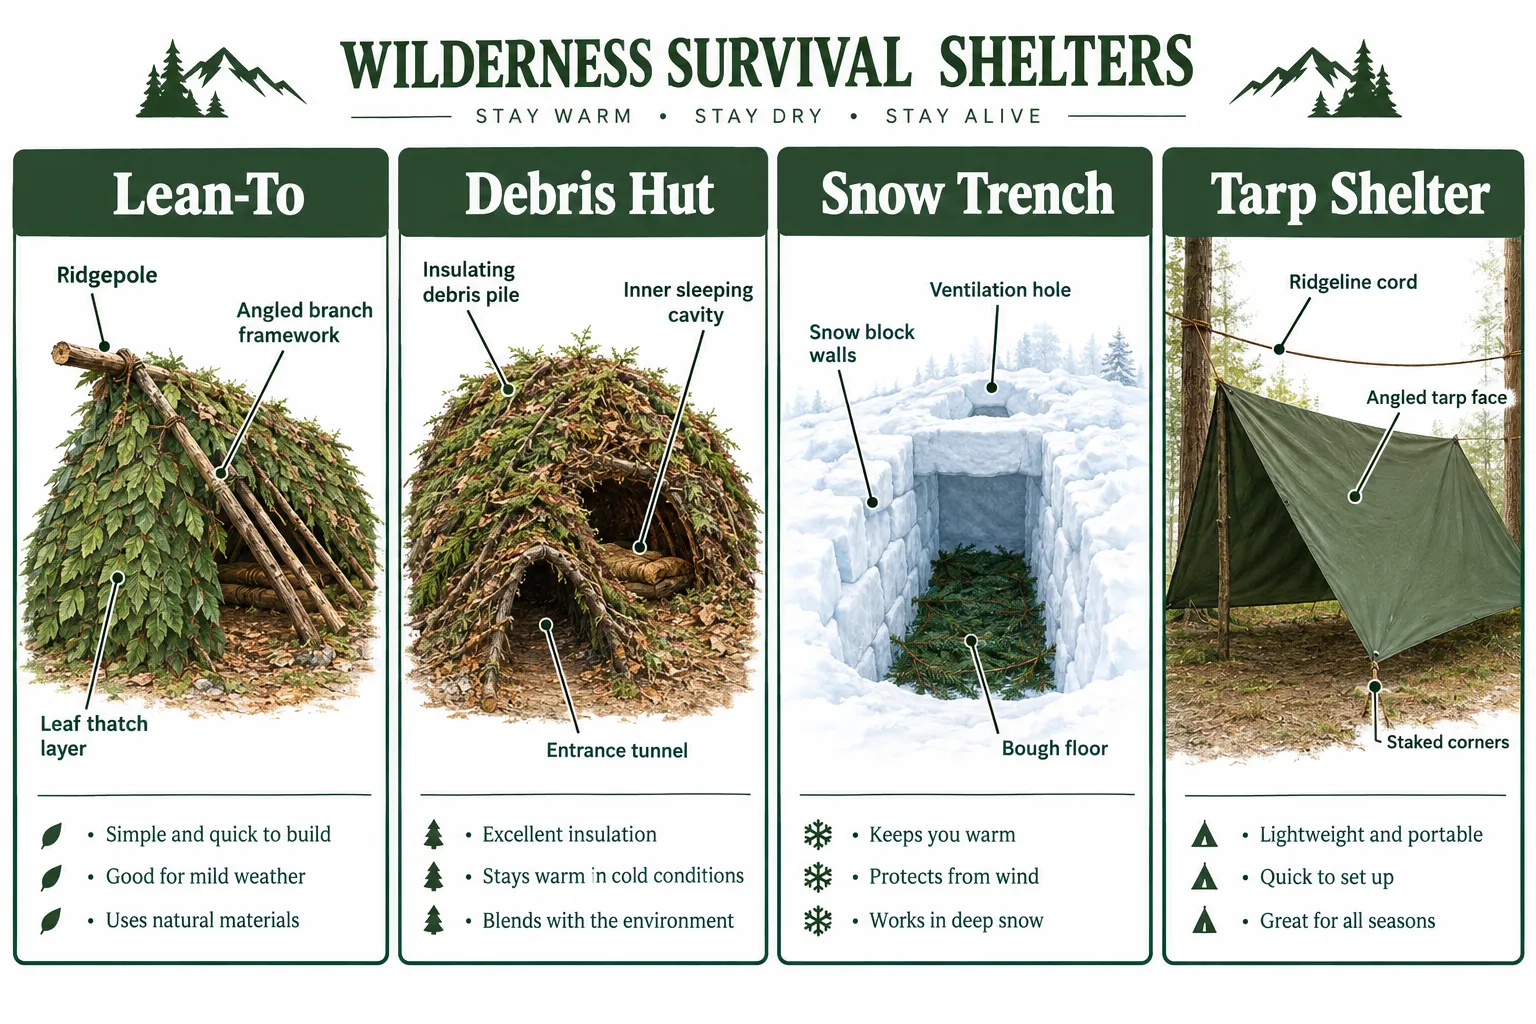
Lean-To: An angled wall of branches thatched with leaves or bark, propped against a horizontal ridgepole between two trees. Fast to build (45 to 90 minutes), excellent for wind and light rain, but less effective in extreme cold because it’s open on one side.
Debris Hut: A fully enclosed cocoon of natural debris, sticks, leaves, pine needles, bark, built over a ridgepole. Exceptional insulation, capable of retaining body heat even in near-freezing temperatures. Takes 2 to 4 hours to build properly.
Snow Trench / Quinzhee: Dug into or packed from snow, these shelters use snow’s natural insulating properties. A snow trench can be dug in 30 minutes; a quinzhee takes longer but offers a standing interior. Best for winter survival above the snowline.
Tarp Shelter: A modern option using a tarp or emergency bivy. Fast, reliable, and highly effective in rain. Requires cordage and anchor points but can be deployed in under 20 minutes by someone who has practiced.
How Do I Build a Lean-To Shelter in the Woods
A lean-to is built by lashing or propping a horizontal ridgepole between two trees, then leaning angled branches against it and layering natural debris on top to shed rain. It’s the most beginner-friendly of all wilderness survival shelter building techniques.
Step-by-step construction:
- Find two trees roughly 7 to 8 feet apart. Your ridgepole should be a sturdy branch or log at least 8 feet long, secured at chest height.
- Lean branches and sticks against the ridgepole at a 45-degree angle, spaced 4 to 6 inches apart.
- Weave smaller sticks horizontally through the vertical ones to create a lattice.
- Layer debris from the bottom up, like shingles on a roof, leaves, bark, pine boughs, grass. Aim for at least 12 inches of thickness to shed rain.
- Build low side walls from stacked debris or logs to block wind.
- Lay a 4-inch bed of dry leaves or pine needles on the ground inside.
Common mistake: Leaving the debris layer too thin. Hold your hand against the outside of the roof, if you can feel pressure from your hand on the inside, the layer isn’t thick enough.
For families building shelters together, the Wilderness Survival For Families With Children guide covers how to assign age-appropriate tasks that keep everyone productive and calm.
What Materials Do I Need for Emergency Shelter Building
No tools are required for a functional emergency shelter. The materials you need are almost entirely sourced from the environment around you.
Natural materials:
- Dead branches and fallen logs (ridgepoles, framing)
- Dry leaves, pine needles, bark, and grass (insulation and thatching)
- Flexible green branches or roots (lashing and weaving)
- Large flat bark pieces (waterproofing layer)
- Moss (gap filler, additional insulation)
Gear that dramatically improves results:
- A fixed-blade survival knife or hatchet, for cutting, notching, and processing materials. A quality survival knife is one of the highest-value tools in any wilderness kit.
- 550 paracord or bank line, for lashing ridgepoles and rigging tarp shelters
- An emergency tarp or mylar blanket, adds waterproofing instantly
- A headlamp, because shelter building in the dark is dangerous
The rule of thumb: the more natural materials available, the less gear you need. Dense forest gives you everything. Open alpine terrain or desert forces more reliance on carried equipment.
How Long Does It Take to Build a Survival Shelter
Build time depends on shelter type, available materials, and your experience level. A practiced survivalist can build a functional lean-to in under an hour. A debris hut built to proper insulation standards takes 2 to 4 hours for most people.
Estimated build times by shelter type:
| Shelter Type | Beginner | Experienced |
|---|---|---|
| Tarp A-frame | 15-25 min | 5-10 min |
| Lean-To | 90-120 min | 45-60 min |
| Debris Hut | 3-4 hours | 2-3 hours |
| Snow Trench | 30-45 min | 20-30 min |
| Quinzhee | 3-5 hours | 2-3 hours |
The critical lesson: start building earlier than you think you need to. Hypothermia, darkness, and exhaustion all accelerate once the sun drops. If you’re unsure whether you need a shelter, build one anyway. Reviewing the 25 Most Critical Wilderness Survival Skills reinforces why shelter consistently ranks above food and water in survival priority.
Best Wilderness Survival Shelter Building Techniques for Different Weather Conditions
The right shelter technique shifts significantly based on weather. A lean-to that works perfectly on a dry summer night becomes a liability in a freezing rainstorm.
Rain: Use a tarp A-frame or lean-to with a steep pitch (45 degrees or more) to shed water quickly. Dig a small drainage channel around the shelter perimeter. Prioritize a dry ground layer.
Cold/Wind: Build a debris hut or fully enclosed natural shelter. Smaller interior = faster to heat with body warmth. Block the entrance with a debris plug or stuffed pack.
Snow: A snow trench covered with branches and a tarp layer is fast and effective. For longer stays, a quinzhee offers more space and better insulation. Always poke a ventilation hole with a stick to prevent CO2 buildup.
Heat/Sun: A lean-to with a raised, ventilated roof provides shade without trapping heat. Orient the opening away from direct afternoon sun.
Decision rule: If rain is the primary threat, prioritize roof pitch and waterproofing. If cold is the primary threat, prioritize enclosed volume and insulation depth. If both are threats, build a debris hut with a tarp outer layer.
What’s the Difference Between a Debris Hut and a Lean-To
A debris hut is a fully enclosed, cocoon-like structure that retains body heat through thick insulation on all sides. A lean-to is an open-faced angled roof that blocks wind and rain from one direction but does not retain warmth. They serve different purposes and suit different conditions.
Choose a debris hut when:
- Temperatures are below 50°F (10°C)
- You have no sleeping bag or insulated gear
- You need to survive overnight without fire
Choose a lean-to when:
- Temperatures are mild (above 50°F)
- You have a fire source to provide warmth
- Speed of construction matters more than insulation
- You’re sheltering a group rather than one person
The debris hut’s insulating power comes from air pockets trapped in the debris, the same principle as a down sleeping bag. That’s why debris thickness matters so much. A 12-inch layer is the minimum; 18 to 24 inches is better in cold conditions.
How Do I Insulate a Survival Shelter from the Ground
Ground insulation is one of the most overlooked elements in wilderness survival shelter building techniques. The ground conducts body heat away far faster than cold air does, sleeping directly on bare earth in cold conditions is dangerous even inside a well-built shelter.
Ground insulation methods:
- Leaf pile: Gather the driest leaves available and pile them at least 4 to 6 inches deep inside the shelter. Compress them slightly, then add another layer.
- Pine bough bed: Layer pine or fir boughs with the cut ends pointing down and the soft needles facing up. Overlap each layer like shingles. Provides both insulation and cushioning.
- Bark platform: Flat pieces of bark laid side by side create a physical barrier between your body and the soil.
- Grass and moss: Dry grass bunched into a mat works well in open terrain where leaves are scarce.
The goal is to create at least 3 to 4 inches of dead air space between your body and the ground. In freezing conditions, double that.
Is a Tarp Shelter Better Than a Natural Shelter
A tarp shelter is faster, more reliably waterproof, and easier to set up correctly. A natural debris shelter provides superior insulation in cold conditions and requires no carried gear. Neither is universally better, the right choice depends on conditions and what you have available.
Tarp shelter advantages:
- Deployable in under 20 minutes
- Predictably waterproof
- Reusable and packable
- Works in environments with limited natural materials (alpine, desert)
Natural shelter advantages:
- No gear required
- Superior thermal insulation in cold conditions
- Completely silent and low-profile
- Can be built to any size with enough time
Best practice for preppers: Carry a tarp or emergency bivy as your primary shelter tool, and know how to build a natural shelter as your backup. The combination covers almost every scenario. Pairing shelter skills with essential wilderness survival tools gives you the widest margin of safety.
How Do I Build a Shelter in Rain or Snow
Building in rain or snow requires working faster, protecting your insulation materials from moisture, and adjusting your construction sequence. The biggest mistake people make is letting their debris get wet before it’s in place, wet leaves insulate poorly and add weight.
In rain:
- Collect dry debris from under dense tree canopies or from the underside of fallen logs first
- Build the roof structure before gathering insulation so you have partial cover while you work
- Use bark as the outermost waterproofing layer, overlapping pieces downward like shingles
- Keep your fire-starting kit dry throughout, you may need it after the shelter is built. The guide on how to start a survival fire in rain covers this in detail.
In snow:
- Work quickly, wet hands in snow conditions accelerate heat loss
- Use snow itself as a building material; it’s an excellent insulator when packed
- Dig or pack rather than building upward, which is slower in snow
- Always create a ventilation hole before sealing yourself inside any snow shelter

What Makes a Survival Shelter Actually Waterproof
A survival shelter becomes waterproof through steep roof pitch, overlapping layers, and sealed gaps, not through any single material. The same principles used in traditional thatched roofing apply here.
The three waterproofing rules:
- Pitch: A roof angle of 45 degrees or steeper sheds water before it can soak through. Shallow roofs pool water and leak regardless of material thickness.
- Shingling: Layers must overlap from bottom to top, just like roof shingles. Water running down the outside should always hit the top of the layer below, not the gap between layers.
- Thickness: Even with perfect pitch and shingling, a thin layer will eventually saturate and drip. Aim for 12 inches minimum; test by pressing your hand flat against the outside, you should feel no moisture transfer after 10 minutes of simulated rain (pour water over a test section).
Bark is the most waterproof natural material in most forests. Large pieces of birch bark, pine bark, or cedar bark laid shingle-style outperform leaves in sustained rain.
What Mistakes Do People Make When Building Wilderness Shelters
The most common shelter-building mistakes are choosing a bad site, building too large, and neglecting ground insulation. These three errors account for the majority of shelter failures in real survival situations.
Site selection errors:
- Building in a low-lying area that floods or collects cold air
- Choosing a site under dead branches (“widow makers”) that can fall
- Building too close to standing water, which increases moisture and insect exposure
- Ignoring wind direction, the shelter opening should face away from prevailing wind
Construction errors:
- Building too large: a shelter that fits your body with 6 to 8 inches of clearance retains heat far better than a roomy one
- Skipping the ground layer entirely
- Using wet or green leaves as insulation (they compress, lose air pockets, and conduct cold)
- Not testing the roof for leaks before nightfall
Mental errors:
- Starting too late in the day, always begin building 2 to 3 hours before dark
- Abandoning a partially built shelter to look for a “better” site
- Overexerting during construction and arriving at nightfall soaked in sweat
Do I Need a Permit to Build a Shelter in National Forests
In most cases, no permit is required to build a temporary emergency shelter in a U.S. national forest. The U.S. Forest Service generally allows dispersed camping and temporary shelter construction for survival purposes without a permit, provided the shelter is removed and the site is restored when you leave.
Key considerations:
- “Temporary” means days, not weeks. Permanent or semi-permanent structures require authorization.
- Some designated wilderness areas and special management zones have stricter rules, check with the local ranger district before your trip.
- Leave No Trace principles require you to dismantle natural shelters and scatter materials when you leave.
- State parks and national parks have different rules from national forests, many prohibit cutting live vegetation entirely.
- On private land, you need the landowner’s permission regardless of the emergency.
For non-emergency recreational shelter building, always verify local regulations in advance.
How Much Space Do I Need for a Functional Survival Shelter
A functional single-person survival shelter needs just enough space for your body plus 6 to 8 inches of clearance on all sides. That’s roughly 7 feet long, 3 feet wide, and 3 feet tall for an average adult. Smaller is warmer.
The most common sizing mistake is building a shelter large enough to “sit up comfortably” when the goal should be retaining body heat. Every cubic foot of interior air space your body heat must warm is energy your body expends. A tight debris hut that fits like a sleeping bag will keep you warmer than a spacious one that feels comfortable.
For two people: Add approximately 2 feet of width. Two bodies sharing a small space generate significantly more heat than one.
For families: Build multiple small shelters or a lean-to with a fire reflector rather than one large enclosed shelter. A large enclosed shelter is difficult to heat without a fire inside, which carries its own risks. The wilderness survival guide for families with children addresses multi-person shelter strategies in detail.
Frequently Asked Questions
Can I build a survival shelter without any tools?
Yes. A debris hut, lean-to, or snow trench can all be built using only your hands and materials found on the ground. Tools speed up the process and improve quality, but they are not required for a functional emergency shelter.
How do I know if my debris hut is insulated enough?
Crawl inside and close the entrance. If you feel noticeably warmer within 10 to 15 minutes from your body heat alone, the insulation is adequate. If the interior feels the same temperature as outside, add more debris, especially to the sides and top.
What’s the best natural material for waterproofing a shelter roof?
Large sheets of bark, particularly birch, cedar, or pine bark, are the most waterproof natural roofing material available in most forests. Overlap them shingle-style from the bottom up, and combine with a steep roof pitch for best results.
Should I build a fire inside my survival shelter?
Generally no. Open fires inside enclosed natural shelters create carbon monoxide risk and fire hazard. Build a fire outside the shelter entrance and use a reflector wall to direct heat inward, or use a properly ventilated small stove if you have one.
How do I keep insects and animals out of my shelter?
Seal gaps in the debris walls, avoid building near standing water or food sources, and keep food stored away from the sleeping area. Smoke from a nearby fire also deters insects effectively.
Is it safe to sleep in a snow shelter?
Yes, when built correctly. Snow shelters maintain a temperature around 32°F (0°C) regardless of outside conditions, which is far safer than being exposed to wind and sub-zero temperatures. Always poke a ventilation hole before sealing the entrance and check it periodically to prevent CO2 buildup.
What’s the fastest survival shelter I can build?
A tarp A-frame with cordage and two anchor points can be deployed in under 15 minutes by someone who has practiced. Without a tarp, a simple lean-to with a debris roof is the fastest natural option at 45 to 90 minutes.
How do I find the best site for a shelter?
Look for natural windbreaks (dense trees, rock faces, hillsides), flat dry ground slightly elevated above the surrounding terrain, and proximity to natural building materials. Avoid low spots, dry riverbeds, and areas under dead trees.
Does the shelter entrance direction matter?
Yes. Orient the entrance away from prevailing wind and, in cold conditions, toward the east to catch morning sun. In hot climates, face the entrance toward prevailing breezes for ventilation.
What if I only have a mylar emergency blanket?
A mylar blanket can be used as a tarp shelter roof, a ground insulation layer, or a heat reflector behind a lean-to. It won’t insulate as well as a debris hut, but combined with a debris floor layer and a fire reflector, it significantly improves survival odds.
Conclusion
Shelter is not a comfort, it’s a survival requirement. In cold, wet, or windy conditions, a person without adequate shelter can lose the ability to think clearly and act effectively within hours. That’s not a worst-case scenario; it’s the documented reality of hypothermia.
The wilderness survival shelter building techniques covered in this guide, from the debris hut to the tarp A-frame, are skills that compound with practice. Reading about them builds awareness. Building them in your backyard or on a weekend camping trip builds real competence.
Actionable next steps:
- Pick one shelter type, start with a lean-to, and build it before you need it.
- Add a quality tarp, 50 feet of paracord, and a fixed-blade knife to your pack. These three items cover most emergency shelter scenarios.
- Practice site selection on your next hike. Before you set up camp, ask: would this location work if I had to build a natural shelter tonight?
- Study the 14 essential survival skills every prepper must know to build a complete wilderness competency framework around your shelter skills.
- Pair shelter knowledge with fire-starting skills, a shelter without warmth in cold conditions is only half a solution. The guide on how to start a fire in wet conditions is the natural next step.
Products, Tools, and Resources
Tarp and cordage: A silnylon or polycryo tarp in the 8×10 foot range covers one to two people and weighs under a pound. Pair it with 50 feet of 550 paracord. This combination handles rain, wind, and moderate cold.
Emergency bivvy: A quality aluminized emergency bivy (not a flat mylar sheet) adds meaningful warmth and waterproofing in a package smaller than a fist. Worth carrying in any day pack.
Fixed-blade knife: A full-tang 4 to 5 inch fixed-blade knife processes shelter materials faster and more safely than a folding knife. See the survival knife training and qualities guide for selection criteria.
Headlamp: A 200+ lumen headlamp with a red-light mode extends your build window into dusk and keeps your hands free. Carry spare batteries.
Field guide: Tom Brown Jr.’s “Tom Brown’s Field Guide to Wilderness Survival” and Mors Kochanski’s “Bushcraft” are the two most referenced practical guides for natural shelter construction. Both are worth having in a home library.
For a broader view of the gear that supports wilderness survival beyond shelter, the essential survival gear guide ranked by priority covers 50 items with field-tested context.