
Hey there! Some links on this page may be affiliate links which means that, if you choose to make a purchase, I may earn a commission at no extra cost to you. I greatly appreciate your support. Read the full disclosure here.
A serious laceration kills faster than starvation, dehydration, or exposure — yet most preppers spend more time planning their food stores than their wound care protocol. Knowing how to treat a deep wound when emergency services can’t reach you is not optional knowledge for anyone serious about self-reliance. It’s a core survival skill that belongs in every prepper’s toolkit, right alongside fire-starting and water purification.
This guide covers every critical step: identifying wound severity, stopping hemorrhage, cleaning and closing the wound, preventing infection, and recognizing when the situation has moved beyond field treatment. Whether you’re 40 miles into backcountry, sheltering through a grid-down scenario, or simply far from the nearest hospital, this is the protocol that can keep someone alive.
Key Takeaways
- A wound is considered “deep” when it penetrates through the skin’s full thickness (dermis) and into underlying tissue, muscle, or fat — these require more than a bandage.
- Stopping bleeding is always the priority. Direct pressure, elevation, and hemostatic agents address the most severe hemorrhage in the field.
- Clean water irrigation is the single most effective tool against wound infection — more effective than any topical antibiotic alone.
- Wound closure (sutures, staples, or closure strips) should only happen after thorough cleaning. Closing a dirty wound traps bacteria and causes serious infection.
- Signs of infection — increasing redness, warmth, swelling, pus, fever, or red streaking — demand aggressive action and, if available, oral antibiotics.
- A well-stocked trauma kit should include hemostatic gauze, an Israeli bandage, closure strips, a suture kit, an irrigation syringe, and broad-spectrum antibiotics.
- Improvised suturing is a last resort. Closure strips and wound staples are safer and easier for non-medical personnel.
- Shock from blood loss is life-threatening. Keep the injured person warm, flat, and hydrated if they can swallow safely.
- The 6-hour “golden window” for wound closure is a useful field guideline — wounds left open longer than 6 hours carry a significantly higher infection risk if closed.
- Always seek professional medical care as soon as it becomes accessible, even if the wound appears to be healing.
What Counts as a Deep Wound and When Do You Really Need Medical Help
A deep wound penetrates through the full thickness of the skin — past the epidermis and dermis — into subcutaneous fat, muscle, or deeper structures. Superficial cuts that only nick the top layer of skin are manageable with basic first aid. Deep wounds are a different category entirely.
You’re dealing with a deep wound if:
- The wound edges gape open and don’t stay together on their own
- You can see yellow fat, muscle, or bone
- The wound is longer than half an inch and won’t stop bleeding with direct pressure
- It was caused by a puncture, impalement, or high-velocity impact
- It involves the face, hands, joints, or genitals (these areas have complex anatomy and higher complication risk)
You need professional medical help immediately if:
- Bleeding doesn’t slow after 10-15 minutes of firm, continuous direct pressure
- The wound shows signs of arterial bleeding (bright red blood spurting in pulses)
- There is a foreign object embedded deeply in the tissue
- The wound involves the chest, abdomen, neck, or head
- The injured person loses consciousness or shows signs of shock
When emergency services genuinely cannot reach you — whether due to a natural disaster, remote location, or grid-down scenario — field treatment becomes your only option. The goal shifts from “ideal care” to “keep this person alive and infection-free until professional help is possible.” Understanding that distinction matters. You’re buying time, not replacing a trauma surgeon.
How to Stop Heavy Bleeding When You’re in a Remote Location
Hemorrhage control is the first and most urgent step when learning how to treat a deep wound when emergency services can’t reach you. Uncontrolled bleeding kills within minutes. Everything else — cleaning, closing, infection prevention — comes after the bleeding stops.
Step 1: Apply direct pressure immediately. Use the cleanest material available — ideally sterile gauze, but a clean cloth works. Press firmly and hold. Do not lift the dressing to check. Hold continuous pressure for a minimum of 10 minutes by the clock.
Step 2: Pack the wound if it’s deep or irregular. For deep lacerations or puncture wounds, packing gauze directly into the wound cavity and applying pressure is more effective than surface pressure alone. Hemostatic gauze (such as QuikClot or Combat Gauze) dramatically accelerates clotting and is worth carrying in every trauma kit.
Step 3: Use a tourniquet for limb wounds that won’t stop bleeding. If direct pressure fails on an arm or leg wound, a properly applied tourniquet is life-saving. Apply it 2-3 inches above the wound, tighten until bleeding stops, and note the time. A tourniquet left on for under 2 hours rarely causes permanent damage. Write the application time on the person’s skin with a marker.
Step 4: Elevate the limb above the level of the heart while maintaining pressure, if the injury allows it.
Common mistake: Removing and reapplying pressure repeatedly to “check” the wound. This disrupts clot formation. Apply pressure and hold it.
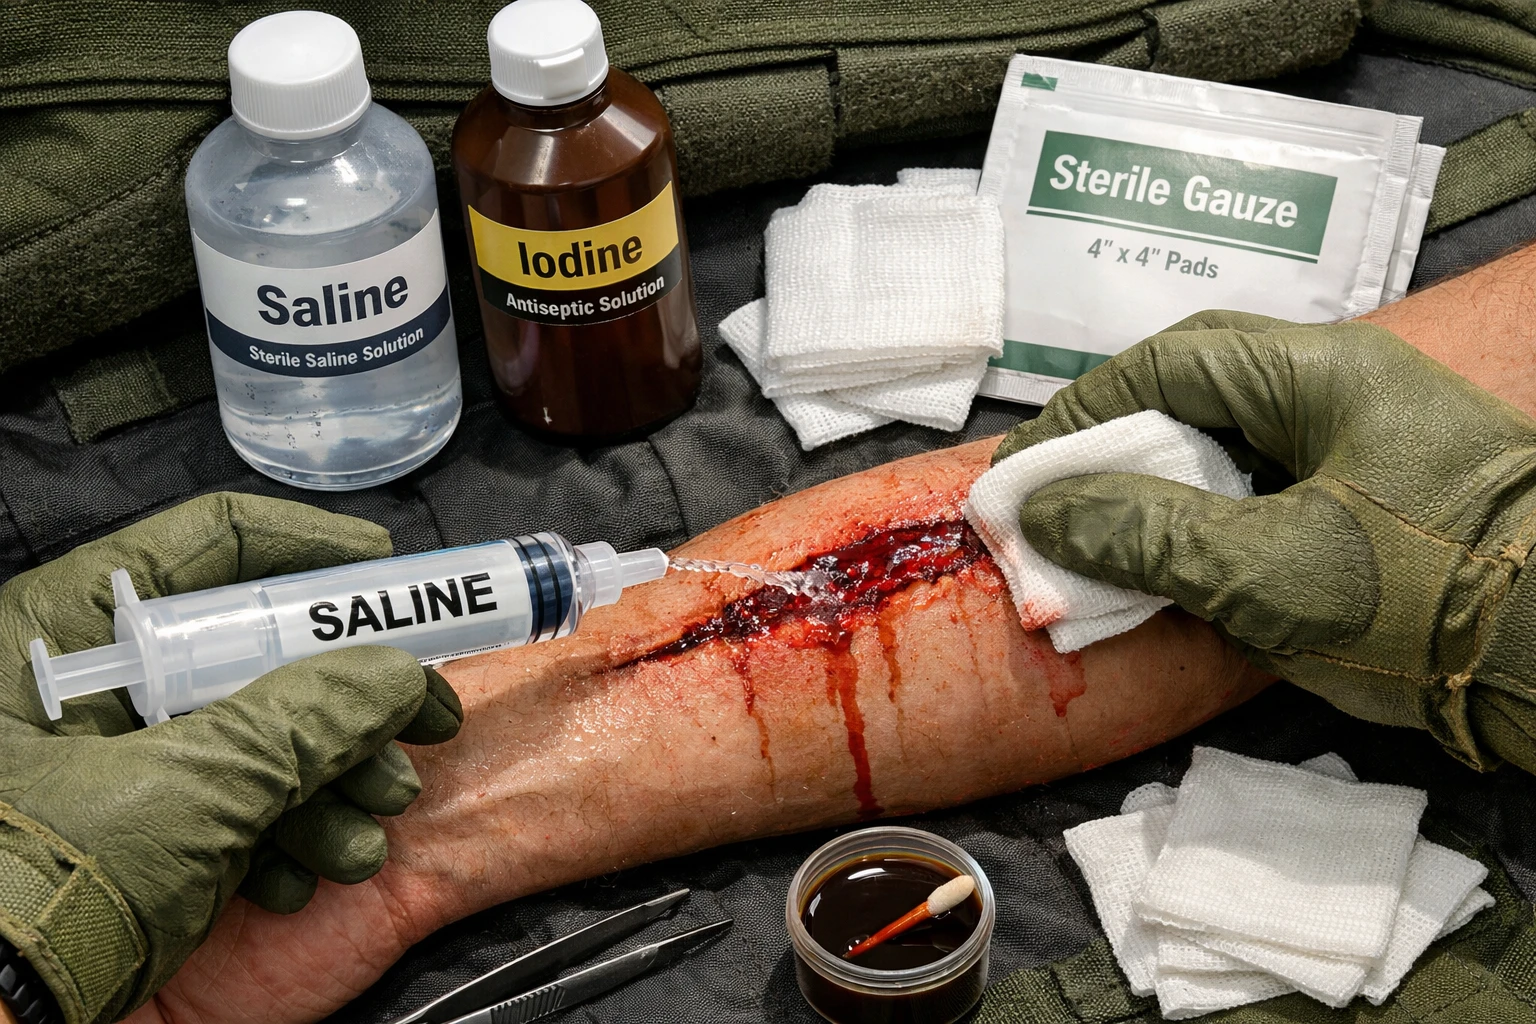
How to Clean a Deep Wound Without Getting an Infection
After bleeding is controlled, wound irrigation is the single most important step to prevent infection. This is where most improvised field treatment fails — people underestimate how thoroughly a wound needs to be cleaned.
The goal is mechanical removal of bacteria, debris, and dead tissue through high-pressure irrigation.
- Use a large syringe (20-35ml) with a blunt tip or 18-gauge needle to create enough pressure to flush debris out of the wound.
- Irrigate with clean, potable water or sterile saline. A rough guideline: use at least 200-500ml of fluid per wound, more for heavily contaminated injuries.
- Flush at an angle, directing fluid into the wound and letting it drain out — don’t just pour water over the surface.
- If clean water is your only option, purified water is acceptable. Tap water from a clean source is better than nothing.
After irrigation:
- Gently remove any visible debris with clean tweezers
- Apply a thin layer of antibiotic ointment (bacitracin or triple antibiotic) to the wound edges
- Do NOT use hydrogen peroxide or full-strength iodine directly in the wound — both damage tissue and impair healing
Iodine diluted to 0.5-1% (a light amber color, not dark brown) can be used as a wound irrigant in the field when sterile saline isn’t available.
What Supplies You Need in a First Aid Kit for Serious Cuts
A standard drugstore first aid kit is not adequate for treating deep traumatic wounds in a survival context. Knowing how to treat a deep wound when emergency services can’t reach you means having the right tools before the emergency happens.
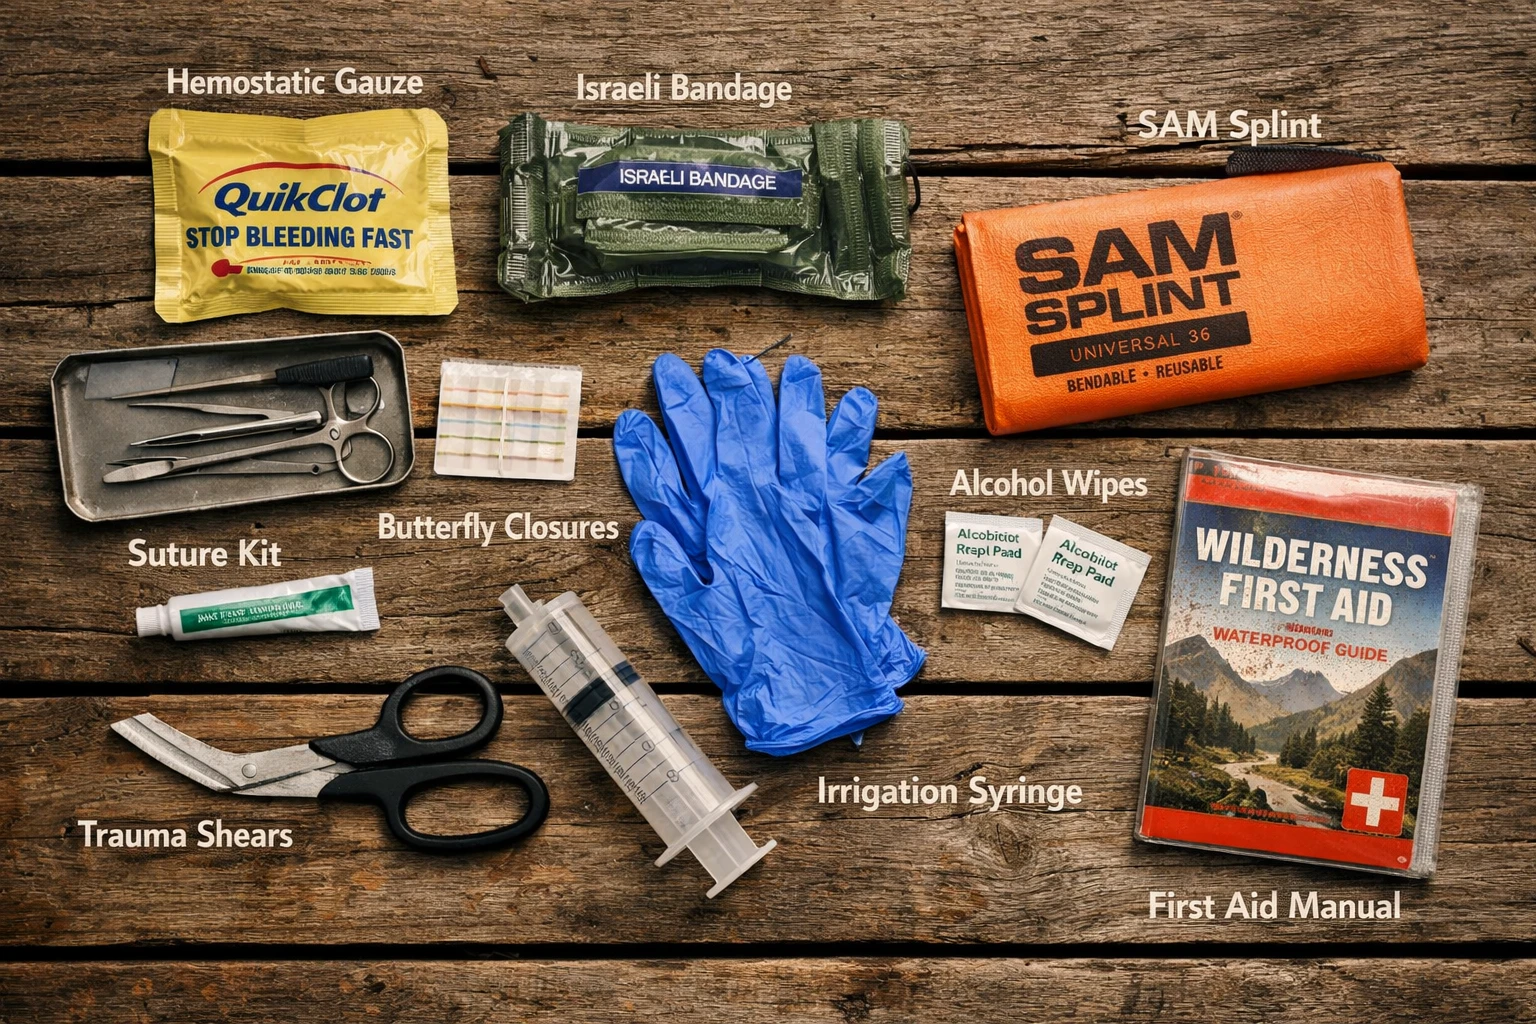
Core trauma kit supplies:
| Item | Purpose |
|---|---|
| Hemostatic gauze (QuikClot) | Accelerates clotting in severe bleeds |
| Israeli bandage (pressure dressing) | Applies and maintains direct pressure |
| CAT or SOFT-T tourniquet | Limb hemorrhage control |
| Sterile gauze pads (4×4, multiple) | Wound packing and dressing |
| Irrigation syringe (35ml) | High-pressure wound cleaning |
| Sterile saline solution | Wound irrigation |
| Butterfly closures / Steri-Strips | Wound edge approximation |
| Suture kit (with needle driver) | Deep wound closure, last resort |
| Wound stapler | Scalp and body wound closure |
| Nitrile gloves (multiple pairs) | Infection control for the provider |
| Trauma shears | Cutting clothing away from wounds |
| Antibiotic ointment | Topical infection prevention |
| Oral broad-spectrum antibiotics | Systemic infection prevention |
| SAM splint | Immobilization |
| Medical tape (several rolls) | Securing dressings |
This kit should be part of your complete emergency supplies system. If you carry a bug-out bag, a dedicated trauma pouch should be one of its non-negotiable components. For a complete build-out, see the complete bug out bag guide.
Can You Stitch a Wound Yourself if You’re Far from a Hospital
Self-suturing is possible but should be a genuine last resort. Butterfly closures and wound staples are faster, safer, and easier to apply correctly without medical training — and they achieve comparable results for most lacerations that don’t involve deep tissue layers.
Use closure strips or butterfly closures when:
- The wound edges can be brought together without tension
- The wound is less than 3-4 inches long
- It’s a clean cut (not a ragged tear or crush injury)
- There’s no sign of infection
Consider sutures when:
- The wound is gaping, and closure strips can’t hold the edges together
- The wound is in a high-tension area (knee, elbow, scalp)
- You have training or have practiced the technique on a suture pad
Basic interrupted suture technique for field use:
- Clean and irrigate the wound thoroughly first — never suture a dirty wound
- Put on gloves
- Use a curved needle with monofilament suture (3-0 or 4-0 for most body wounds, 5-0 for face)
- Enter the skin 3- 5 mm from the wound edge at a 90-degree angle
- Pass through to the other side at equal depth and distance
- Tie a square knot — snug but not so tight that it cuts into the skin
- Space sutures 3- 5 mm apart
- Cover with antibiotic ointment and a sterile dressing
Never suture a wound that is more than 6-8 hours old, heavily contaminated, a bite wound, or showing any signs of infection. These wounds need to heal open (by secondary intention) with regular dressing changes.
What Are the Signs That a Wound Might Be Getting Infected
Infection is the primary cause of death from wounds in austere environments — not the initial injury. Recognizing infection early gives you time to act before it becomes life-threatening.
Early signs (within 24-48 hours):
- Increasing pain rather than decreasing pain
- Redness spreading beyond the wound edges
- Warmth around the wound
- Swelling that’s getting worse, not better
Moderate signs (48-72 hours):
- Pus or cloudy discharge from the wound
- Fever (above 100.4°F / 38°C)
- The wound smells foul
Serious signs — act immediately:
- Red streaking extending from the wound up the limb (lymphangitis — infection spreading through the lymphatic system)
- Swollen lymph nodes in the armpit or groin near the wound
- High fever, chills, confusion, or rapid heart rate (signs of systemic infection or sepsis)
- The wound tissue looks black, gray, or necrotic
If you see red streaking, start oral antibiotics immediately and move toward professional medical care as fast as possible. This is not a “wait and see” situation.
How Long Can You Wait Before Getting Professional Medical Treatment
The window for safe wound management without professional care is limited. For most deep wounds, the goal is to reach professional medical treatment within 6-12 hours for optimal outcomes — but survival field care can extend that window significantly when done correctly.
General timelines to understand:
- 0-6 hours: The “golden period” for wound closure. Clean wounds treated within this window have the best outcomes if closed.
- 6-12 hours: Closure becomes riskier. Wounds in this range may be better left open and packed, then reassessed.
- 12+ hours: Most contaminated wounds should not be closed primarily. Focus on keeping the wound clean and open, changing dressings every 12-24 hours, and using antibiotics.
- Puncture wounds and bites: Should generally not be closed at all in field conditions due to high infection risk.
The 6-hour guideline isn’t absolute. Clean wounds in low-contamination environments (a knife cut in a clean kitchen) can sometimes be safely closed later. Heavily contaminated wounds (soil, animal contact, standing water) should be treated more conservatively.
The bottom line: Get to professional care as soon as it’s physically possible. Field treatment is a bridge, not a destination.
What’s the Difference Between Treating a Deep Wound in the Wilderness vs. at Home
The core wound care principles are the same in both settings, but the resources, risks, and decision-making differ significantly.
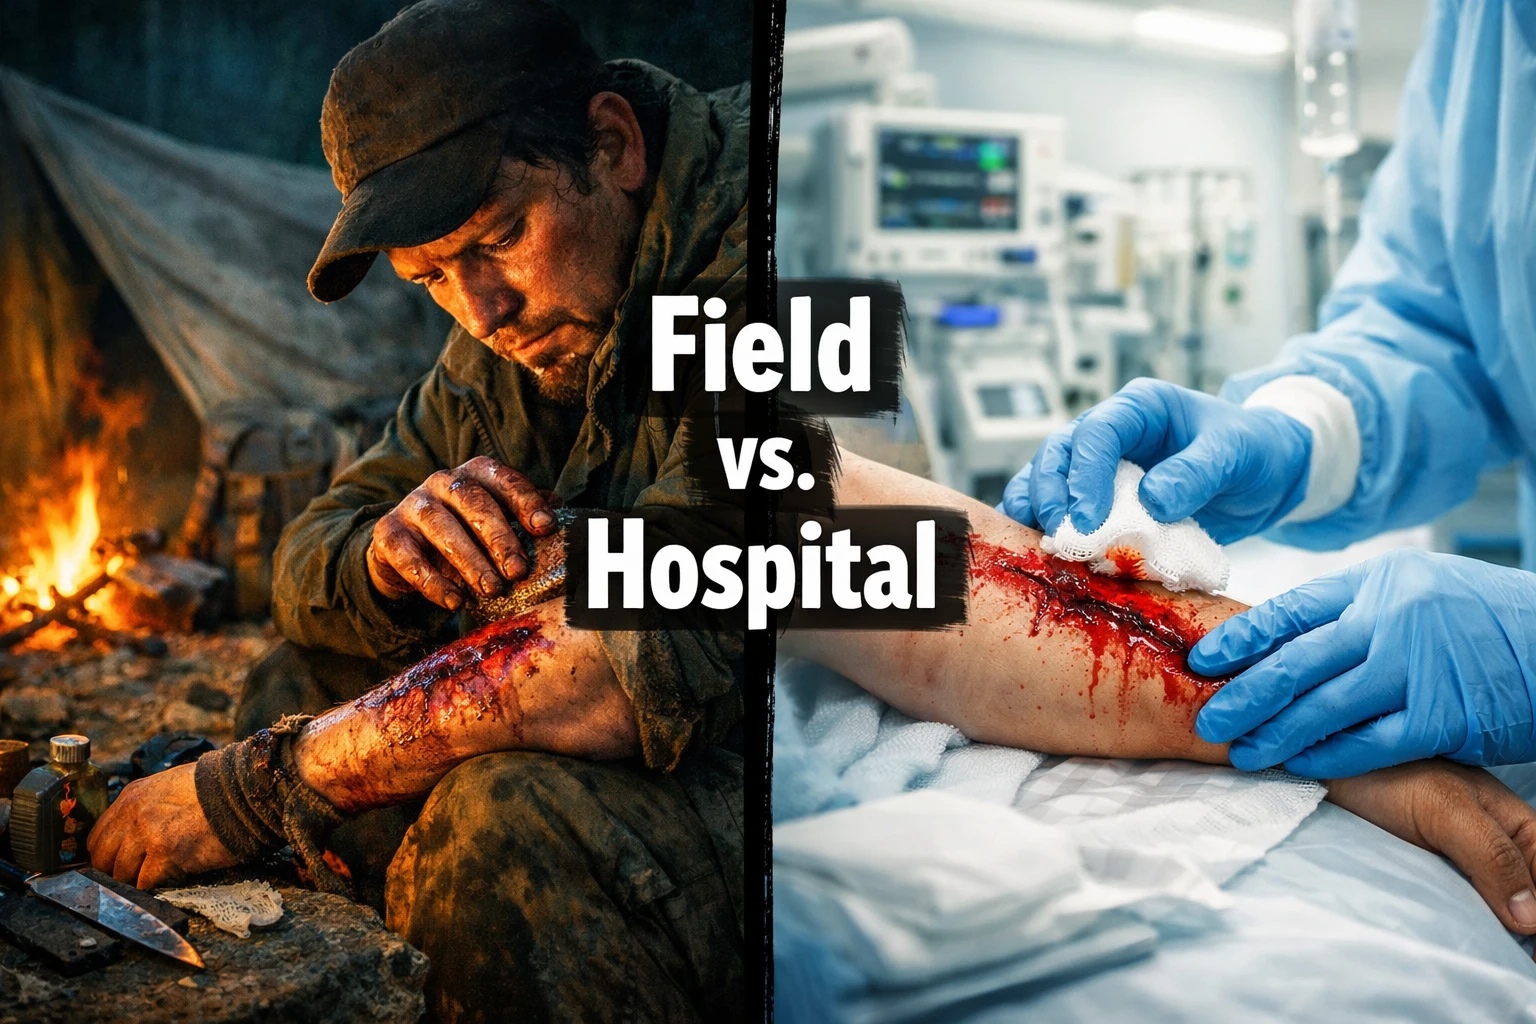
In the wilderness:
- Water availability is limited and may require purification before use for irrigation
- Temperature extremes affect both the patient (hypothermia risk) and supplies (freezing saline)
- Evacuation time may be measured in hours or days, which changes how aggressively you manage infection risk
- Improvisation is often necessary — clean clothing as bandages, improvised splints, natural shelter for warmth
- The 25 most critical wilderness survival skills include wound management as a top-tier priority for exactly this reason
At home during a grid-down or disaster scenario:
- Cleaner water is more likely to be available (stored supply, filtered tap water)
- Better lighting and a stable environment make wound care easier
- Supplies from your home emergency kit are accessible
- Evacuation to a hospital may be possible sooner, depending on the scenario
- A well-prepared home emergency preparedness system should include a dedicated medical component
Key difference in decision-making: In the wilderness, you often need to be more aggressive about infection prevention (more irrigation, earlier antibiotics) because evacuation timelines are longer. At home, you may have more flexibility to monitor and reassess before committing to a treatment decision.
Are There Natural Remedies That Can Help with a Serious Wound
Some natural substances have documented antimicrobial or wound-healing properties and are worth knowing about as true last-resort options — when no conventional supplies are available. They are not replacements for proper wound care.
Honey (raw, preferably Manuka): Has well-documented antibacterial properties. Medical-grade Manuka honey is used in clinical wound care. In a true no-supplies scenario, raw honey applied to a wound and covered with a clean dressing can help prevent infection. It also keeps wounds moist, which supports healing.
Plantain leaves (Plantago major): A common weed found in most temperate regions. Crushed fresh leaves applied to a wound have mild antimicrobial and anti-inflammatory properties. This is not a sterile treatment, but in a genuine no-option scenario, it’s better than leaving a wound exposed and dry.
Aloe vera (fresh gel): Has mild antimicrobial properties and promotes moist wound healing. Useful for burns and abrasions more than deep lacerations.
Pine resin: Has been used historically as a wound sealant and has some antimicrobial properties. Can be applied warm (not hot) to seal wounds in extreme situations.
What to avoid: Applying dirt, spider webs, or animal materials to wounds — these are folk remedies with no evidence base and real contamination risk. Alcohol (whiskey, vodka) is a poor wound irrigant — it damages tissue and is less effective than clean water irrigation.
The honest assessment: natural remedies buy a little time and may reduce surface contamination. They don’t replace irrigation, proper closure, and antibiotics.
What Antibiotics and Medications to Have on Hand for Wound Care
Prescription antibiotics are the most critical medication gap in most preppers’ medical supplies. Without them, a serious wound infection can escalate to sepsis within days.
Recommended oral antibiotics for wound care (requires prescription in the US):
- Amoxicillin-clavulanate (Augmentin): Broad-spectrum, covers most wound pathogens including Staphylococcus and Streptococcus. First-line choice for most lacerations and bite wounds.
- Doxycycline: Good coverage for many wound pathogens; also covers tick-borne illness. Useful if a penicillin allergy exists.
- Trimethoprim-sulfamethoxazole (Bactrim): Effective against MRSA (methicillin-resistant Staph aureus), which is increasingly common.
- Metronidazole (Flagyl): For wounds with suspected anaerobic contamination (deep punctures, soil-contaminated wounds).
How to obtain them legally: Talk to a travel medicine physician or your primary care doctor about getting a “just in case” prescription for a wilderness or disaster medicine kit. Many physicians who understand preparedness will accommodate this request.
Fish antibiotics are sometimes discussed in prepper communities as an alternative. The active ingredients are often identical to human formulations, but dosing, purity, and quality control are not regulated for human use. This is a last-resort option only.
Other medications worth stocking:
- Ibuprofen and acetaminophen (pain and fever management)
- Diphenhydramine (antihistamine for allergic reactions)
- Iodine solution (diluted for irrigation)
- Sterile saline (irrigation and wound cleaning)
For a broader look at what your emergency kit should contain beyond wound care, see the ultimate emergency supplies list.
How to Prevent Shock When Someone Has a Deep Traumatic Injury
Hemorrhagic shock occurs when blood loss reduces oxygen delivery to vital organs. It’s a direct killer and a complication of any serious wound. Recognizing and managing it is part of knowing how to treat a deep wound when emergency services can’t reach you.
Signs of shock:
- Pale, cold, clammy skin
- Rapid, weak pulse (above 100 beats per minute)
- Rapid, shallow breathing
- Confusion, anxiety, or unusual calmness
- Thirst
- Decreased urine output
Field management of shock:
- Stop the bleeding — this is the root cause. All hemorrhage control steps above apply.
- Position the patient — lay them flat. Elevate the legs 8-12 inches if there’s no spinal injury suspected. This shifts blood toward the core organs.
- Keep them warm — hypothermia worsens shock. Use blankets, sleeping bags, or extra clothing. Wet clothing must be removed.
- Provide fluids if the patient is conscious and can swallow — oral rehydration is better than nothing. Avoid giving fluids to an unconscious patient.
- Reassure and calm the patient — anxiety increases heart rate and oxygen demand.
- Do not give food — if surgery becomes possible, an empty stomach is safer.
What not to do: Do not give aspirin (increases bleeding). Do not give alcohol. Do not leave the patient alone.
What Mistakes People Often Make When Treating Serious Cuts
Even well-prepared people make critical errors under the stress of a real wound emergency.
The most common and dangerous mistakes:
- Closing a dirty wound: Traps bacteria inside. Always irrigate thoroughly before any closure attempt.
- Removing a blood-soaked dressing to check the wound: This disrupts clot formation. Add more gauze on top and keep pressing.
- Using hydrogen peroxide in the wound: It feels like it’s “working” but it damages healthy tissue and slows healing.
- Applying a tourniquet too loosely: A tourniquet that doesn’t stop arterial flow creates venous congestion and increases bleeding. Tighten until the bleeding stops.
- Forgetting to note the tourniquet application time: Critical information for the medical team that takes over care.
- Waiting too long to start antibiotics: If infection signs appear, start antibiotics immediately — don’t wait to see if it gets worse.
- Suturing bite wounds: Bite wounds (human or animal) have extremely high infection rates and should be left open in most field scenarios.
- Ignoring the patient’s overall condition: Focusing entirely on the wound while missing signs of shock, hypothermia, or internal bleeding.
The essential survival skills checklist includes first aid as a foundational category — and wound care is where most people’s practical knowledge has the biggest gaps.
When Is a Wound Too Deep to Treat Without Professional Medical Help
Some wounds exceed the limits of field treatment, regardless of how well-equipped or trained you are. Recognizing these situations is as important as knowing what you can handle.
Wounds that require professional care, even if you must delay getting it:
- Chest wounds (penetrating): Any wound that enters the chest cavity risks pneumothorax (collapsed lung). Seal the wound with an occlusive dressing (taped on three sides) and evacuate immediately.
- Abdominal wounds: Penetrating abdominal trauma can damage internal organs. Do not attempt to push protruding organs back in — cover with a moist, clean dressing and evacuate.
- Neck wounds: High risk of vascular and airway damage. Apply gentle pressure only — never pack a neck wound aggressively.
- Wounds involving tendons or nerves: If the patient can’t move fingers or toes normally after a limb wound, tendon or nerve involvement is possible.
- Wounds with embedded objects: Do not remove impaled objects. Stabilize them in place and evacuate.
- Wounds showing signs of necrotizing fasciitis: Rapid tissue death, severe pain disproportionate to appearance, gas bubbles under the skin. This is a surgical emergency.
- Any wound in a diabetic or immunocompromised patient: Infection risk is dramatically higher and progression is faster.
The honest rule: If you’re asking yourself whether a wound is too serious to treat in the field, it probably is. Err on the side of evacuation.
Frequently Asked Questions
How do I know if a wound needs stitches or just a bandage? If the wound edges gape open, won’t stay together on their own, are longer than half an inch, or you can see fat or muscle tissue, it needs closure — sutures, staples, or, at minimum, butterfly closure strips. A wound that stays closed on its own with light pressure and is under half an inch can usually be managed with a bandage and antibiotic ointment.
What’s the best way to clean a wound if I don’t have sterile saline? Purified drinking water is an acceptable substitute. Use a large syringe or a clean plastic bag with a small hole to create irrigation pressure. The volume and pressure of irrigation matter more than the sterility of the water — use at least 200-500ml per wound.
Can I use superglue to close a wound in an emergency? Regular superglue (cyanoacrylate) has been used in field emergencies and is chemically similar to medical-grade tissue adhesive (Dermabond). It works for small, clean, superficial lacerations that are not under tension. It should not be used inside a wound, on deep lacerations, or on wounds that show any sign of infection.
How long should I keep a wound covered? Keep the wound covered with a clean dressing until it has fully closed and is no longer draining. Change dressings every 24 hours or whenever they become wet or soiled. Once a wound has a dry scab and no signs of infection, it can be left uncovered.
What does infected wound drainage look like vs. normal healing? Normal healing produces a small amount of clear or slightly yellow fluid (serum) in the first 24-48 hours. Infected drainage is cloudy, yellow-green, or has a foul odor. Any pus — thick, opaque discharge — indicates infection and requires treatment.
Is it safe to remove a bullet or embedded object in the field? No. Removing an embedded object can cause sudden massive bleeding if it has been tamponading (plugging) a damaged blood vessel. Stabilize the object in place, do not remove it, and focus on evacuation.
What’s the right tourniquet time limit before permanent damage occurs? The general guideline is that tourniquets applied for under 2 hours rarely cause permanent nerve or vascular damage. Beyond 2 hours, risk increases. This does not mean you loosen a tourniquet after 2 hours if the patient hasn’t reached medical care — leaving a tourniquet on is safer than releasing it and risking fatal re-bleeding.
Should I give someone with a serious wound anything to eat or drink? If the patient is fully conscious, not nauseated, and surgery is not imminent, oral fluids are acceptable and help with shock management. Avoid food if surgery might be needed. Never give anything by mouth to an unconscious patient.
How do I treat a wound on myself when I’m alone? Self-treatment is harder but possible. Apply a tourniquet before you lose consciousness if there’s arterial bleeding on a limb. Use your non-dominant hand to pack and hold pressure. Position yourself so you can maintain pressure without falling. If you’re alone and seriously injured, your first action after hemorrhage control should be signaling for help.
What’s the difference between a pressure dressing and a tourniquet? A pressure dressing (like an Israeli bandage) applies firm, sustained pressure directly over a wound to control bleeding through clotting. A tourniquet cuts off all blood flow to a limb by compressing the artery above the wound. Use a pressure dressing first; use a tourniquet when pressure dressing fails or when bleeding is too severe to control any other way.
Conclusion
Knowing how to treat a deep wound when emergency services can’t reach you is one of the highest-value skills a prepper can develop — and one of the most neglected. The gap between “I have a first aid kit” and “I can actually manage a traumatic wound” is significant. Closing that gap takes deliberate preparation: the right supplies, practiced skills, and a clear mental protocol for high-stress situations.
Your immediate action steps:
- Audit your current first aid kit against the trauma supply list in this article. Fill the gaps.
- Take a Stop the Bleed course (offered free through many hospitals and community organizations) to practice tourniquet and wound packing techniques on a training model.
- Talk to your doctor about obtaining prescription antibiotics for your emergency medical kit.
- Practice wound irrigation technique with a syringe and water before you need it under stress.
- Review your overall emergency preparedness system — wound care doesn’t exist in isolation. It’s part of a broader readiness framework that includes your home emergency preparedness plan and your bug-out bag build.
The goal isn’t to become a field surgeon. It’s to be the person who keeps someone alive until real medical care is available — and that’s a goal every serious prepper can achieve.
Products, Tools, and Resources
Trauma kits worth building around:
- North American Rescue Individual First Aid Kit (IFAK): Used by military and law enforcement. Includes CAT tourniquet, hemostatic gauze, and pressure bandage. A solid foundation for any trauma kit.
- QuikClot Combat Gauze: The hemostatic agent of choice for the US military. Dramatically reduces clotting time in severe wounds.
- CAT (Combat Application Tourniquet) Gen 7: The most widely validated tourniquet for field use. Don’t substitute with cheap knockoffs — counterfeit tourniquets fail under pressure.
- Israeli Bandage (Emergency Bandage): Versatile pressure dressing that can be applied one-handed. Essential for solo situations.
- Suture Practice Kit: Available on Amazon for under $30. Practice on a suture pad before you need the skill for real.
Training resources:
- Stop the Bleed Campaign (stopthebleed.org): Free courses on hemorrhage control. Widely available across the US.
- Wilderness First Responder (WFR) certification: A 70-80 hour course covering trauma, medical emergencies, and evacuation in austere environments. The gold standard for serious wilderness travelers and preppers.
- “Wilderness Medicine” by Paul Auerbach: The definitive reference text for field medical care. Worth having in physical form in your preparedness library.
For a broader look at what belongs in a comprehensive emergency kit — beyond medical supplies — the ultimate emergency supplies list covers the full picture. And if you’re still building out your core preparedness system, the complete prepping guide for beginners is the right place to start.