
Hey there! Some links on this page may be affiliate links which means that, if you choose to make a purchase, I may earn a commission at no extra cost to you. I greatly appreciate your support. Read the full disclosure here.
Land navigation using compass and map is an essential survival skill that works without batteries or signals when electronic devices fail. Mastering how to orient your map, take and follow bearings, and use triangulation ensures you can confidently navigate in any terrain or weather. This reliable technique is vital for wilderness, urban emergencies, and bug-out scenarios.
Key Takeaways
- Land navigation using compass and map is a non-negotiable survival skill, GPS devices fail, batteries die, and cell signals disappear exactly when you need them most.
- A baseplate (orienteering) compass is the most practical tool for field navigation; it works without batteries and handles both bearing-taking and map orientation.
- Magnetic declination, the difference between true north and magnetic north, must be accounted for or your bearing will be wrong by several degrees, potentially sending you miles off course.
- Orienting your map to the terrain before moving is the single most important habit in field navigation.
- Triangulation lets you pinpoint your exact location on a map using two or three known landmarks and a compass bearing.
- Common mistakes include confusing magnetic and grid north, skipping declination adjustment, and failing to account for terrain obstacles when following a bearing.
- In bad weather or low visibility, compass and map navigation becomes more critical, not less, and requires shorter legs and more frequent checks.
- Compass navigation pairs directly with other survival skills; it belongs in every bug-out bag and emergency kit.
Every year, search-and-rescue teams respond to thousands of calls from hikers and survivors who relied entirely on a smartphone or GPS device that failed them in the field. Land navigation using compass and map requires no signal, no battery, and no subscription, which is exactly why it remains the backbone of military land navigation training worldwide and a core skill for any serious prepper.
Whether you’re executing a bug-out route after a grid-down event, navigating unfamiliar wilderness after a vehicle breakdown, or guiding your family away from a disaster zone, the ability to read a topographic map and use a compass is what separates people who get out safely from those who don’t.
For a broader foundation of field skills, the 14 essential survival skills every prepper must know covers the full picture, but compass navigation sits near the top of that list for good reason.
Start here: land navigation using compass and map is learnable in an afternoon and masterable with a few weekends of practice. You don’t need military training or advanced gear.
The core concept is straightforward. A topographic map shows the physical shape of the land, hills, valleys, rivers, and trails, using contour lines and symbols. A compass tells you which direction you’re facing relative to magnetic north. Together, they let you determine where you are, where you want to go, and exactly how to get there.
Three foundational concepts to understand before anything else:
- Orienting the map: Rotating the map so its north aligns with actual north in the field.
- Taking a bearing: Using the compass to measure the direction from one point to another, expressed in degrees (0-360).
- Following a bearing: Walking in the direction indicated by your compass bearing while accounting for obstacles.
That’s the entire system. Everything else, declination adjustment, triangulation, resection, builds on these three concepts.
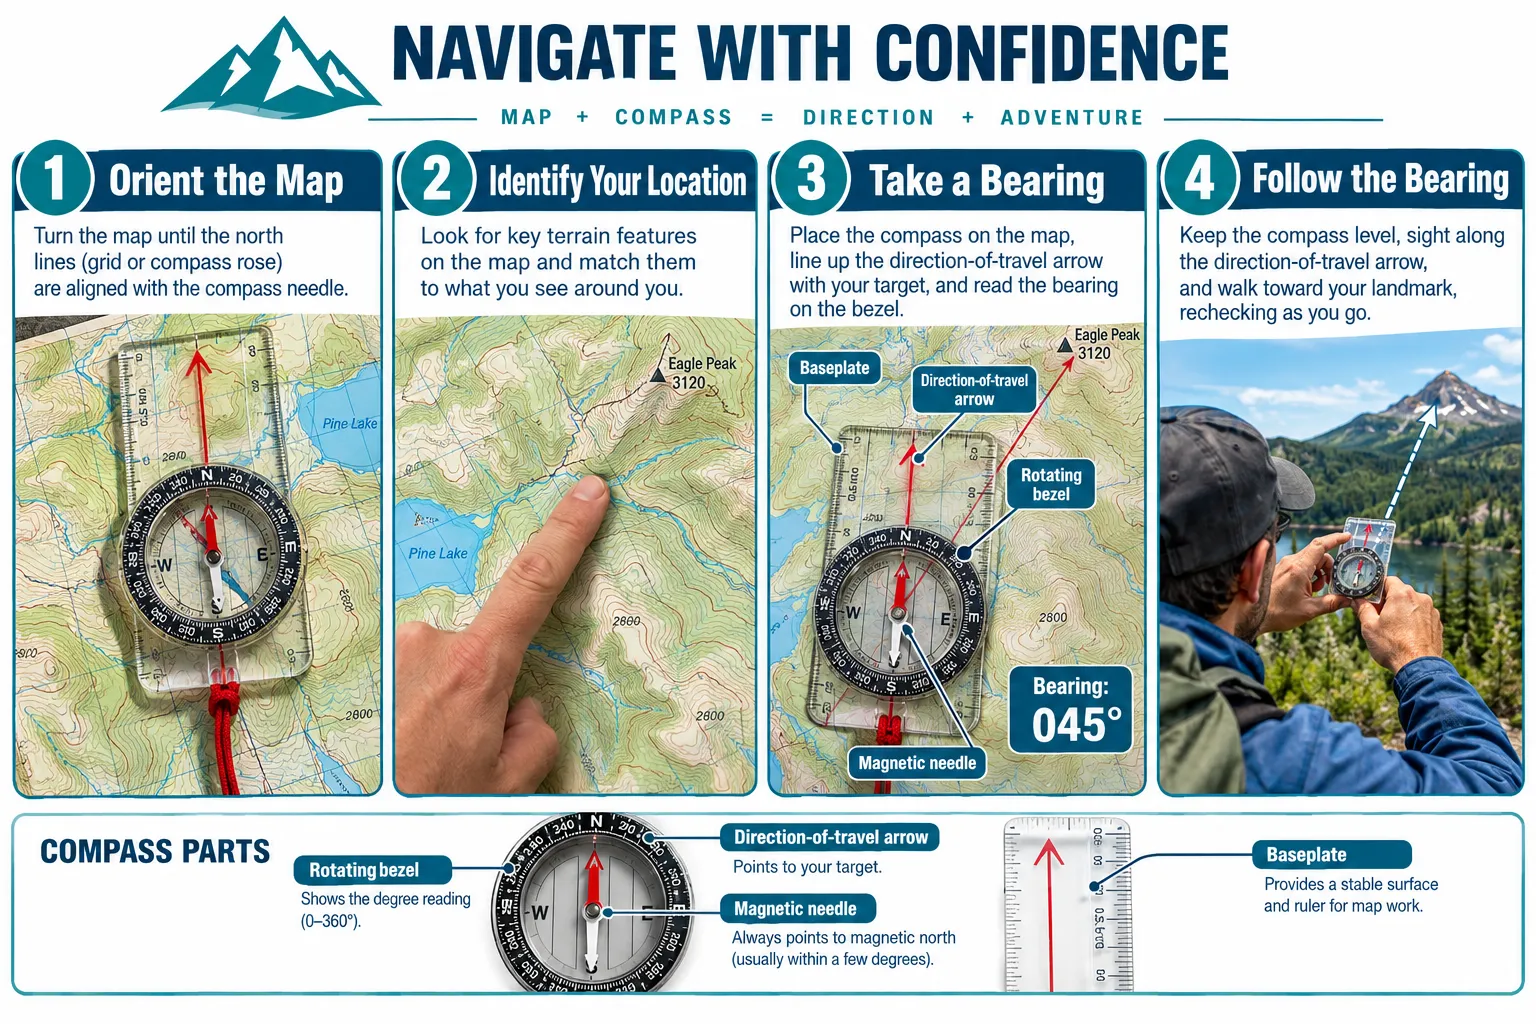
A baseplate orienteering compass is the best all-around choice for land navigation. It combines a transparent rectangular base (for laying across a map), a rotating bezel marked in degrees, and a magnetic needle, all in one lightweight, battery-free tool.
The most widely trusted models come from Suunto and Silva, both of which have been used in military and wilderness navigation for decades. When choosing a compass, look for:
- Rotating bezel with 2-degree or finer graduations
- Transparent baseplate with map scales (1:24,000 and 1:50,000 are most useful for USGS topo maps)
- Declination adjustment, either a built-in adjustment screw or a clear declination scale
- Sighting mirror (optional but useful for precision bearings over long distances)
- Liquid-filled housing to dampen needle movement
A lensatic compass (the military-style folding compass) is more durable and precise for long-distance sighting but harder to use directly on a map. For most preppers and survivalists, a quality baseplate compass in the $30-$80 range handles everything needed in the field.
Do not use a wrist compass or a phone compass app as your primary navigation tool. They lack the precision required for reliable land navigation.
What’s the Difference Between True North and Magnetic North?
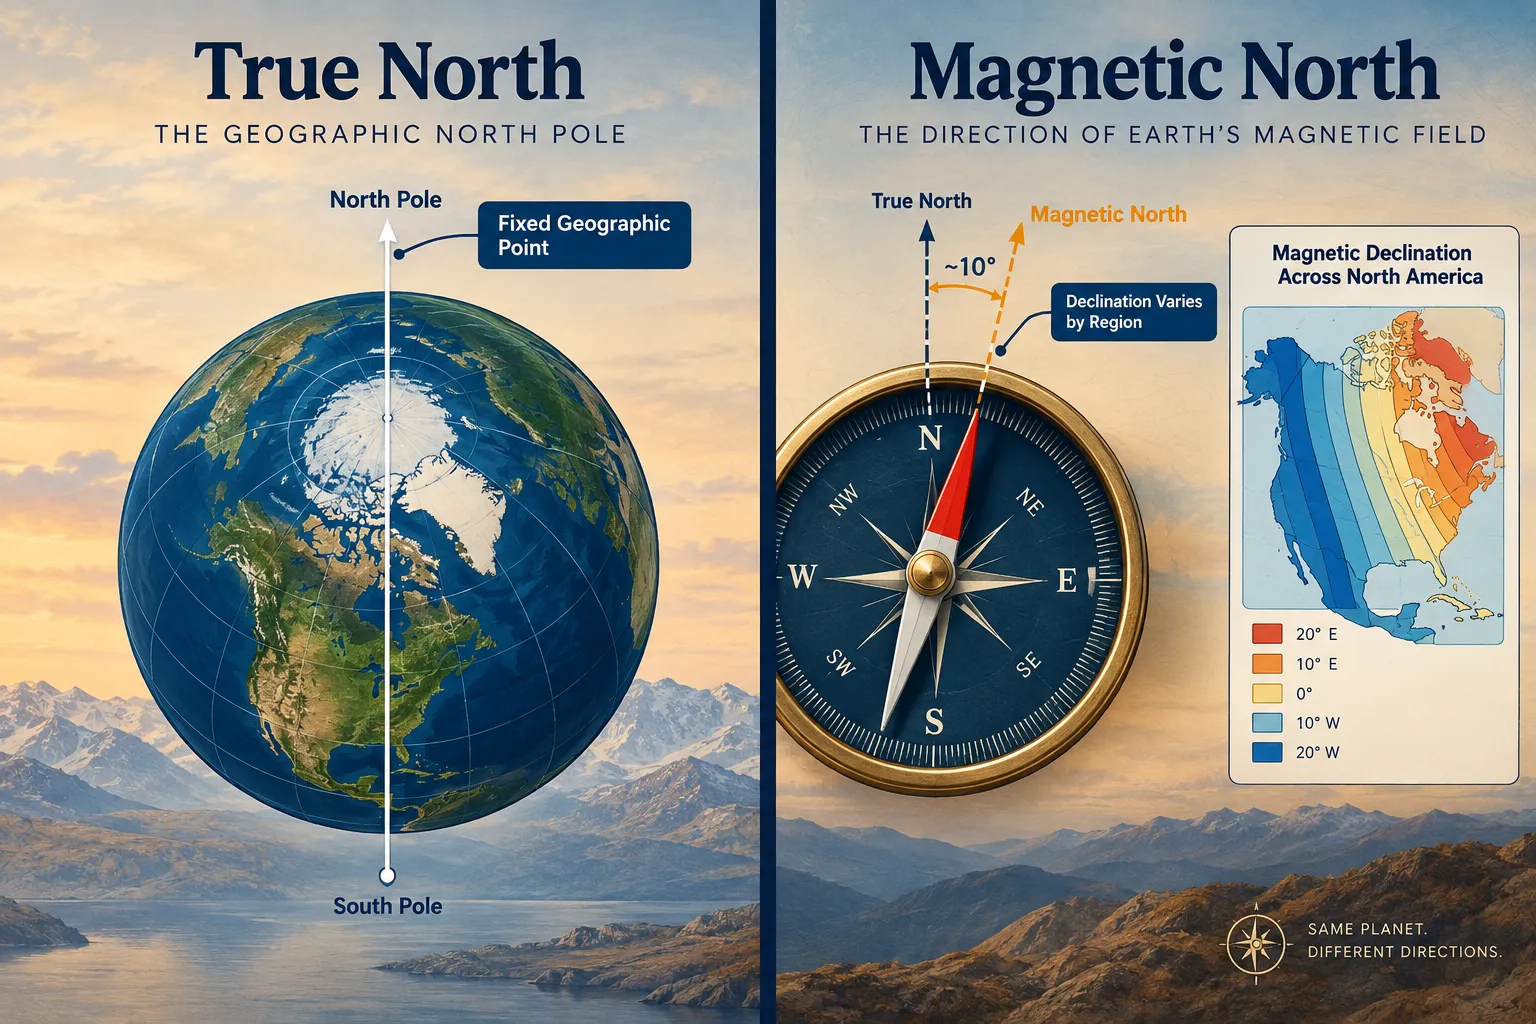
True north is the geographic North Pole, a fixed point on the Earth’s axis. Magnetic north is where the Earth’s magnetic field actually points, and it shifts over time. In 2026, magnetic north is located in the Canadian Arctic, and it continues to drift slowly each year.
The angle between true north and magnetic north at your specific location is called magnetic declination. It varies significantly depending on where you are:
- In the eastern United States, magnetic north is west of true north (negative declination).
- In the western United States, magnetic north is east of true north (positive declination).
- Along a narrow line running roughly through the Midwest, declination is near zero.
Why this matters in practice: A topographic map is printed to true north (or grid north, which is very close). Your compass points to magnetic north. If you don’t account for declination, your bearing will be off by the declination angle, which can mean being hundreds of yards or more off target after just a mile of travel.
Always check the declination for your specific region before a trip. USGS topographic maps print the declination diagram in the map margin. The National Oceanic and Atmospheric Administration (NOAA) also provides an online declination calculator by location.
How to Orient a Map With a Compass
Orienting your map is the first step before any navigation decision. An oriented map means north on the map points toward actual north in the real world, so features on the map match what you see around you.
Step-by-step process:
- Set your compass to 0 degrees (north) on the rotating bezel.
- Place the compass on the map with the baseplate edge running along the map’s north-south grid lines.
- Rotate the entire map (with the compass on top) until the magnetic needle aligns with the north arrow inside the bezel housing.
- Adjust for declination: if your area has a 10-degree east declination, rotate the map slightly so the needle points 10 degrees east of the bezel’s north marker.
- The map is now oriented. Features on the map should correspond to what you see in the terrain around you.
Once the map is oriented, look up and identify two or three landmarks you can see, a ridgeline, a river bend, a road junction, and confirm they match their positions on the map. This ground-truth check takes 30 seconds and prevents major navigation errors.
How to Take a Bearing From a Map Using a Compass
Taking a map bearing means measuring the direction from your current position to a destination, expressed in degrees, so you can follow that direction on the ground.
Step-by-step process:
- Mark your current position (Point A) and your destination (Point B) on the map.
- Place the compass baseplate so one long edge connects Point A to Point B, with the direction-of-travel arrow pointing toward your destination.
- Without moving the baseplate, rotate the compass bezel until the orienting lines inside the housing align with the map’s north-south grid lines, with the north arrow pointing toward map north.
- Read the bearing at the index line (the mark at the base of the direction-of-travel arrow). That number, say, 285 degrees, is your magnetic bearing to the destination.
- Adjust for declination by adding or subtracting your local declination value from the bearing.
Write the bearing down. In the field, you’ll dial this bearing into your compass and follow it.
How to Follow a Bearing on the Ground With a Compass
Following a bearing means physically walking in the direction your compass indicates, regardless of what the terrain looks like.
The process:
- Hold the compass level at chest height, with the direction-of-travel arrow pointing away from you.
- Rotate your body until the magnetic needle aligns with the orienting arrow inside the bezel (the “red in the shed” rule, the red end of the needle inside the red orienting arrow).
- Look up along the direction-of-travel arrow and identify a distant landmark, a specific tree, rock, or hilltop, directly in line with your bearing.
- Walk to that landmark, then repeat the process from that new position.
This technique (called “aiming off” or “leapfrogging”) lets you navigate around obstacles without losing your bearing. Never stare at the compass while walking, pick landmarks and walk to them.
Common mistake: Holding the compass near metal objects (belt buckles, knives, vehicle doors) or near electronics. Metal and electromagnetic fields deflect the needle and produce false readings.
What Is Triangulation and How Do You Use It?
Triangulation (more accurately called resection in land navigation) is the method of determining your exact location on a map by taking compass bearings to two or more known landmarks.
When to use it: When you’re lost or uncertain of your position and can identify at least two landmarks on both the map and in the terrain around you.
Step-by-step:
- Identify a visible landmark (a hilltop, tower, or distinct terrain feature) that also appears on your map.
- Take a compass bearing to that landmark from where you’re standing.
- Convert the bearing to a back-bearing (add or subtract 180 degrees).
- Draw a line on the map from the landmark in the direction of the back-bearing.
- Repeat with a second landmark at a different angle (ideally 60-120 degrees apart from the first).
- Your location is where the two lines intersect.
A third landmark narrows the intersection to a small triangle, the smaller the triangle, the more accurate your position fix. This technique is covered in depth in the complete beginner’s guide to navigation without GPS.
Land navigation using compass and map works as a continuous loop, not a one-time action. Here’s how the full sequence fits together in the field:
- Orient the map to the terrain using your compass.
- Identify your current position using visible landmarks and map features.
- Plan your route on the map, noting terrain obstacles, elevation changes, and waypoints.
- Take a bearing from your current position to your first waypoint.
- Follow the bearing on the ground, leapfrogging to visible landmarks.
- Confirm your position at each waypoint using map features or triangulation.
- Repeat for each leg of the route.
This sequence works for a 1-mile trail navigation or a 20-mile bug-out route. The principles don’t change, only the number of legs and the complexity of the terrain.
For preppers building a full bug-out plan, this skill integrates directly with bug-out route planning from the city, knowing your route on paper means nothing if you can’t execute it on the ground without a phone.
Why Isn’t My Compass Working Correctly?
A compass that gives inconsistent or clearly wrong readings is almost always being affected by one of these causes:
- Metal interference: Keep the compass at least 6-12 inches from knives, belt buckles, firearms, and vehicle bodies. Even a steel zipper pull can deflect the needle slightly.
- Electronic interference: Smartphones, GPS devices, and radios can affect compass readings at close range. Hold the compass away from all electronics when taking a bearing.
- Magnetic anomalies: Certain rock formations (particularly those high in iron ore) create local magnetic disturbances. If your compass behaves erratically in a specific area with no obvious metal nearby, suspect the geology.
- Damaged compass: A bubble in the compass housing (from altitude change or a crack) causes the needle to stick. A compass that won’t settle consistently needs to be replaced.
- User error: The most common “malfunction” is simply misreading the bezel. Confirm the red end of the needle is in the orienting arrow, not the white end, a 180-degree error sends you in the exact opposite direction.
If you suspect compass damage, verify against a second compass or use the sun and shadow method as a backup.
Yes, but with significant limitations. Natural navigation methods work as rough guides, not precision tools.
Practical alternatives:
- Sun position: The sun rises roughly east and sets roughly west. At solar noon (highest point in the sky), it’s due south in the Northern Hemisphere.
- Star navigation: Polaris (the North Star) sits within about 1 degree of true north in the Northern Hemisphere. Find it by extending the line from the two outer stars of the Big Dipper’s bowl.
- Shadow stick method: Place a stick vertically in the ground, mark the tip of the shadow, wait 15-20 minutes, mark again. The line between the two marks runs roughly east-west.
- Terrain association: Reading the landscape, following ridgelines, rivers, and valleys, can guide movement without a compass if you have a detailed map and strong terrain awareness.
None of these methods approach the accuracy of a compass. They’re useful for rough orientation when a compass is unavailable, but they can’t replace land navigation using compass and map for serious survival scenarios. See 20 essential bushcraft skills for beginners for more on natural navigation and field craft.
Most navigation errors are preventable. These are the ones that cause the most problems in the field:
- Skipping declination adjustment: The single most common error. Even a 5-degree error compounds over distance, at 1 mile, you could be 460 feet off course.
- Confusing magnetic north with grid north: Topographic maps use grid north, which differs slightly from both true north and magnetic north. Know which reference your map uses.
- Not re-orienting the map after stopping: Terrain looks different from different positions. Re-orient every time you stop and reassess.
- Following the compass while walking: Looking down at the compass instead of picking a distant landmark leads to wandering off the bearing.
- Ignoring terrain: A straight-line bearing may cross a cliff, swamp, or river. Always check the map for obstacles along your route before committing to a bearing.
- Not accounting for pace count: Without tracking distance, you won’t know when you’ve reached your waypoint, especially in dense forest where landmarks are hard to see.
With proper technique, compass and map navigation is accurate to within 1-3 degrees of bearing error, which translates to roughly 50-150 feet of lateral error per mile traveled. That’s more than sufficient for reaching a waypoint, a road, or a water source.
Factors that affect accuracy:
- Compass quality: A quality baseplate compass with fine graduations outperforms a cheap compass significantly.
- Declination adjustment: Proper declination correction keeps bearing errors minimal.
- Map scale: A 1:24,000 scale USGS topographic map (the standard 7.5-minute quad) provides the detail needed for accurate field navigation. Smaller-scale maps (1:100,000 or smaller) are useful for route planning but too coarse for precise navigation.
- Terrain and pace count: Tracking distance traveled keeps you from overshooting waypoints.
For reference, military land navigation standards require soldiers to navigate to within 100 meters of a point at distances up to 5 kilometers, achievable with a quality compass and a 1:50,000 scale map.
Bad weather, fog, heavy rain, snow, darkness, removes visual landmarks and forces full reliance on the compass. This is when land navigation using compass and map skills matter most.
Adjustments for low-visibility navigation:
- Shorten your legs: Instead of leapfrogging to a landmark 400 meters away, pick a point 50-100 meters ahead. More frequent checks reduce accumulated error.
- Use a pace count: Count your steps to track distance when you can’t see terrain features. The average adult covers roughly 60-65 meters per 100 paces on flat ground (adjust for terrain and load).
- Follow terrain features: Rivers, ridgelines, and valleys are navigable by feel even in zero visibility. Use the map to identify which terrain feature to follow and in which direction.
- Mark your position before stopping: If you must stop and shelter, note your last confirmed position on the map. Don’t rely on memory after rest.
- Protect your map: A waterproof map case or laminated map is essential in wet conditions. A wet paper map deteriorates quickly and becomes unreadable.
This is also when having a complete bug-out bag with a quality compass, waterproof map case, and extra batteries for a headlamp pays off directly.
Frequently Asked Questions
Do I need a special compass for hiking, or will any compass work?
A baseplate orienteering compass is strongly recommended for hiking and survival navigation. Basic button compasses and keychain compasses lack the precision and features needed for reliable land navigation. A quality baseplate compass in the $30-$80 range is sufficient for most field use.
How do I know which direction is north on a topographic map?
On USGS topographic maps, north is always toward the top of the map. A declination diagram in the lower margin shows the relationship between true north, grid north, and magnetic north for that specific map.
What does a contour line on a topographic map actually tell me?
A contour line connects all points at the same elevation. Closely spaced contour lines indicate steep terrain; widely spaced lines indicate gentle slopes. The contour interval (the elevation difference between lines) is printed in the map margin, typically 20 or 40 feet on standard USGS quads.
Can I use a compass indoors to practice?
Yes, but be aware of metal structures, rebar in concrete floors, and electronics that may affect the needle. Practicing outside on open ground gives more reliable results. Practice taking bearings between known points in a park or field.
What’s the difference between a bearing and an azimuth?
They refer to the same thing, the direction from one point to another expressed in degrees from 0 to 360. “Bearing” is the more common civilian term; “azimuth” is the standard military term.
How long does it take to learn basic compass and map navigation?
Most people can learn the fundamentals in a single afternoon session. Becoming confident and reliable in the field takes 3-5 practice outings in varied terrain. The skill builds quickly with repetition.
What map scale is best for survival navigation?
The USGS 7.5-minute quadrangle maps at 1:24,000 scale are the gold standard for on-foot navigation in the United States. They show enough terrain detail to identify individual trails, stream crossings, and elevation changes. Download and print them free from the USGS National Map website.
Should my compass be in my bug-out bag?
Absolutely. A quality baseplate compass weighs under 2 ounces and takes up minimal space. It belongs in every bug-out bag, every 72-hour kit, and every vehicle emergency kit. Pair it with a printed topo map of your region.
What if my two triangulation lines don’t intersect cleanly?
They rarely cross at a perfect point. You’ll typically get a small triangle called a “cocked hat.” Your position is somewhere within that triangle, the smaller it is, the better. If the triangle is large, re-take your bearings more carefully.
Is compass navigation useful in urban environments?
Yes. In a grid-down urban scenario, GPS fails and street signs may be missing or misleading. A compass keeps you oriented and moving in the right direction. Pair it with a printed city map for urban survival situations.
Conclusion
Land navigation using compass and map is one of the few survival skills that works equally well in a wilderness bug-out, an urban grid-down scenario, or a rural emergency evacuation. It requires no power, no signal, and no infrastructure, just a quality compass, a printed topographic map, and the knowledge to use them together.
The core skills, orienting a map, taking a bearing, following a bearing, and triangulating a position, can be learned quickly and practiced anywhere. The investment in time is small. The payoff, when GPS fails at the worst possible moment, is enormous.
Actionable next steps:
- Download and print the USGS 7.5-minute topo map for your home region and your primary bug-out area.
- Purchase a quality baseplate orienteering compass (Suunto A-10 or Silva Ranger are solid starting points).
- Look up the magnetic declination for your region on the NOAA declination calculator.
- Practice orienting your map and taking bearings in a local park before you need the skill under stress.
- Add the compass and a waterproof map case to your bug-out bag and vehicle emergency kit.
For families, consider teaching basic map orientation to every member old enough to understand it, the wilderness survival guide for families with children covers age-appropriate ways to build these skills together.
Recommended Tools and Resources
Compass:
- Suunto A-10, A reliable, affordable baseplate compass ideal for beginners. Transparent baseplate, clear bezel markings, and a straightforward design.
- Silva Ranger 2.0, Adds a sighting mirror for precise long-distance bearings. A solid step up for more serious field use.
- Brunton TruArc 15, Features a global needle that works in both hemispheres and a built-in declination adjustment. Well-suited for preppers who may travel across different regions.
Maps:
- USGS National Map (nationalmap.gov), Free download of all 7.5-minute quadrangle topo maps for the United States. Print on waterproof paper or laminate for field use.
- Mytopo.com, Prints custom-area topo maps at various scales, shipped to your door.
- Avenza Maps app, Useful for pre-downloading PDF topo maps for offline reference on a phone (as a backup, not a replacement for a printed map and compass).
Training:
- Orienteering USA (orienteeringusa.org), Organized orienteering events are one of the best ways to build practical compass and map skills in a low-stakes, competitive environment.
- Land Navigation by Chris Imperial, A concise, practical manual covering military-style land navigation techniques adapted for civilian use.
These tools, combined with consistent practice, build the kind of navigation confidence that holds up when conditions are worst and the stakes are highest.