

Evacuation Plan Guide: How Preppers Build a System That Actually Works
An evacuation plan is a documented, practiced strategy that tells every member of a household exactly where to go, how to get there, and what to bring when a disaster forces them to leave home. A solid plan covers multiple exit routes, pre-assigned rally points, a packed go-bag, and at least two communication methods. Without practice, even a well-written plan fails under stress.
Key Takeaways
- Every household needs a written evacuation plan with at least two exit routes per location.
- Rally points (one near home, one farther away) prevent family separation during chaotic evacuations.
- A go-bag should sustain each person for at least 72 hours, including water, food, documents, and first aid.
- Communication plans must account for cell network failure — use out-of-area contacts and battery-powered radios.
- Evacuation plans need to be drilled at least twice a year to build real muscle memory.
- Special needs, pets, and vehicles all require specific sub-plans within the main evacuation strategy.
- Knowing when to evacuate is as critical as knowing how — waiting too long is the most common fatal mistake.
- Digital copies of critical documents stored in encrypted cloud storage add a critical backup layer.
- Shelter-in-place and evacuation are separate decisions; know which threats demand which response.
Why Most Households Have No Real Evacuation Plan
Most people assume they’ll figure it out when the time comes. They won’t. According to FEMA’s Ready.gov program, only about 39% of Americans have discussed emergency plans with their households (Ready.gov, 2023). In a fast-moving wildfire or chemical spill, roads jam within minutes, cell towers overload, and decision-making collapses under adrenaline. A real evacuation plan removes the guesswork before the emergency starts.
This guide is built for preppers and survivalists who want a functional, tested system — not a generic checklist that collects dust in a drawer.
What Is an Evacuation Plan and What Should It Include?
An evacuation plan is a pre-written, pre-practiced set of instructions that guides a household from its current location to safety during an emergency. It covers routes, rally points, communication, supplies, and roles for each family member.
A complete evacuation plan includes these core components:
- Threat assessment: Which specific hazards apply to your area (wildfire, flood, hurricane, industrial accident, civil unrest)?
- Exit routes: At least two routes from home, two from work, and two from school for each family member.
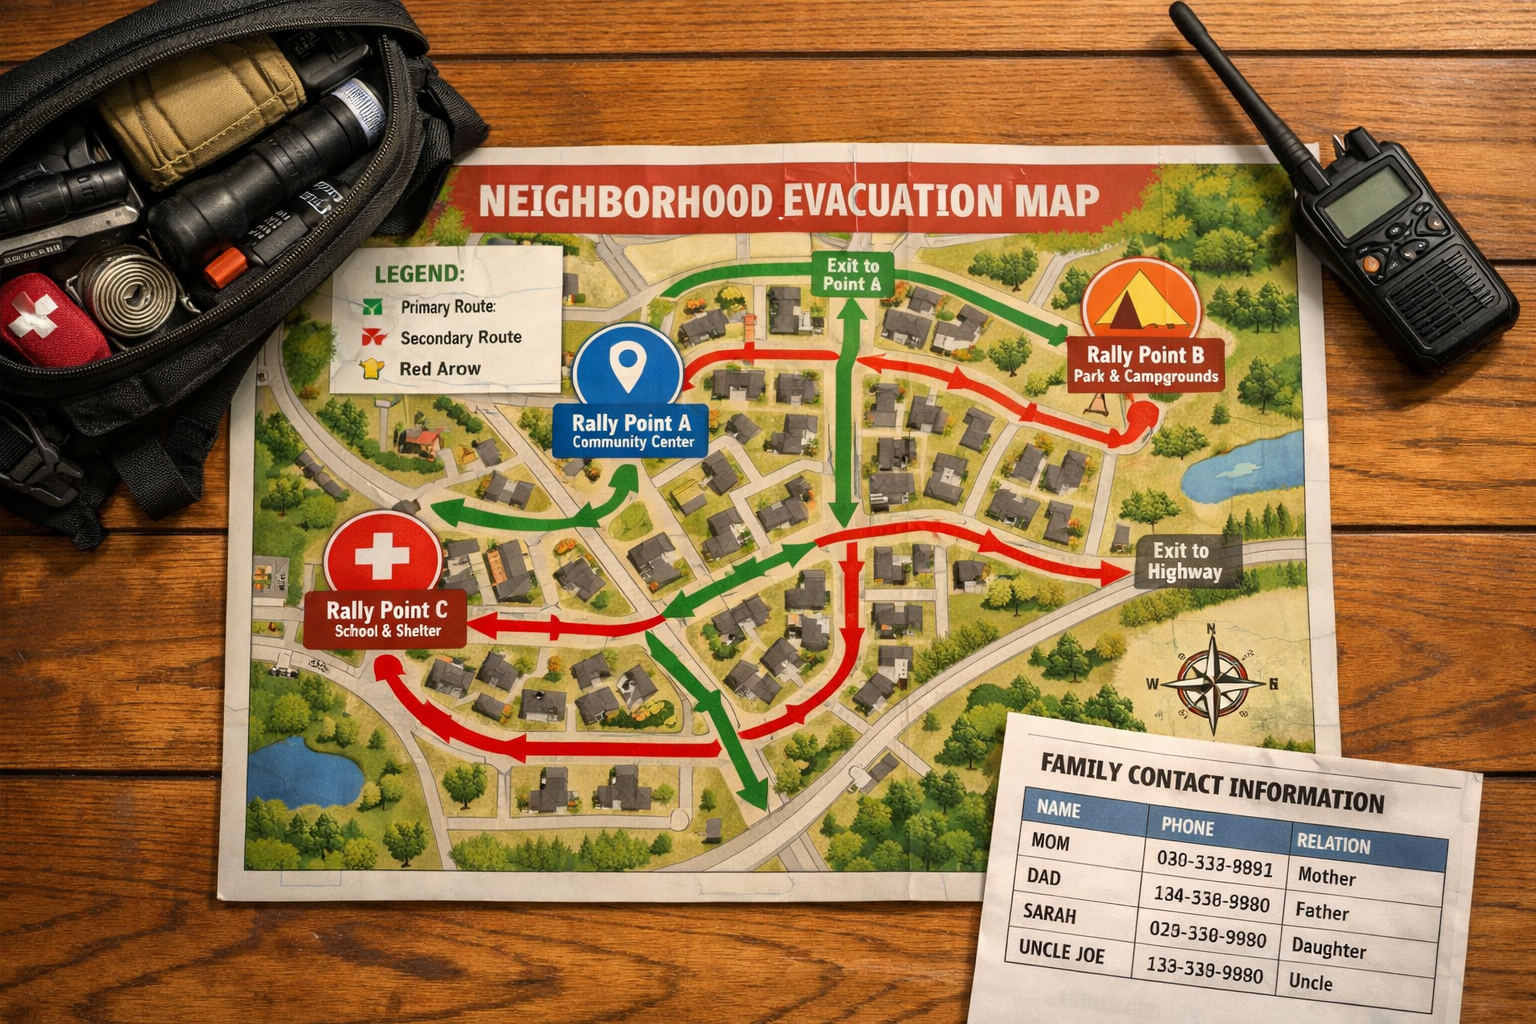
- Rally points: A nearby point (neighbor’s driveway, corner store) and a distant point (relative’s home, motel in another county).
- Communication plan: An out-of-area contact everyone checks in with, plus a physical list of phone numbers (not just stored in a phone).
- Go-bag inventory: Packed and ready to grab within two minutes.
- Roles and responsibilities: Who grabs the go-bags, who gets the pets, who checks on elderly neighbors?
- Trigger criteria: Specific conditions that automatically activate the plan (mandatory evacuation order, visible smoke within X miles, etc.).
Common mistake: Many preppers build a great supply list but skip the trigger criteria. Without a pre-decided threshold, families debate whether to leave while the window closes.
How to Map Your Evacuation Routes Effectively
Route planning is the backbone of any evacuation plan. The goal is to identify multiple paths to safety before roads become gridlocked or blocked by the disaster itself.
Step-by-step route mapping process:
- Start with a physical map. Download and print county road maps. GPS fails during power outages and network congestion.
- Identify your primary route. Choose the fastest path away from the most likely threat vector (away from flood plains, downwind areas, or industrial zones).
- Plot a secondary route. This should use different roads entirely — not just a parallel street. Think back roads, rural highways, or routes through neighboring counties.
- Mark chokepoints. Bridges, tunnels, and highway on-ramps are the first places to jam. Know alternate crossings.
- Note fuel stops. Mark gas stations along each route. Keep your vehicle above half a tank as a standing rule.
- Drive both routes. Do this in normal conditions first, then at different times of day. Note road conditions, one-lane sections, and seasonal flood risk.
Choose a route based on the threat:
- Wildfire: Evacuate perpendicular to the wind direction, not directly away from flames.
- Flood: Move to a higher elevation immediately; low-lying shortcuts become death traps.
- Hurricane: Follow official evacuation zone routes — they’re designed to distribute traffic load.
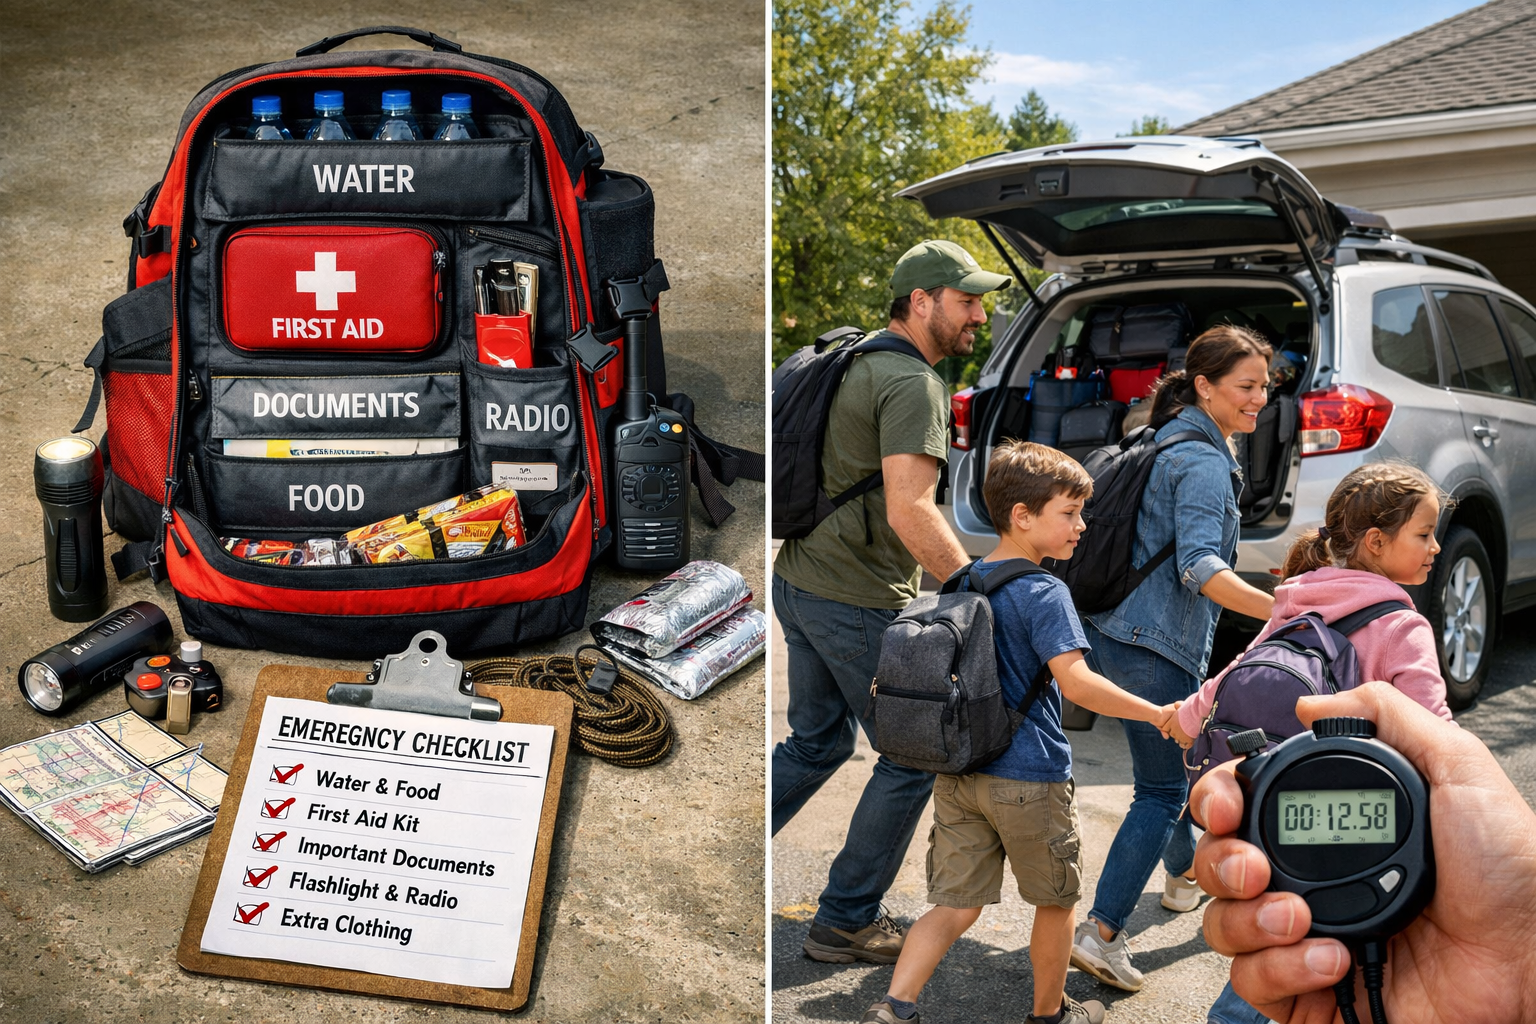
Building a Go-Bag That’s Actually Ready in Two Minutes
A go-bag (also called a bug-out bag or 72-hour kit) is a pre-packed bag that lets a person leave home within minutes without having to think about what to grab. The two-minute rule is the benchmark: if it takes longer, the bag isn’t ready.
Core go-bag contents per person:
| Category | Items |
|---|---|
| Water | 1 liter minimum + water filter or purification tablets |
| Food | 2,000+ calories of shelf-stable food (bars, pouches) |
| Documents | Copies of ID, passport, insurance, deed/lease, medical records |
| First Aid | Trauma kit, prescription medications (30-day supply), N95 masks |
| Communication | Battery or hand-crank radio, whistle, written contact list |
| Tools | Multi-tool, fire starter, flashlight + extra batteries, duct tape |
| Shelter | Emergency mylar blanket, rain poncho |
| Cash | Small bills — ATMs and card readers fail during power outages |
| Clothing | One change of weather-appropriate clothes, sturdy boots |
Weight guideline: A go-bag should not exceed 20-25% of the carrier’s body weight. Overloaded bags slow evacuation and cause fatigue quickly.
Edge case — children and elderly: Build separate, lighter bags for children (age-appropriate snacks, comfort items, a copy of family contacts). For elderly family members with mobility limitations, pre-arrange transportation and pack medications first.
How to Create a Family Communication Plan for Emergencies
 Cell networks routinely fail during large-scale evacuations because everyone calls at once. A family communication plan accounts for this failure before it happens.
Key elements of a working communication plan:
- Out-of-area contact: Choose one person outside your region (a relative in another state) whom everyone checks in with. Local calls fail; long-distance calls often go through when local networks are overloaded.
- Physical phone list: Write down 10 critical numbers on a laminated card in every go-bag. Phones die, get lost, or get damaged.
- Meeting locations: If communication fails, family members know to go to Rally Point 1 (near home) first, then Rally Point 2 (farther out) after a set time window (e.g., two hours).
- Text over calls: Text messages use less bandwidth and often get through when voice calls cannot.
- NOAA Weather Radio: A battery-powered or hand-crank NOAA radio receives emergency alerts without cell or internet service.
- FRS/GMRS radios: Handheld two-way radios work within a few miles and require no infrastructure. Useful for keeping family members in contact during local movement.
Pull quote: “The families who reunite fastest after a disaster are the ones who agreed on a meeting place before it happened — not the ones who had the most gear.”
When Should You Evacuate vs. Shelter in Place?
Evacuation and shelter-in-place are two different emergency responses. Choosing the wrong one can be as dangerous as having no plan at all.
Evacuate when:
- A mandatory evacuation order has been issued by local authorities.
- The threat is moving toward your location (approaching wildfire, rising floodwater, confirmed gas leak).
- Staying puts you in the path of the hazard (storm surge zones, wildland-urban interface during fire season).
- Your home cannot protect you from the threat (mobile home in a tornado warning, older structure in a major earthquake zone).
Shelter in place when:
- The threat is airborne and brief (chemical spill, nuclear fallout in the first hours, severe tornado warning).
- Roads are more dangerous than staying put (active shooter situation, ice storm, immediate flash flood).
- Authorities specifically instruct sheltering in place.
Decision rule: If you’re unsure and there’s time, evacuate early. Early evacuees face less traffic, more fuel availability, and more shelter options. Late evacuees often face gridlock, closed routes, and full shelters.
Special Considerations: Pets, Vehicles, and Medical Needs
A standard evacuation plan breaks down when pets, vehicle limitations, or medical needs aren’t accounted for. These aren’t edge cases — they affect the majority of households.
Pets:
- Identify pet-friendly shelters and hotels along your evacuation routes in advance. Most public emergency shelters do not accept pets.
- Pack a separate pet go-bag: food (3-day supply), water, leash, carrier, vaccination records, medications, and a recent photo of the pet with you in it (for proof of ownership).
- Microchip pets and ensure tags are current.
Vehicles:
- Keep the gas tank above half at all times during elevated threat seasons (hurricane season, wildfire season).
- Know your vehicle’s range and fuel stop locations along each route.
- If the household has only one vehicle and multiple drivers, assign a primary driver and a backup.
- For households without a vehicle: identify a neighbor or community member who can provide transport, and know the location of public evacuation transport pickup points in your county.
Medical needs:
- Maintain a 30-day supply of critical medications in the go-bag, rotating stock to prevent expiration.
- Carry a written list of diagnoses, medications, dosages, and physician contacts.
- For oxygen-dependent or dialysis-dependent family members, register with your local utility company’s medical baseline program and your county’s special needs registry — many counties offer evacuation assistance for registered individuals.
How to Practice and Test Your Evacuation Plan
A written evacuation plan that has never been practiced is little more than a wish list. Drills expose gaps that planning alone never reveals.
Drill schedule for serious preppers:
- Twice a year minimum: Run a full household drill, including grabbing go-bags, loading the vehicle, and driving the primary route.
- Vary the scenario: One drill assumes the primary route is blocked. One drill happens at night. One drill assumes the primary vehicle is unavailable.
- Time it: The goal is to be out the door with go-bags within 5 minutes of the decision to evacuate.
- Debrief afterward: What was forgotten? What took too long? What didn’t fit in the bag? Fix it before the next drill.
Tabletop exercise: Once a year, sit down as a household and walk through a specific scenario verbally. “It’s 2 AM. There’s a wildfire 8 miles away, and the wind shifted. What do we do first?” This builds decision-making speed without requiring a full physical drill.
Annual plan review checklist:
- Update contact lists (phone numbers change).
- Rotate food and water in go-bags (check expiration dates).
- Update documents (new insurance policies, updated IDs).
- Re-evaluate routes (new construction, road closures, changed flood maps).
- Check medications and first aid supplies.
FAQ: Evacuation Plan Questions Answered
How long should an evacuation plan take to put together?
A basic written plan takes 2-4 hours. A fully tested plan with go-bags packed and routes driven takes a weekend. Start with the written plan and build from there.
How much water should be in a go-bag?
FEMA recommends one gallon per person per day. For a 72-hour go-bag, that’s three gallons — too heavy to carry. A practical compromise: carry one liter and include a portable water filter (like a Sawyer Squeeze or LifeStraw) to source water along the route.
Should I keep my evacuation plan digital or on paper?
Both. A printed copy lives in each go-bag and in the vehicle. A digital copy (PDF) stored in encrypted cloud storage (like Bitwarden or a password-protected Google Drive folder) serves as a backup accessible from any device.
What if family members are at different locations when the emergency hits?
This is exactly why rally points and an out-of-area contact are critical. Each person goes to Rally Point 1 if safe, Rally Point 2 if not, and checks in with the out-of-area contact. Everyone knows the plan in advance.
Do I need a separate plan for work and school?
Yes. Know your workplace’s evacuation procedures and your children’s school emergency protocols. Identify who is authorized to pick up children from school during an emergency and ensure the school has that list updated.
How do I evacuate with a large family or multiple vehicles?
Assign a lead vehicle and a follow vehicle. Agree on a convoy protocol (what happens if vehicles get separated). The lead vehicle carries the primary go-bags and navigation. The follow vehicle carries backup supplies.
What documents should I include in my go-bag?
Copies of: government-issued IDs, passports, Social Security cards, birth certificates, insurance policies (home, health, auto), vehicle titles, property deed or lease, bank account information, and medical records. Store originals in a fireproof safe at home.
Is a bug-out location the same as a rally point?
Not exactly. A rally point is a short-term meeting place. A bug-out location is a pre-arranged longer-term destination (a relative’s home, a rural property, a cabin) where the household plans to shelter after evacuating. Both are part of a complete evacuation plan.
How do I handle cash during an evacuation?
Keep $200-$500 in small bills ($5s, $10s, $20s) in each go-bag. Card readers and ATMs fail during power outages. Cash works when nothing else does.
What’s the biggest mistake preppers make with evacuation plans?
Waiting too long to leave. The plan is only useful if it’s activated early enough. Pre-set trigger criteria (a specific alert level, a specific distance of a threat) remove the hesitation that costs lives.
Conclusion: Build It, Pack It, Practice It
An evacuation plan is not a document — it’s a system. The document is just the starting point. The real plan lives in packed go-bags, driven routes, practiced drills, and a household that knows exactly what to do at 2 AM when the alert goes off.
Actionable next steps to take this week:
- Write the plan. Use the components listed above. One page is enough to start.
- Identify two routes from your home and drive them both within the next 30 days.
- Set two rally points and make sure every household member can name them from memory.
- Pack one go-bag per person this weekend. Start with documents, water, and medications.
- Choose an out-of-area contact and call them to let them know their role.
- Schedule a drill within the next 60 days. Put it on the calendar now.
- Set a calendar reminder for six months from now to review and update the plan.
The goal is not perfection. The goal is to be faster, clearer, and more prepared than the version of yourself who has no plan at all. Start today.
References
- FEMA / Ready.gov. (2023). Household preparedness statistics. https://www.ready.gov
- Centers for Disease Control and Prevention (CDC). (2022). Emergency preparedness and you. https://www.cdc.gov/niosh/topics/emres/
- American Red Cross. (2023). Make a plan. https://www.redcross.org/get-help/how-to-prepare-for-emergencies/make-a-plan.html
- National Oceanic and Atmospheric Administration (NOAA). (2023). NOAA Weather Radio All Hazards. https://www.weather.gov/nwr/


