
Hey there! Some links on this page may be affiliate links which means that, if you choose to make a purchase, I may earn a commission at no extra cost to you. I greatly appreciate your support. Read the full disclosure here.
Before refrigeration existed, families fed themselves through brutal winters using nothing more than a hole in the ground, some ventilation, and the right vegetables. That same principle, cold, dark, humid storage underground, is one of the most reliable long-term food preservation methods available to preppers and homesteaders in 2026. Learning how to build a root cellar for long-term food storage is not a relic skill. It’s a practical, cost-effective system that can keep hundreds of pounds of food viable for months without electricity.
Key Takeaways
- A root cellar works by using the earth’s natural insulation to maintain temperatures between 32°F and 40°F and humidity between 85% and 95%.
- The best location is a north-facing slope or the north corner of an existing basement, away from tree roots and water tables.
- Building costs range from roughly $500 for a basic basement conversion to $10,000 or more for a fully excavated freestanding structure.
- Proper ventilation, two PVC pipes, one for intake and one for exhaust, is the single most critical construction element most builders get wrong.
- Root vegetables, apples, cabbages, and cured alliums store best; high-moisture fruits like tomatoes and berries do not belong in a root cellar.
- A basement root cellar is often the most accessible starting point for preppers who already own a home.
- Mold, pests, and ethylene gas from certain fruits are the three biggest threats to stored food quality.
- No-dig alternatives like buried trash cans, straw bale pits, and insulated garage storage work well in small spaces or rental properties.
What Is a Root Cellar and How Does It Work
A root cellar is an underground or partially underground storage space that uses the earth’s thermal mass to keep temperatures consistently cool and humidity naturally high, conditions that dramatically slow the spoilage of fresh produce. The ground below the frost line (typically 4 to 8 feet deep depending on climate) stays between 32°F and 55°F year-round in most of North America. That stable environment suppresses the microbial activity and enzymatic processes that cause food to rot.
The system works through three mechanisms:
- Thermal mass: Surrounding soil absorbs heat in summer and releases it in winter, buffering temperature swings.
- Humidity retention: Earth naturally holds moisture, keeping relative humidity high enough to prevent vegetables from desiccating.
- Darkness: Absence of light prevents premature sprouting in root vegetables like potatoes and carrots.
Root cellars are not freezers. They preserve food in a living, dormant state rather than stopping biological processes entirely. That distinction matters when you’re planning what to store and for how long.
What Temperature and Humidity Should a Root Cellar Be
The target temperature for a root cellar is 32°F to 40°F (0°C to 4°C), with relative humidity between 85% and 95%. These numbers are not arbitrary, they represent the conditions under which most root vegetables, cabbages, and hard fruits enter a stable dormancy without freezing or drying out.
A few practical notes on managing these conditions:
- Below 32°F: Produce freezes and cell walls rupture, destroying texture and accelerating rot after thawing.
- Above 50°F: Bacterial and fungal activity accelerates significantly, cutting storage life in half or worse.
- Humidity below 80%: Root vegetables like carrots and beets shrivel within weeks.
- Humidity above 95%: Free moisture accumulates on surfaces, promoting mold growth.
Use a digital thermometer/hygrometer combination unit mounted at mid-shelf height for accurate readings. Check it weekly during the first season to understand how your specific build responds to outside temperature changes.
Best Location to Build a Root Cellar on Your Property
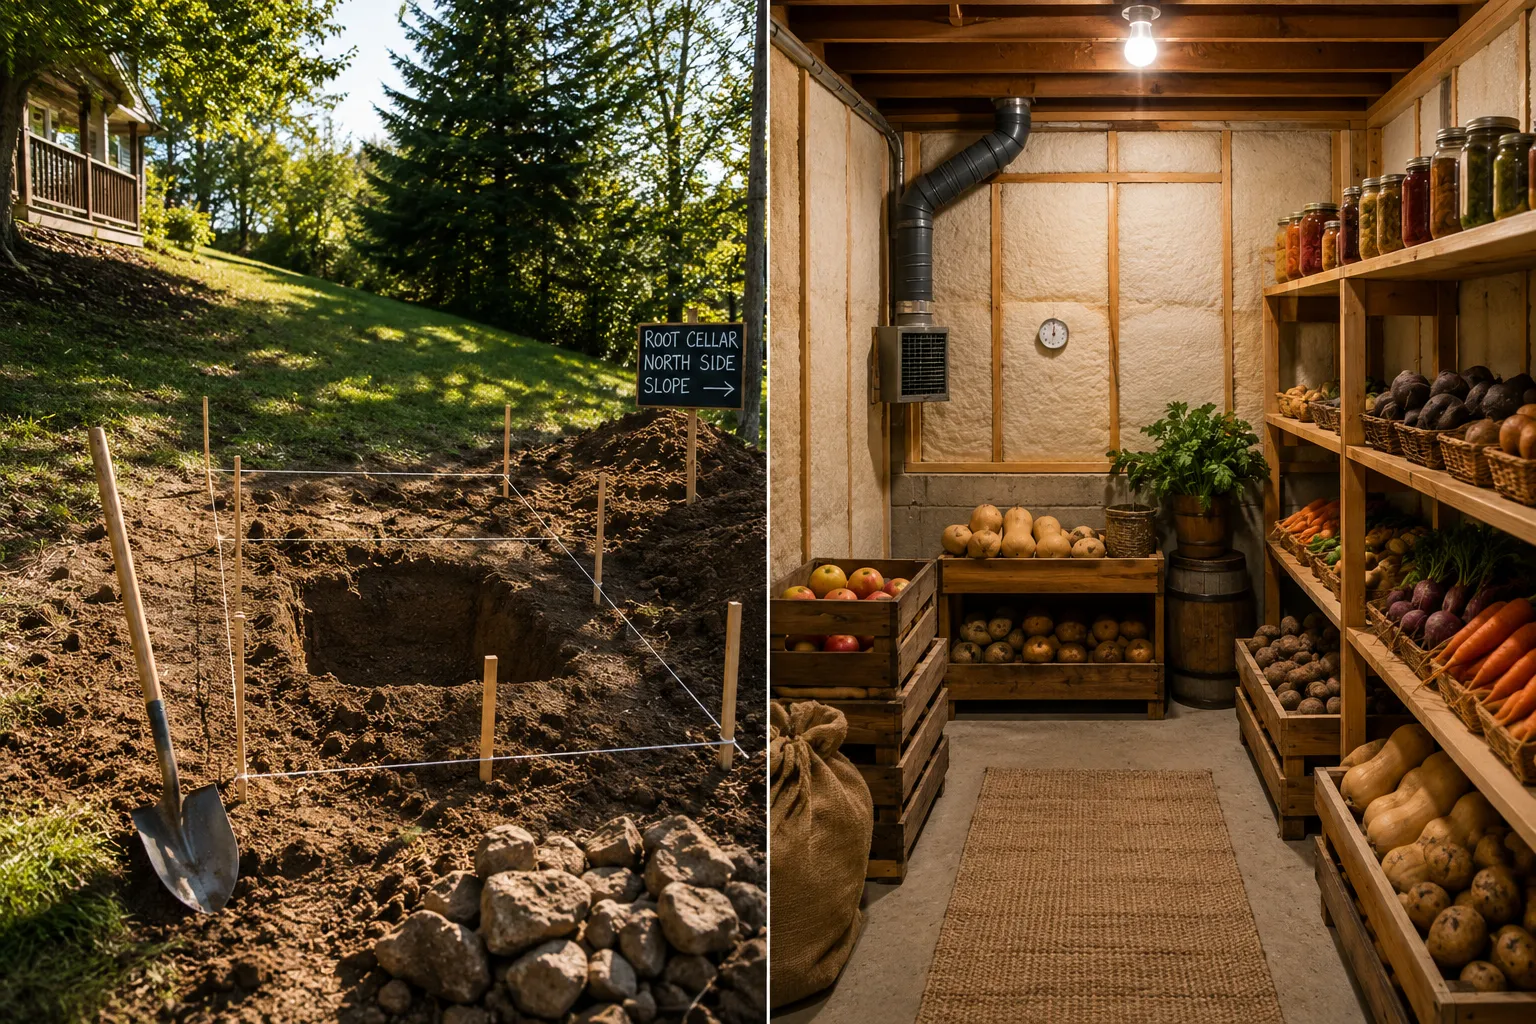
The best location for a root cellar is a north-facing slope or the northeast corner of an existing structure, where sun exposure is minimal and the soil stays coolest. Avoid south-facing exposures, areas within 10 feet of large trees (root intrusion and moisture competition), and any low-lying ground where water pools after rain.
Key site selection criteria:
- Soil type: Well-draining loam or clay-loam holds temperature well. Sandy soil drains fast but insulates poorly. Rocky ground makes excavation expensive.
- Water table depth: The floor of your cellar should sit at least 12 inches above the seasonal high water table. Dig a test hole 4 feet deep in early spring and check for standing water after 48 hours.
- Distance from the house: Closer is more convenient for daily access, but the cellar must not undermine your foundation. Maintain at least 6 feet of clearance from any structure’s footings.
- Slope availability: A hillside location allows you to build a walk-in entrance without a vertical hatch, which is far more practical when carrying heavy loads of produce.
Choose a location based on soil drainage first, sun exposure second, and convenience third. Getting the site wrong is the most expensive mistake to fix after construction.
Root Cellar vs. Basement Storage: Which Is Better
A dedicated root cellar outperforms standard basement storage for long-term food preservation because it achieves lower, more stable temperatures and higher humidity. Most finished basements run between 55°F and 70°F, far too warm for extended vegetable storage. An unfinished basement corner can be converted into a functional root cellar at a fraction of the cost of new construction.
When a basement conversion makes sense:
- You already own a home with an unfinished basement
- Budget is under $2,000
- You need a solution within weeks, not months
- Your climate has cold winters (the outdoor air provides natural cooling)
When a freestanding root cellar is worth it:
- You’re storing 500+ pounds of produce regularly
- You live in a mild climate where basements don’t get cold enough
- You want a fully independent off-grid food storage system
- You’re building a long-term homestead
A basement conversion is the right starting point for most preppers. A freestanding cellar is the right long-term investment for serious homesteaders.
How Much Does It Cost to Build a Root Cellar
Building a root cellar costs between $500 and $15,000 depending on size, materials, and whether you hire labor. These are realistic estimates based on common build types, not guarantees, local labor rates, soil conditions, and material prices vary significantly.
| Build Type | Estimated Cost | Best For |
|---|---|---|
| Basement corner conversion (DIY) | $500, $1,500 | Beginners, renters with landlord approval |
| Buried culvert or barrel cellar (DIY) | $300, $800 | Small-scale storage, rural properties |
| Hillside walk-in cellar (DIY + materials) | $2,000, $5,000 | Homesteaders with slope access |
| Fully excavated freestanding cellar (contractor) | $8,000, $15,000+ | Large families, serious long-term preppers |
The biggest cost variable is excavation. Renting a mini excavator for a weekend runs $400 to $700 in most regions. If you can do your own digging, you cut total project cost by 30 to 50 percent.
Root Cellar Construction Materials and Tools Needed
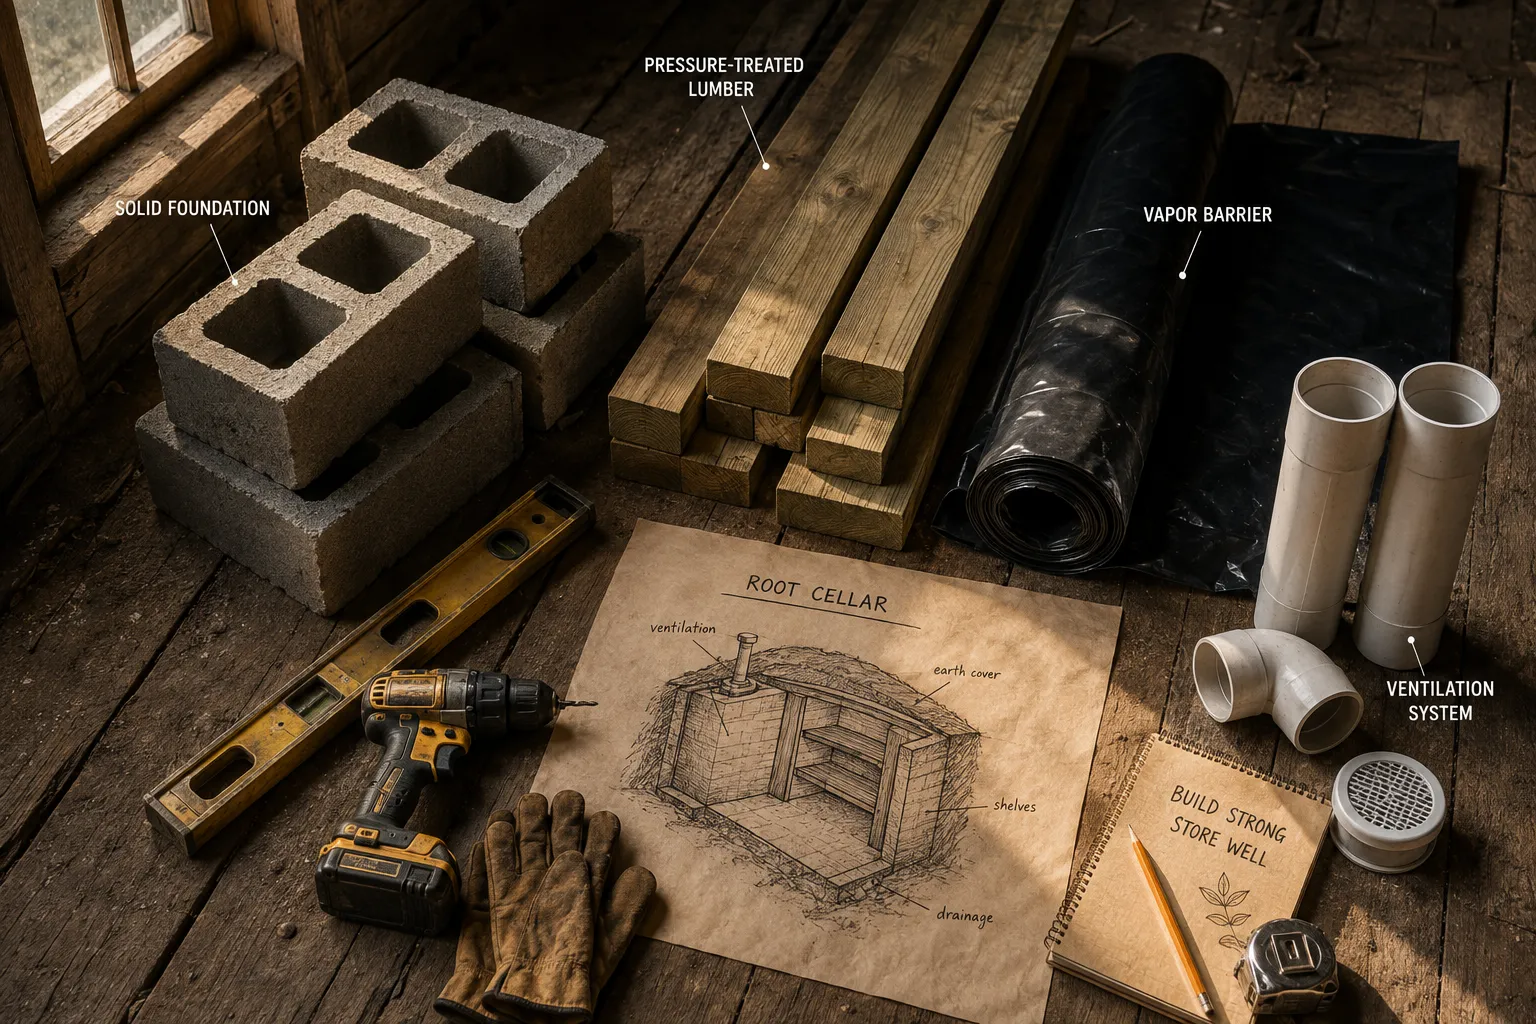
For a functional root cellar, you need materials that insulate, resist moisture, and support structural loads. The specific list depends on your build type, but the core requirements apply across all designs.
Essential materials:
- Concrete blocks or poured concrete (walls and floor slab)
- Pressure-treated lumber (framing, shelving)
- Rigid foam insulation board (ceiling and interior of above-grade walls)
- 6-mil polyethylene vapor barrier (floor and wall undersides)
- 4-inch PVC pipe (ventilation, two lengths, one for intake, one for exhaust)
- Gravel (drainage layer beneath floor, minimum 4 inches)
- Solid-core exterior door with weatherstripping
Essential tools:
- Shovel, pickaxe, or mini excavator rental
- Level, measuring tape, chalk line
- Circular saw and drill
- Concrete mixer or access to ready-mix delivery
- Caulk gun and waterproof sealant
Avoid using standard interior lumber for framing, moisture will rot it within a few seasons. Pressure-treated lumber rated for ground contact (UC4B or higher) is the correct specification for any wood touching soil or concrete.
How to Build a Root Cellar in a Basement
A basement root cellar is built by framing off a corner of an unfinished basement, insulating it from the heated interior of the house, and adding a ventilation system that draws in cold outside air. This is the most accessible version of how to build a root cellar for long-term food storage without major excavation.
Step-by-step process:
- Choose the corner. Select the northeast or northwest corner of the basement. Two exterior walls are already in place, you only need to frame two interior walls.
- Frame the interior walls. Use pressure-treated 2×4 lumber. Build a standard stud wall 8 feet tall with a door rough opening. Do not insulate the exterior walls, you want cold from outside to penetrate.
- Insulate the interior walls and ceiling. Apply 2 inches of rigid foam insulation to the two framed walls and the ceiling. This separates the cold cellar from the warm interior of the house.
- Install the vapor barrier. Staple 6-mil poly sheeting to the interior side of the insulation before adding any wall finish. This prevents warm interior air from introducing moisture into the cellar space.
- Install ventilation. Drill two holes through the rim joist (the framing at the top of the foundation wall). Install one 4-inch PVC intake pipe near the floor (cold air in) and one exhaust pipe near the ceiling (warm air out). Cap both with screened elbows outside to prevent pest entry.
- Add shelving. Build freestanding shelves from pressure-treated lumber or galvanized metal. Keep shelves 2 to 3 inches from walls to allow air circulation.
- Install a thermometer/hygrometer. Monitor conditions weekly for the first season and adjust ventilation as needed.
Common mistake: Insulating the exterior foundation walls instead of the interior partition walls. That traps heat inside the cellar rather than keeping it out.
Root Cellar Ventilation System Setup
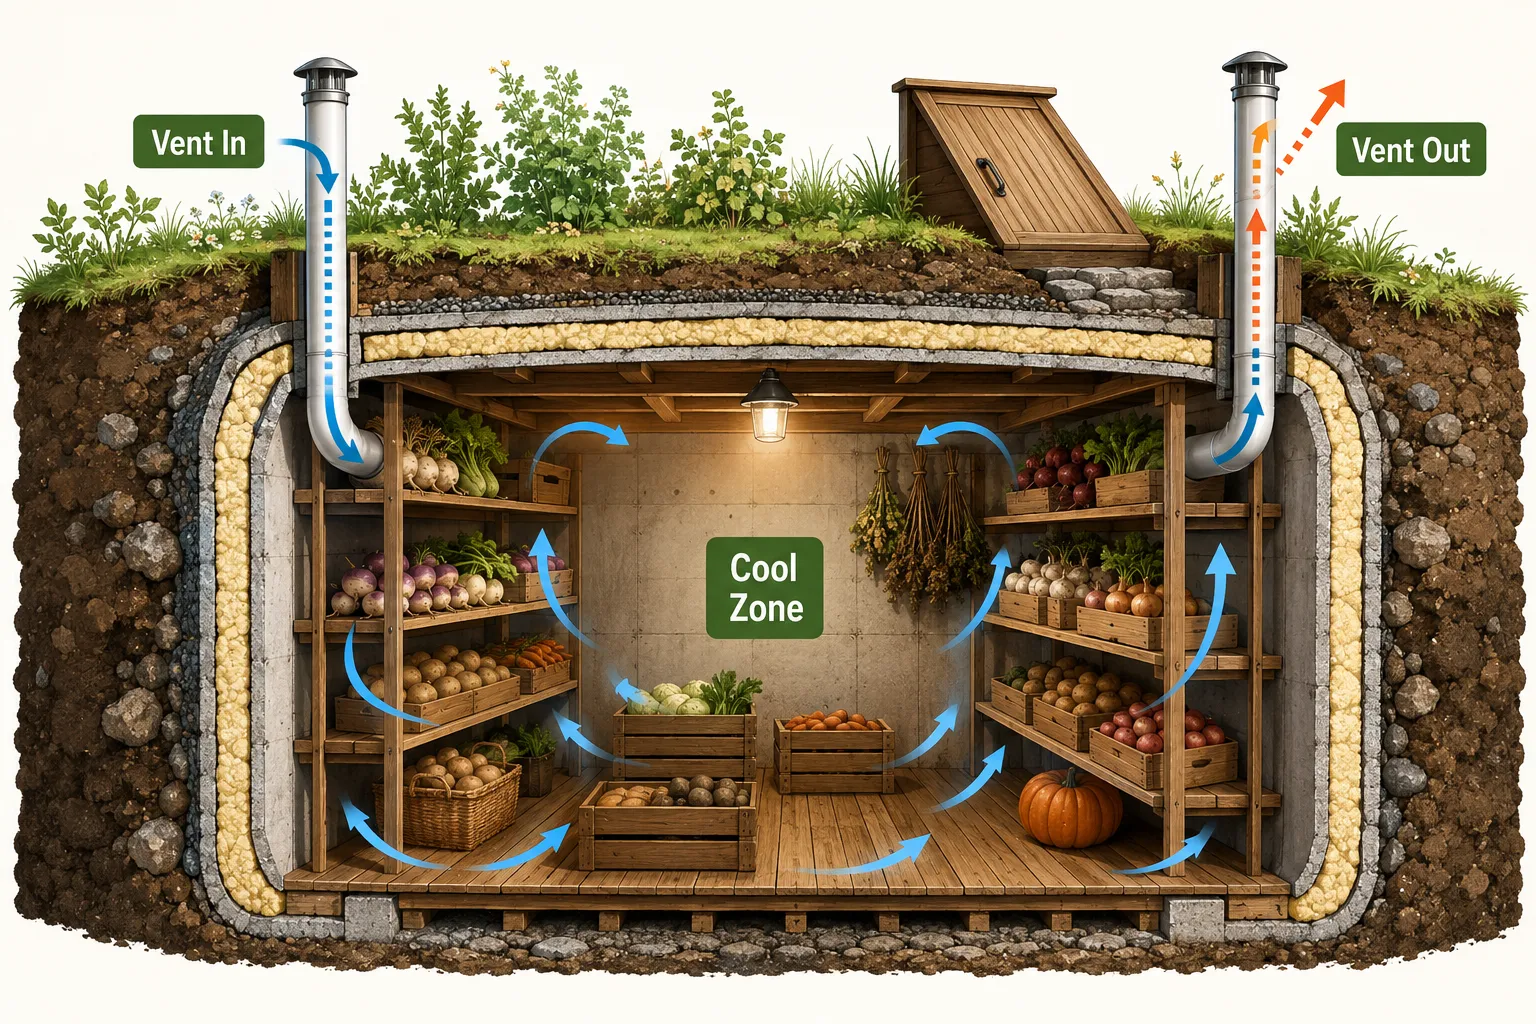
Ventilation is the most critical and most frequently botched element of root cellar construction. Without proper airflow, humidity becomes uncontrolled, carbon dioxide from produce respiration accumulates, and temperatures fluctuate wildly. A two-pipe passive ventilation system solves all three problems.
How to set it up:
- Intake pipe: 4-inch PVC, positioned so the interior opening is 12 inches above the floor. The exterior opening should face north or east, screened and elbowed downward to prevent rain entry.
- Exhaust pipe: 4-inch PVC, positioned so the interior opening is 6 inches below the ceiling. The exterior opening should be higher than the intake to create a natural convection draft.
- Pipe spacing: Intake and exhaust should be on opposite walls when possible to encourage cross-ventilation.
- Damper valves: Install sliding dampers on both pipes. Close them partially during extreme cold snaps to prevent the cellar from dropping below freezing.
In mild climates where passive convection isn’t sufficient, a small thermostat-controlled exhaust fan (rated for damp locations) can be wired to the exhaust pipe. Set it to activate when cellar temperature rises above 40°F.
What Foods Can You Store in a Root Cellar and How Long Do They Last
Root cellars are ideal for storing dense, low-moisture vegetables and certain fruits. They are not suitable for everything, understanding which foods belong there and which don’t will prevent significant losses.
Best foods for root cellar storage and approximate storage life:
| Food | Ideal Temp (°F) | Humidity | Storage Life |
|---|---|---|---|
| Potatoes | 38-40 | 90-95% | 4-6 months |
| Carrots | 32-35 | 90-95% | 4-6 months |
| Beets | 32-35 | 90-95% | 3-5 months |
| Cabbage | 32-35 | 90-95% | 3-4 months |
| Apples | 32-35 | 90-95% | 3-5 months |
| Winter squash | 50-55 | 60-70% | 3-6 months |
| Onions/Garlic | 32-35 | 65-70% | 6-8 months |
| Turnips/Parsnips | 32-35 | 90-95% | 4-5 months |
Do not store in a root cellar: Tomatoes, peppers, cucumbers, eggplant, or any tropical fruit. These require temperatures above 50°F and will suffer chilling injury in a proper root cellar.
Important: Keep apples away from other produce. Apples emit ethylene gas, which accelerates ripening and spoilage in neighboring vegetables. Store them in a separate bin or section if possible.
Common Mistakes When Building a Root Cellar
Most root cellar failures come down to four recurring errors, not complex engineering problems.
- Inadequate ventilation. A sealed cellar becomes a mold incubator. Two pipes are not optional, they’re the foundation of the system.
- Insulating the wrong walls. In a basement conversion, insulate the interior partition walls, not the exterior foundation walls. The exterior walls are your natural cooling source.
- Ignoring drainage. Water intrusion is the fastest way to destroy both the structure and stored food. A 4-inch gravel drainage layer under the floor slab and proper site grading outside are non-negotiable.
- Storing incompatible produce together. Ethylene-producing fruits near root vegetables, or high-humidity crops next to low-humidity crops, will shorten the life of everything in the space.
- Skipping the cure step. Potatoes, sweet potatoes, and winter squash need to be cured (held at higher temperatures for 1 to 2 weeks) before cold storage. Uncured produce rots faster.
How to Prevent Mold and Pests in a Root Cellar
Mold prevention starts with airflow and ends with cleanliness. Pests are managed through physical exclusion. Neither problem requires chemicals if the cellar is built and maintained correctly.
Mold prevention:
- Maintain relative humidity between 85% and 95%, not higher
- Never store damaged or bruised produce (one rotting item spreads mold rapidly)
- Clean shelves and walls with a diluted white vinegar solution at the start and end of each storage season
- Ensure ventilation pipes are unobstructed and functional
Pest exclusion:
- Screen all ventilation pipe openings with 1/4-inch hardware cloth
- Seal any gaps in the foundation walls with hydraulic cement or expanding foam
- Use solid-core doors with tight weatherstripping
- Store produce in wooden crates or ventilated bins rather than open piles on the floor
Inspect stored produce every two weeks and remove anything showing signs of rot or pest damage immediately. One soft potato left unchecked can ruin an entire bin within days.
Root Cellar Alternatives for Small Spaces and Can You Build a Root Cellar Without Digging
Yes, you can build a functional root cellar without major excavation. Several no-dig or minimal-dig alternatives provide similar temperature and humidity conditions for preppers with limited space, rental properties, or tight budgets.
Practical no-dig alternatives:
- Buried trash can cellar: Dig a hole just large enough for a 30-gallon galvanized metal trash can. Bury it vertically with the lid at ground level, insulate the lid with straw or foam board. Effective for 20 to 50 pounds of root vegetables.
- Straw bale pit: Dig a shallow pit 18 to 24 inches deep, line it with straw bales, and cover with a plywood lid topped with more straw. Works well in USDA zones 5 through 7.
- Insulated garage storage: In climates with cold winters, an unheated garage corner with an insulated storage chest can maintain near-root-cellar temperatures from November through March.
- Basement closet conversion: A small closet on an exterior basement wall, insulated on the interior side and vented, can function as a micro root cellar for 100 to 200 pounds of produce.
None of these alternatives match the capacity or consistency of a properly built root cellar, but they’re far better than no cold storage at all, and they can be built in a weekend.
Conclusion
Building a root cellar for long-term food storage is one of the highest-value investments a prepper or homesteader can make. It requires no electricity, no ongoing costs, and no complex technology. What it does require is careful site selection, proper ventilation, moisture management, and a clear understanding of what you’re storing and why.
Start with what you have. If you own a home with an unfinished basement, a corner conversion is your fastest path to functional cold storage. If you have land and a slope, a hillside walk-in cellar will serve your family for decades. If you’re renting or working with limited space, a buried trash can or insulated pit gets you started without a single permit.
Actionable next steps:
- Test your basement or yard for drainage by digging a 4-foot test hole in early spring.
- Sketch a simple floor plan for a basement corner conversion using two exterior walls.
- Source pressure-treated lumber, rigid foam insulation, and 4-inch PVC pipe from a local building supply store.
- Build the framing and ventilation system before the first harvest season.
- Start small, store 50 pounds of potatoes and carrots in your first season and track temperature and humidity weekly.
Confidence in preparedness comes from systems that actually work when the grid goes down, supply chains fail, or the unexpected arrives. A root cellar is one of those systems.
Frequently Asked Questions
Do I need a building permit to build a root cellar?
In most jurisdictions, a basement conversion does not require a permit. A freestanding excavated structure typically does. Check with your local building department before breaking ground, permit requirements vary significantly by county and state.
How deep does a root cellar need to be?
The floor should sit at least 4 feet below grade, and ideally 6 to 8 feet in colder climates. This depth puts the structure below the frost line and within the earth’s stable thermal zone.
Can I build a root cellar in a warm climate?
Yes, but it’s harder. In USDA zones 8 and above, ground temperatures may not drop low enough for passive cooling. A small thermostat-controlled cooling unit (similar to a wine cooler mechanism) can supplement natural cooling in warm climates.
What’s the difference between a root cellar and a cold room?
The terms are often used interchangeably. Technically, a cold room is a basement partition that relies on outdoor air for cooling, while a root cellar is typically fully underground. Both serve the same function.
How do I keep my root cellar from freezing in extreme cold?
Install dampers on both ventilation pipes and close them partially during extreme cold snaps. A single 60-watt incandescent bulb on a thermostat can provide enough heat to prevent freezing without warming the space significantly.
Can I store canned goods in a root cellar?
Yes, but keep them off the floor and away from walls to prevent moisture damage to lids and labels. Canned goods do not benefit from root cellar humidity the way fresh produce does, they simply need a cool, stable temperature.
How often should I inspect stored produce?
Every two weeks at minimum. One rotting item can spread mold or attract pests to an entire bin. Pull anything soft, discolored, or showing mold growth immediately.
What’s the best way to store carrots in a root cellar?
Pack them in slightly damp sand or sawdust in a wooden crate. This maintains humidity around the carrots without allowing free moisture to accumulate. Avoid washing carrots before storage, field dirt acts as a natural protective layer.
Will a root cellar attract rodents?
It can, if there are gaps in the structure. Seal all penetrations with hardware cloth and expanding foam. A solid-core door with tight weatherstripping is your primary defense. Avoid storing grain or dried goods in the same space as fresh produce if rodent pressure is high in your area.
Is a root cellar worth building if I only grow a small garden?
Yes. Even a small 6×8-foot basement conversion can store several hundred pounds of produce and pay for itself in the first season. It also provides a stable storage environment for emergency food supplies beyond fresh vegetables.
Products, Tools, and Resources
These are practical items worth having for any root cellar build or maintenance routine:
- Inkbird IBS-TH2 Bluetooth Thermometer/Hygrometer, Accurate, affordable, and connects to a phone app for remote monitoring. Essential for the first season of operation.
- Leaktite 5-Gallon Buckets with Gamma Seal Lids, Useful for storing cured onions, garlic, and dried goods alongside root vegetables.
- Owens Corning FOAMULAR 150 Rigid Foam Insulation (2-inch), The standard choice for basement root cellar partition walls and ceilings. Moisture-resistant and easy to cut.
- Charlotte Pipe 4-inch PVC Schedule 40, The correct pipe specification for root cellar ventilation. Available at any major hardware retailer.
- “Root Cellaring: Natural Cold Storage of Fruits and Vegetables” by Mike and Nancy Bubel, The definitive reference book on cold storage. Covers crop-by-crop storage requirements in detail and belongs on every serious prepper’s shelf.
- IRWIN Tools STRAIT-LINE Chalk Line, Useful for laying out framing lines on concrete basement floors accurately.
For more on building a self-reliant food system, explore the Preppers HQ guides on freeze-dried food storage and off-grid living. Both pair directly with root cellar storage as part of a layered, long-term food security plan.